Go Back
The appeal of no-bake cheesecakes lies in their convenience and versatility. Unlike traditional cheesecakes that require an oven, no-bake versions can be whipped up in a matter of minutes, making them an ideal choice for those who may be short on time or simply want to avoid the heat of the kitchen.

No-Bake Cheesecake Cups

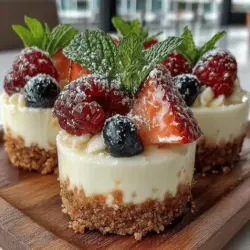
Indulge in the delicious simplicity of Dreamy No-Bake Cheesecake Cups, the perfect dessert for any occasion! This recipe offers creamy, rich cheesecake goodness without the need for baking, making it an ideal choice for warm days. Customize your cups with fresh berries or your favorite toppings to delight your guests and satisfy your sweet cravings. Quick and easy, these cheesecake cups are sure to impress, whether you're celebrating or just treating yourself. Enjoy a delightful dessert that showcases your creativity!

Ingredients
  

1 ½ cups graham cracker crumbs

½ cup unsalted butter, melted

2 tablespoons granulated sugar

16 oz cream cheese, softened to room temperature

1 cup powdered sugar

1 teaspoon vanilla extract

1 cup heavy whipping cream, chilled

1 cup fresh berries (such as strawberries, blueberries, or raspberries)

Fresh mint leaves for garnish (optional)

Instructions
 

Prepare the crust: In a medium-sized mixing bowl, combine the graham cracker crumbs, melted butter, and granulated sugar. Stir until the mixture is well combined and resembles wet sand. Evenly distribute this crust mixture into the bottoms of your serving cups or jars, pressing it down gently to create a compact, even layer. Once done, place the cups in the refrigerator to chill and firm up while you prepare the cheesecake filling.

    Make the cheesecake mixture: In a large mixing bowl, use a hand mixer or stand mixer to beat the softened cream cheese until it becomes smooth and creamy, about 2-3 minutes. Gradually incorporate the powdered sugar and vanilla extract, continuing to mix until the mixture is fully combined and silky in texture.

      Whip the cream: In a separate, chilled bowl, whip the heavy whipping cream with an electric mixer until stiff peaks form. This process will create a light and airy texture for your cheesecake. Carefully fold the whipped cream into the cream cheese mixture using a spatula, mixing gently until just combined. Be cautious not to deflate the whipped cream.

        Layer the cheesecake: Retrieve the cups from the refrigerator. Using a spoon or a piping bag, fill each cup with the cheesecake mixture, allowing them to become about three-quarters full to leave room for toppings.

          Add the berry topping: Generously top each cheesecake cup with a mix of fresh berries. You can choose to mix different types of berries together for a colorful look, or designate one type per cup for a striking visual appeal.

            Chill: Place the filled cups back into the refrigerator and allow them to chill for at least 2 hours, ensuring the cheesecake sets properly and develops its wonderful flavors.

              Serve: After chilling, carefully remove the cups from the refrigerator. If desired, garnish with fresh mint leaves for an added touch of elegance. Serve immediately and delight in the creamy, luscious goodness!

                Prep Time: 20 mins | Total Time: 2 hrs 20 mins | Servings: 8 cups

                  - Presentation Tips: For an enhanced visual appeal, consider serving the cheesecake cups on a decorative tray and place a few extra berries and mint leaves around for an inviting display.