Introduction
Lasagna is more than just a dish; it’s a beloved comfort food that has warmed hearts and filled bellies for generations. With its layers of pasta, hearty sauce, and gooey cheese, it’s a meal that brings families together around the dinner table. The origins of lasagna can be traced back to ancient Greece and Rome, where a similar dish made with layers of pasta and sauce was enjoyed. Over the centuries, this classic recipe has evolved, taking on various forms and flavors across different cultures. Today, lasagna is a staple in Italian cuisine and has become a favorite in homes worldwide, celebrated for its versatility and satisfying flavors.
While store-bought lasagna might save time, nothing beats the rich and wholesome taste of homemade lasagna made from scratch. When you prepare lasagna at home, you have full control over the ingredients, allowing you to customize each layer to your liking. From the choice of pasta to the selection of meats and cheeses, homemade lasagna reflects personal taste and culinary creativity. In this guide, we will explore the essential components of classic lasagna, the techniques for crafting the perfect sauce, and the art of layering to achieve that ideal texture and flavor.
Understanding the Ingredients
To create an unforgettable lasagna, it’s crucial to understand the key ingredients that come together to make this dish a masterpiece. Each component plays a vital role in building the flavor profile and texture of the final product.
Overview of Key Ingredients in Classic Lasagna
The foundation of any great lasagna lies in its ingredients. A classic lasagna typically includes:
– Lasagna Sheets: The backbone of the dish, these sheets can be made fresh or bought dried. The type of pasta you choose will significantly affect the lasagna’s texture and cooking time.
– Meat: Ground beef, sausage, or a vegetarian option such as mushrooms or spinach can transform a simple lasagna into a hearty meal.
– Cheese: The creamy layers of ricotta, the melty goodness of mozzarella, and the sharp bite of Parmesan are essential for a well-rounded lasagna.
– Sauce: A rich tomato sauce is the heart of any lasagna, providing moisture and depth of flavor.
– Herbs and Spices: Fresh basil, oregano, garlic, and salt are key to enhancing the dish’s overall taste.
Discussion of Pasta Types: Fresh vs. Dried Lasagna Sheets
One of the most significant decisions you’ll make when preparing lasagna is choosing the type of pasta.
– Fresh Lasagna Sheets: Made from flour and eggs, fresh lasagna sheets are often lighter and have a more delicate texture. They require less cooking time and can absorb the flavors of the sauce more effectively. If you have the time, making fresh pasta from scratch can elevate your lasagna to new heights.
– Dried Lasagna Sheets: These sheets are more convenient and have a longer shelf life. They typically require boiling before layering, but many brands offer no-boil options that cook directly in the oven. Dried sheets can be a great time-saver without sacrificing too much on flavor.
Choosing between fresh and dried sheets ultimately comes down to your preference and how much time you have at your disposal.
Exploring the Choice of Meats: Ground Beef, Sausage, or Vegetarian Options
The choice of protein in your lasagna can significantly impact its flavor and heartiness.
– Ground Beef: A classic choice, ground beef provides a rich, savory flavor that pairs well with the tomato sauce. It’s important to brown the meat before adding it to the sauce to enhance its depth of flavor.
– Sausage: Italian sausage, whether sweet or spicy, adds an extra layer of flavor that can make your lasagna stand out. The spices within the sausage complement the herbs in your sauce beautifully.
– Vegetarian Options: For a meatless version, consider using mushrooms, spinach, or a combination of roasted vegetables. These ingredients not only add texture but also provide a wealth of vitamins and nutrients, making for a lighter yet satisfying dish.
The Role of Cheese in Lasagna: Ricotta, Mozzarella, and Parmesan
Cheese is arguably one of the most beloved components of lasagna, contributing to its creamy texture and rich flavor. The combination of cheeses you use can make or break your dish.
– Ricotta: This soft cheese is often mixed with egg and herbs to create a creamy filling that adds richness to the layers. Ricotta provides a unique texture that contrasts beautifully with the other ingredients.
– Mozzarella: Known for its melting properties, mozzarella forms the gooey, stretchy layer that everyone loves. You can use fresh mozzarella for a more delicate flavor or shredded mozzarella for convenience.
– Parmesan: Sprinkled generously on top or incorporated into the layers, Parmesan adds a nutty flavor that enhances the overall taste of the lasagna. Its sharpness contrasts nicely with the creamy textures of ricotta and mozzarella.
When selecting cheeses, aim for high-quality options for the best results. The combination of these cheeses offers a delightful balance of creaminess and flavor that is essential for a classic lasagna.
Importance of Fresh Herbs and Spices in Enhancing Flavor
Fresh herbs and spices are crucial for elevating the flavor of your lasagna. Using fresh basil and oregano in your sauce can add brightness and depth, while garlic provides aromatic notes that enhance the overall experience.
– Basil: A staple in Italian cooking, fresh basil adds a fragrant touch that pairs perfectly with tomato sauce.
– Oregano: This herb has a robust flavor that complements the other ingredients without overpowering them.
– Garlic: Used in both the sauce and the meat, garlic brings a savory depth that rounds out the flavors.
Using a combination of fresh herbs and dried spices can create a well-balanced taste profile that captures the essence of traditional Italian cuisine.
Preparing the Sauce
The sauce is arguably the most important component of lasagna, serving as the glue that holds the layers together. A well-made sauce can elevate your dish from ordinary to extraordinary.
Importance of a Good Sauce in Lasagna
A good sauce is what differentiates a homemade lasagna from a mediocre one. It provides moisture, flavor, and richness. A traditional marinara sauce, made from ripe tomatoes, garlic, and herbs, is a classic choice for lasagna. The sauce should be rich and robust, with a balance of acidity and sweetness that complements the other ingredients.
Step-by-Step Guide to Making a Traditional Marinara Sauce
1. Gather Your Ingredients: For a basic marinara sauce, you’ll need crushed tomatoes (fresh or canned), garlic, olive oil, fresh or dried herbs (like basil and oregano), salt, and pepper.
2. Sauté the Garlic: In a large saucepan, heat a few tablespoons of olive oil over medium heat. Add minced garlic and sauté until fragrant, about 1 minute. Be careful not to burn the garlic, as it can turn bitter.
3. Add Tomatoes: Stir in the crushed tomatoes, mixing well with the sautéed garlic.
4. Season the Sauce: Add salt, pepper, and your choice of herbs. Bring the sauce to a simmer and let it cook for at least 20-30 minutes. The longer it simmers, the more the flavors will deepen.
5. Balance Acidity and Sweetness: Taste your sauce and adjust it as necessary. If it’s too acidic, consider adding a pinch of sugar to balance the flavors.
Alternative Sauces: Béchamel and Pesto Variations
While a traditional marinara sauce is the most common choice for lasagna, there are many variations that can offer a unique twist.
– Béchamel Sauce: This creamy white sauce made from butter, flour, and milk can be used in place of or in addition to marinara. It adds richness and a luxurious texture.
– Pesto: For a fresh and vibrant flavor, consider using pesto as a layer in your lasagna. It pairs beautifully with vegetables and adds a unique twist to the traditional recipe.
Layering Techniques for Perfect Lasagna
The way you layer your lasagna is crucial for achieving the right texture and flavor balance. Proper layering ensures that every bite is filled with the delicious combination of ingredients.
The Significance of Proper Layering for Texture and Flavor
Layering is not just about aesthetics; it plays a vital role in how your lasagna cooks and how the flavors meld together. Each layer should be evenly distributed to ensure consistent cooking and a balanced taste.
Suggested Layering Order: Sauce, Noodles, Cheese, and Meat
A classic layering order for lasagna typically follows this pattern:
1. Sauce: Start with a thin layer of sauce at the bottom of your baking dish. This prevents the noodles from sticking.
2. Noodles: Add a layer of lasagna sheets, ensuring they are slightly overlapping.
3. Cheese: Spread a layer of ricotta or a mixture of cheeses over the noodles.
4. Meat: If using meat, add a layer now.
5. Repeat: Continue this pattern until you reach the top of the dish, finishing with a generous layer of sauce and a sprinkle of mozzarella and Parmesan for a golden crust.
Creative Variations in Layering: Adding Vegetables or Different Cheeses
Feel free to get creative with your layers. Adding sautéed vegetables like zucchini, spinach, or mushrooms can enhance the nutritional profile and flavor of your lasagna. You can also experiment with different cheeses, such as goat cheese or provolone, to create a unique taste.
Importance of Even Distribution for Consistent Cooking
Ensuring that each layer is evenly distributed is essential for consistent cooking. Uneven layers can lead to some sections being overcooked while others remain undercooked. Take your time to spread each component evenly, and don’t be afraid to adjust as needed.
In the next part of this ultimate guide, we will delve into the baking process that will turn your beautifully layered lasagna into a bubbling, golden masterpiece. Stay tuned to learn how to achieve the perfect bake and bring your lasagna to life!
{{image_2}}
The Right Temperature and Baking Time for Optimal Results
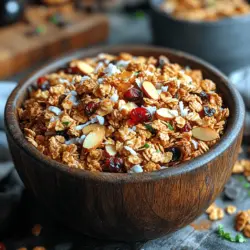
When it comes to baking toasted almond coconut granola, achieving the right temperature and baking time is essential for the perfect crunch and flavor. Preheat your oven to 325°F (163°C), a temperature that allows the granola to toast evenly without burning.
Bake the granola for approximately 25 to 30 minutes, stirring it every 10 minutes to ensure that it browns evenly. The granola should be golden brown and fragrant when done. Keep a close eye on it during the last few minutes of baking, as granola can go from perfectly toasted to burnt very quickly.
Tips for Covering and Uncovering: How to Achieve the Perfect Crust
To achieve that delightful crunchy crust, it’s important to manage the covering and uncovering of the granola while it bakes. Initially, allow the granola to bake uncovered. This exposure to the hot air in the oven helps to develop a beautiful golden color and crisp texture.
If you notice that some parts of the granola are browning too quickly, you can cover the pan loosely with aluminum foil for the last few minutes of baking. This will help prevent over-browning while still allowing the granola to continue to crisp up.
Signs to Look for When Determining Doneness
Determining when your toasted almond coconut granola is perfectly done can be tricky. Look for these signs to know when to take it out of the oven:
1. Color: The granola should be a rich golden brown. If it appears too light, give it a few more minutes, but if it’s darkening too quickly, it’s time to cover it or remove it from the oven.
2. Aroma: A toasty, nutty aroma should fill your kitchen. If you can smell the rich fragrance of almonds and coconut, you’re on the right track.
3. Texture: Once out of the oven, the granola will seem slightly soft but will harden as it cools. You want to be cautious not to over-bake, which can lead to a hard, unpalatable texture.
Allowing the Granola to Rest
Just like with many baked goods, allowing your granola to rest after baking is crucial. This resting period allows the oats and nuts to fully set and develop their flavors.
Why Letting Granola Rest is Crucial
Resting granola serves two purposes: it enhances the flavor and improves the texture. As the granola cools, the sugars continue to crystallize, creating clumps that provide that delightful crunch. Additionally, the cooling process will allow any remaining moisture to evaporate, resulting in a crispier final product.
Recommended Resting Times for the Best Results
Let your granola cool completely on the baking sheet, which should take about 30 minutes. Resist the urge to stir it during this time; allowing it to sit undisturbed will help form those coveted clusters.
Serving Suggestions
Toasted almond coconut granola is versatile and can be enjoyed in various ways. Here are some ideal serving suggestions that can elevate your breakfast or snack experience:
Ideal Side Dishes to Complement Granola
Pair your granola with fresh fruits like berries, bananas, or sliced peaches. A dollop of Greek yogurt or a splash of milk can also complement the granola beautifully, creating a delicious and nutritious breakfast bowl. For an indulgent twist, drizzle with honey or maple syrup to enhance the natural sweetness.
Discussion on Wine Pairings for a Perfect Meal
While granola is typically enjoyed at breakfast or as a snack, if you’re serving it as part of a brunch spread, consider pairing it with a light sparkling wine or a refreshing mimosa. The effervescence of the wine will cut through the richness of the granola and balance the flavors.
Presentation Ideas for an Inviting Serving Style
Presentation is key when serving granola. Consider using clear glass jars or bowls to display the beautiful layers of oats, almonds, and coconut. Top your yogurt or fruit bowls with a sprinkle of granola for a visually appealing dish. Garnishing with fresh mint leaves can add a pop of color and an aromatic touch.
Storage and Reheating Tips
Proper storage of your toasted almond coconut granola is crucial to maintain its freshness and crunchy texture.
How to Properly Store Leftover Granola
Once completely cooled, transfer the granola to an airtight container. It can be stored at room temperature for up to two weeks. To keep it fresh for an extended period, consider placing it in the refrigerator, where it can last for a month.
Best Methods for Reheating Without Losing Moisture and Texture
If you prefer your granola warm, you can reheat it in the oven. Spread it out on a baking sheet and warm it at a low temperature (about 300°F or 149°C) for 5 to 10 minutes. This method will revive its crunch without making it soggy, ensuring that you enjoy the same wonderful texture as when it was freshly baked.
Freezing Options for Meal Prep Enthusiasts
If you’ve made a large batch or want to save some for later, freezing granola is an excellent option. Portion it into small, airtight freezer bags or containers, making sure to label them with the date. Granola can be frozen for up to three months. When you’re ready to enjoy it, simply thaw it at room temperature and give it a quick toast in the oven for that fresh-from-the-oven taste.
Exploring Variations of Classic Granola
One of the joys of making granola is the ability to customize it to your liking. Here are some variations to consider:
Vegetarian Granola: Ingredients and Layers
For a vegetarian twist, consider adding different seeds like pumpkin or sunflower seeds for extra nutrition and texture. Additionally, incorporating dried fruits like cranberries or apricots can provide a chewy contrast to the crunchy elements.
Gluten-Free Options: Ingredient Alternatives and Adaptations
If you’re following a gluten-free diet, ensure that you use certified gluten-free oats. You can also swap in other bases like quinoa flakes or puffed rice for a unique texture. Coconut flakes and nuts remain gluten-free options that add flavor and crunch.
International Takes on Granola: Unique Flavors from Around the World
Explore global flavors by adding spices like cinnamon or cardamom for an Indian-inspired granola, or mix in matcha powder for a Japanese twist. You could also experiment with savory options by adding herbs and spices, making it a perfect topping for soups or salads.
Conclusion
Making toasted almond coconut granola at home is a rewarding and delightful experience that fills your kitchen with irresistible aromas. The joy of crafting this crunchy, flavorful treat from scratch cannot be overstated. Whether you enjoy it as a breakfast staple, a snack, or a topping for your favorite dishes, homemade granola offers endless possibilities for customization and creativity.
Embrace the opportunity to experiment with different ingredients and flavors, tailoring the recipe to suit your taste buds. Share your granola creations with family and friends, and enjoy the satisfaction of knowing you made something delicious and nutritious from scratch. With this guide, you’re well on your way to becoming a granola-making expert. So roll up your sleeves, gather your ingredients, and start creating your own toasted almond coconut granola masterpiece!