Crispy Coconut Chicken Strips: A Delightful Culinary Adventure
Crispy Coconut Chicken Strips are more than just a dish; they are a celebration of flavor and texture that appeals to both the young and the young at heart. Imagine tender chicken breast coated in a crisp, golden-brown shell made from a delightful blend of shredded coconut and panko breadcrumbs. The first bite reveals a satisfying crunch followed by the juicy, succulent chicken within, making these strips a perfect culinary creation for any occasion.
In today’s fast-paced world, the significance of easy-to-make, flavorful recipes cannot be overstated. Home cooking often feels like a race against time, but dishes like Crispy Coconut Chicken Strips provide a quick and uncomplicated solution without sacrificing taste. Whether you’re looking for a satisfying snack, an impressive appetizer for your next gathering, or a main dish to accompany your favorite sides, these chicken strips are versatile enough to fit any role. Their tropical flair makes them a great choice for summer barbecues, while their comforting crunch is perfect for cozy winter evenings.
Understanding Ingredients
To craft the perfect Crispy Coconut Chicken Strips, it’s essential to understand the role of each ingredient in the recipe. The right components not only enhance the flavor but also contribute to the overall texture and nutritional value of the dish.
Chicken Breast
At the heart of this recipe lies the chicken breast, a lean source of protein that’s not only nutritious but also ideal for frying. Chicken breast is celebrated for its low-fat content and high protein levels, making it a popular choice among health-conscious individuals. When cooked properly, it remains juicy and tender, providing an excellent base for the crispy coating that follows. This protein powerhouse ensures that your chicken strips are both satisfying and nourishing, making them a great option for families looking to maintain a balanced diet.
Shredded Coconut
Shredded coconut is the star ingredient that adds a tropical twist to the dish. When selecting shredded coconut, you’ll find two primary options: sweetened and unsweetened. Sweetened coconut is often used in desserts, lending a sugary flavor that may not be ideal for savory dishes. Unsweetened shredded coconut, on the other hand, is the preferred choice for Crispy Coconut Chicken Strips, as it provides a rich coconut flavor without added sugars. This ingredient not only enhances the taste but also contributes to the crunchy texture that makes these chicken strips stand out.
Panko Breadcrumbs
Panko breadcrumbs are the secret weapon in achieving that coveted crunch. Unlike traditional breadcrumbs, panko is made from crustless bread and is coarser, resulting in a lighter, airier texture. This unique quality allows the chicken strips to develop a crispy coating that stays crunchy even after frying. When combined with shredded coconut, panko elevates the overall texture, creating a delightful contrast with the tender chicken inside.
Seasonings
The magic of Crispy Coconut Chicken Strips also lies in the seasonings used to enhance the flavor profile. A blend of garlic powder, onion powder, smoked paprika, and cayenne pepper creates a harmonious balance of savory and spicy notes. Garlic and onion powders introduce depth, while smoked paprika adds a subtle smokiness that elevates the dish. For those who enjoy a little heat, cayenne pepper can be adjusted to taste, giving the chicken strips a pleasant kick. Together, these seasonings ensure that every bite is bursting with flavor, making the chicken strips irresistible.
Preparation Steps for Crispy Coconut Chicken Strips
Now that we’ve covered the ingredients, let’s dive into the preparation steps for making Crispy Coconut Chicken Strips. Each step is crucial in ensuring that your chicken strips turn out perfectly crispy and flavorful.
Preparing the Chicken
The first step in this culinary journey is to prepare the chicken. Start by selecting fresh chicken breasts, ideally of similar size for even cooking. To enhance the flavor, it’s essential to season the chicken properly. A simple mix of salt and pepper can go a long way, but for a more robust flavor, consider adding some of the previously discussed seasonings directly to the chicken. Marinating the chicken for at least 30 minutes can help the flavors penetrate deeper, resulting in a more flavorful strip.
Next, it’s important to cut the chicken into even strips to ensure uniform cooking. Use a sharp knife to slice the chicken breast lengthwise into strips approximately 1-inch wide. For best results, try to keep the strips as consistent in size as possible; this will help them cook evenly and avoid any pieces being overcooked or undercooked.
Setting Up the Breading Station
Once your chicken is prepared, it’s time to set up your breading station. This process involves creating a three-bowl system that will streamline the breading process and ensure that each piece of chicken is adequately coated.
1. First Bowl: In the first bowl, place all-purpose flour seasoned with salt and pepper. The flour acts as a base that helps the egg adhere to the chicken.
2. Second Bowl: In the second bowl, beat a couple of eggs with a splash of water. This egg wash will help bind the coating to the chicken strips, making sure the panko and coconut adhere perfectly.
3. Third Bowl: In the final bowl, combine panko breadcrumbs, shredded coconut, and your chosen seasonings. This mixture is where the magic happens, as it will create the incredible crunch for your chicken strips.
The importance of each step in this breading process cannot be overstated. Properly following this method ensures that the chicken strips are evenly coated, which is key to achieving that perfect texture.
Breading the Chicken
With your breading station ready, it’s time to begin the breading process. Start by taking one chicken strip and dredging it in the flour, tapping off any excess. Next, dip the floured strip into the egg wash, allowing any excess to drip off before moving to the final bowl. Here, press the chicken strip into the panko and coconut mixture, ensuring an even coating. It’s essential to press the coating onto the chicken strips, as this will help the mixture adhere better during cooking and create that desired crunch.
Repeat this process for each chicken strip, arranging them on a baking sheet lined with parchment paper or a cooling rack. This not only keeps the strips from sticking but also allows air to circulate around them, which is vital for achieving maximum crispiness.
Enhancing the Crunch: Chilling the Chicken Strips
For an extra layer of crunch, consider chilling the breaded chicken strips in the refrigerator for about 30 minutes before cooking. This step helps the coating set, ensuring that it adheres better during frying and results in a crunchier texture. Chilling gives the breadcrumbs and coconut time to bind to the chicken, making each bite even more satisfying.
As you prepare to cook your Crispy Coconut Chicken Strips, you’ll be ready to embark on the final steps of frying or baking, which will transform these flavorful strips into a dish that’s sure to impress.
{{image_2}}
Why Chilling the Breaded Chicken is Essential for Crispiness
Chilling your breaded chicken strips may seem like an optional step, but it plays a crucial role in achieving that desired crispy texture. When you chill the breaded chicken strips, the moisture in the coating begins to firm up, creating a more durable crust that holds up during cooking. This process not only enhances the texture but also allows the breading to adhere better to the chicken, preventing it from falling off while cooking.
The Science Behind the Refrigeration Step
The refrigeration step works on a simple principle of temperature control. When the breaded chicken strips are cooled, the fats in the breading solidify slightly, which helps create a barrier that keeps moisture from seeping in during cooking. Additionally, this chilling process helps the breading to set, allowing it to form a more stable structure when it’s exposed to heat. This means that during baking or frying, the coating is less likely to become soggy, leading to a crunchier end product. By following this simple step, you can elevate your crispy coconut chicken strips to restaurant-quality levels.
Cooking Methods for Crispy Coconut Chicken Strips
When it comes to cooking your crispy coconut chicken strips, you have two primary methods to choose from: baking and frying. Each method has its advantages and disadvantages, which can influence your choice based on your cooking preferences and dietary needs.
Baking vs. Frying: Pros and Cons
Baking
Pros:
– Lower in fat and calories compared to frying.
– Easier cleanup as you won’t deal with hot oil.
– More consistent cooking as the heat surrounds the chicken evenly.
Cons:
– May not achieve the same level of crispiness as frying.
– Takes longer to cook as compared to frying.
Frying
Pros:
– Produces a golden-brown, crispy exterior that is hard to replicate.
– Cooking time is generally shorter.
Cons:
– Higher in calories and fat due to the oil absorption.
– Requires more attention to manage oil temperature and ensure safety.
Baking Method: Step-by-Step Details for Oven Preparation
To bake your crispy coconut chicken strips, follow these steps:
1. Preheat the Oven: Begin by preheating your oven to 425°F (220°C). This high temperature will help achieve a crispy texture.
2. Prepare the Baking Sheet: Line a baking sheet with parchment paper or lightly grease it with cooking spray. This prevents sticking and makes cleanup easier.
3. Arrange the Chicken Strips: Place the chilled, breaded chicken strips in a single layer on the prepared baking sheet. Make sure there’s space between each strip to allow air circulation for even cooking.
4. Bake: Bake in the preheated oven for about 20-25 minutes, flipping the strips halfway through. This ensures both sides become evenly crispy and golden.
5. Check for Doneness: The chicken is done when it reaches an internal temperature of 165°F (75°C) and the coating is golden brown.
Frying Method: Tips for Achieving the Perfect Golden Brown Color
Frying your chicken strips can yield an unbeatable crunch. Here’s how to do it right:
1. Heat the Oil: In a deep skillet or frying pan, heat about 1 inch of oil over medium-high heat. To check if the oil is ready, drop a small piece of bread into the oil. If it sizzles and bubbles, the oil is hot enough for frying.
2. Fry in Batches: Carefully add a few chicken strips to the hot oil, making sure not to overcrowd the pan. This will lower the oil temperature and lead to soggy strips.
3. Cooking Time: Fry the chicken strips for about 4-5 minutes on each side until they are golden brown. Use tongs to turn them carefully.
4. Drain Excess Oil: Once cooked, remove the strips from the oil and place them on a paper towel-lined plate to absorb any excess oil.
Explanation of Oil Temperature Management for Frying
Oil temperature management is critical for perfect frying. If the oil is too hot, the outside of the chicken strips will burn before the inside cooks through. Conversely, if the oil is not hot enough, the chicken will absorb too much oil and become greasy. Maintaining the ideal frying temperature of 350-375°F (175-190°C) ensures that the chicken cooks evenly while achieving that desired crispy crust. A deep-fry thermometer can be a handy tool for monitoring the oil temperature.
Serving Suggestions
Once your crispy coconut chicken strips are cooked to perfection, it’s time to present them in a way that makes your meal visually appealing and appetizing.
Presentation Ideas for an Appealing Dish
– Plating: Arrange the chicken strips in a circular pattern or stack them in a small tower to create height and interest on the plate.
– Color Contrast: Use a vibrant plate, such as a bright blue or yellow, to contrast against the golden brown of the chicken strips.
Garnishing with Lime Wedges and Cilantro
To enhance the visual appeal of your dish, add fresh lime wedges and a sprinkle of chopped cilantro around the chicken strips. The green of the cilantro and the bright yellow of the lime add freshness, making the dish more inviting. Plus, a squeeze of lime over the chicken strips adds a zesty flavor that complements coconut beautifully.
Plate Choices That Enhance the Dining Experience
Choose plates that are wide and shallow, allowing the chicken strips to spread out without being cramped. This not only presents the dish attractively but also makes it easier for guests to serve themselves. You might also consider using wooden boards for a rustic feel or colorful ceramic dishes for a fun, casual dining experience.
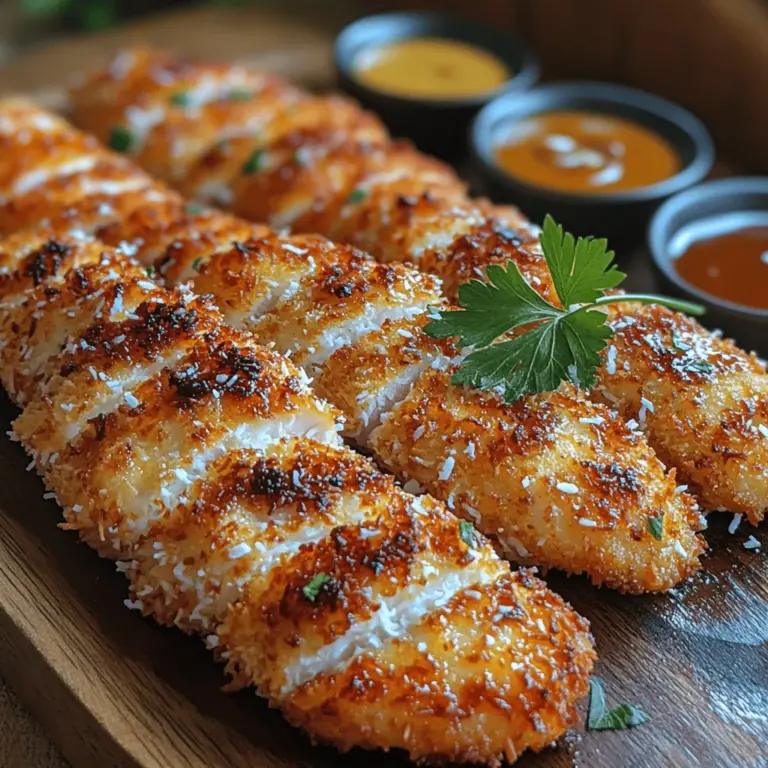
Suggested Dipping Sauces and Their Flavor Pairings
Dipping sauces can elevate your crispy coconut chicken strips and provide an additional layer of flavor. Here are some excellent options:
Sweet Chili Sauce: A Perfect Balance of Sweetness and Heat
Sweet chili sauce is a classic pairing for coconut chicken. Its sweet yet spicy profile complements the flavors of the coconut while adding a delightful kick.
Honey Mustard: Creamy and Tangy Contrast
This creamy sauce offers a tangy contrast to the crispy chicken. The sweetness of the honey and the tang of the mustard create a delightful balance that pairs perfectly with the dish.
Avocado Dip: Creamy Texture and Fresh Taste
For a healthier alternative, serve your chicken strips with a creamy avocado dip. Blend ripe avocados with lime juice, garlic, and a pinch of salt for a refreshing dip full of healthy fats.
Nutritional Information
Understanding the nutritional profile of your crispy coconut chicken strips can help you enjoy them guilt-free. Here’s a general breakdown of what one serving (about 3-4 strips) may contain:
– Calories: Approximately 350-400 calories
– Protein: 25-30 grams
– Fat: 20-25 grams
– Carbohydrates: 25-30 grams
Discussion on How to Make the Recipe Healthier
To make the recipe healthier, consider the following modifications:
– Baking Instead of Frying: As discussed, baking reduces the overall fat and calorie content while still delivering a crispy texture.
– Using Whole Wheat Breadcrumbs: Opt for whole wheat breadcrumbs instead of traditional ones to boost fiber content.
– Serving with a Side of Vegetables: Pair your chicken strips with a fresh salad or steamed vegetables for added nutrients and a balanced meal.
Conclusion
Crispy coconut chicken strips are not just a delightful treat; they are a versatile dish that can be tailored to suit any occasion, from casual weeknight dinners to festive gatherings. The combination of a crunchy exterior and tender chicken inside creates a satisfying experience that will please both kids and adults alike.
By trying your hand at this recipe, you’re not only indulging in a delicious meal but also embracing the joy of cooking and sharing homemade dishes with friends and family. The satisfaction of creating something so tasty from scratch is unparalleled, and we encourage you to experiment with different cooking methods and sauces to make this dish truly your own.
So gather your ingredients, follow the steps, and enjoy the delightful experience of making crispy coconut chicken strips at home. Happy cooking!