Sweet Campfire Delights: No-Bake S’mores Fudge Bars
When it comes to classic summer treats, few can rival the nostalgic appeal of s’mores. The delightful combination of gooey marshmallows, rich chocolate, and crunchy graham crackers has become synonymous with camping trips and bonfires, evoking memories of warm evenings spent under the stars. But what if you could bring that same beloved flavor to your kitchen without the need for an open flame? Enter the no-bake s’mores fudge bar—a creative twist on the traditional campfire treat that offers all the indulgent taste of s’mores in a simple, convenient form.
The no-bake s’mores fudge bar is not only a celebration of the classic flavors we know and love, but it also provides a quick and straightforward way to enjoy them. Whether you’re an experienced baker or a novice in the kitchen, the beauty of this recipe lies in its accessibility. With just a handful of ingredients and minimal preparation time, you can craft these delicious treats that are perfect for summer gatherings, picnics, or an everyday dessert.
In this article, we aim to guide you through the process of making these indulgent fudge bars. We will delve into the necessary ingredients, their roles in achieving that perfect s’mores flavor, and the step-by-step instructions to ensure your fudge bars turn out beautifully. By the end, you’ll be well-equipped to create an irresistible batch of no-bake s’mores fudge bars that will have everyone asking for seconds.
Understanding the Ingredients
To create the perfect no-bake s’mores fudge bars, it’s essential to understand the role of each ingredient in the recipe. Each component contributes to the overall taste and texture, making them integral to achieving that classic s’mores experience.
1. Graham Cracker Crumbs: Serving as the foundation for the base, graham cracker crumbs bring a delightful crunch and a mild sweetness that mirrors the traditional s’mores component. Their texture helps form a sturdy base that holds the fudge together.
2. Unsweetened Cocoa Powder: This ingredient is crucial for imparting a rich chocolate flavor without overwhelming the bars with sweetness. It complements the other ingredients, ensuring that the fudge maintains a balanced taste.
3. Granulated Sugar: While the fudge bars do require sweetness, granulated sugar plays a vital role in achieving the desired fudgy consistency. It enhances the overall flavor and helps bind the ingredients together.
4. Unsalted Butter: Acting as a binding agent, unsalted butter adds a creamy richness to the fudge. It helps to meld the dry ingredients and contributes to the smooth mouthfeel of the final product.
5. Sweetened Condensed Milk: The star of the show, sweetened condensed milk is key to achieving that luscious, fudgy consistency without the need for baking. It brings moisture and a touch of caramelized sweetness that enhances the overall flavor.
6. Mini Marshmallows: Essential for replicating the classic s’mores experience, mini marshmallows add that gooey texture and nostalgic flavor. They provide an inviting contrast to the denser fudge components.
7. Chocolate Chips: These are crucial for adding melty chocolate goodness to the bars. Whether you choose semi-sweet, milk, or dark chocolate chips, they create pockets of rich chocolate throughout the fudge.
8. Crushed Graham Crackers and Mini Marshmallows for Topping: Not only do these toppings enhance the presentation, but they also add an extra layer of texture, mimicking the classic s’mores experience.
9. Optional Chocolate Drizzle: For those who want to take their fudge bars to the next level, a drizzle of melted chocolate can provide an additional layer of indulgence and visual appeal.
Step-by-Step Guide to Making No-Bake S’mores Fudge Bars
Now that you’re familiar with the essential ingredients and their contributions, it’s time to roll up your sleeves and get started on making your no-bake s’mores fudge bars. Follow these steps for a seamless preparation process.
1. Preparation of the Baking Dish
Before you begin mixing your ingredients, it’s important to prepare your baking dish. Start by selecting a square or rectangular baking dish, depending on how thick you want your fudge bars to be. Line the bottom and sides of the dish with parchment paper, leaving some overhang on the edges. This step is crucial, as it will make removing the fudge bars from the dish a breeze once they’ve set.
2. Creating the Base Mixture
In a large mixing bowl, combine the graham cracker crumbs, unsweetened cocoa powder, granulated sugar, and a pinch of salt. Mixing these dry ingredients first ensures an even distribution of flavors and helps prevent clumping. To achieve a uniform blend, use a whisk or a spatula to thoroughly combine the ingredients until they are well incorporated.
Next, melt the unsalted butter in a microwave-safe bowl or on the stovetop until it is completely liquid. Allow it to cool slightly before adding it to the dry mixture, followed by the sweetened condensed milk. This combination will create the base layer of your fudge bars, providing both flavor and structure. Mix until the ingredients are fully combined, and a cohesive dough-like consistency forms.
These initial steps set the foundation for your no-bake s’mores fudge bars, ensuring they are packed with flavor and have the perfect texture. In the next section, we will explore how to incorporate the marshmallows and chocolate, as well as how to prepare the fudge for its final touches. Stay tuned for the continuation of this delicious journey into the world of no-bake treats!
{{image_2}}
Creating delectable No-Bake S’mores Fudge Bars is a delightful way to experience the essence of s’mores without the need for a campfire. This indulgent treat combines the classic flavors of graham crackers, chocolate, and gooey marshmallows into a luscious fudge that is easy to prepare and even easier to enjoy. In this section, we will dive deeper into the preparation steps, presentation ideas, nutritional information, and creative variations that will help you customize this recipe to your liking.
Incorporating Wet Ingredients
To achieve a consistent batter for your No-Bake S’mores Fudge Bars, it’s essential to incorporate the wet ingredients thoroughly. Begin by melting your butter in a medium saucepan over low heat. Once melted, remove it from the heat and allow it to cool slightly before adding the sweetened condensed milk. This prevents the milk from curdling and ensures a smooth mixture. Stir the ingredients together until they are well combined, creating a rich, creamy base that will bind your fudge bars together.
Folding in Marshmallows and Chocolate
Once your wet ingredients are perfectly blended, it’s time to fold in the marshmallows and chocolate. To maintain the delightful texture of the fudge, use a gentle folding technique. Start by adding your mini marshmallows and chocolate chips to the wet mixture. Using a spatula, carefully lift and fold the mixture from the bottom, rotating it until the marshmallows and chocolate are evenly distributed throughout. This method ensures that the marshmallows remain fluffy and intact, adding to the overall texture of your fudge bars.
Spreading the Mixture
After incorporating the marshmallows and chocolate, you’ll need to spread the mixture into a prepared 9×9-inch baking dish lined with parchment paper. This step is crucial for ensuring the integrity of your fudge bars. Use a spatula to evenly distribute the mixture across the dish, pressing down firmly but gently. This compression helps the bars hold their shape once set, preventing crumbling or breaking when you cut them.
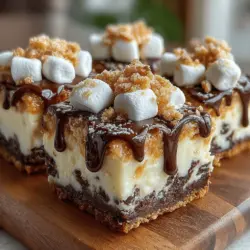
Topping the Fudge
For an added touch of flavor and presentation, it’s time to top your fudge. Sprinkle additional mini marshmallows, chocolate chips, and crushed graham crackers over the surface of the fudge mixture. After sprinkling, gently press these toppings into the fudge using your hands or a spatula. This step is important as it helps the toppings adhere to the fudge, ensuring they stay in place when you cut your bars.
Chilling Process
Chilling your No-Bake S’mores Fudge Bars is vital for achieving the perfect texture. Place the baking dish in the refrigerator for at least two hours, or until the fudge is firm to the touch. This chilling period allows the ingredients to meld together, creating a cohesive bar that is easy to cut and serve. If you’re in a hurry, you can hasten the process by placing the dish in the freezer for about 30 minutes, but be sure to monitor it closely to avoid freezing.
Optional Chocolate Drizzle
For those looking to elevate the presentation and flavor of their fudge bars, consider adding a chocolate drizzle. To create this, melt a small amount of chocolate in a microwave-safe bowl in 30-second intervals, stirring between each interval until smooth. Once melted, use a spoon or a piping bag to drizzle the chocolate over the chilled fudge bars. This not only enhances the visual appeal but also adds an extra layer of chocolaty goodness that complements the s’mores flavors beautifully.
Final Cutting and Serving Tips
When it’s time to cut your fudge bars, it’s essential to use the right technique to achieve neat, clean bars. First, remove the fudge from the baking dish by lifting the edges of the parchment paper. Place it on a cutting board and use a sharp knife to slice into squares or rectangles. To maintain clean cuts, wipe the knife with a damp cloth between slices. This keeps the edges of your bars looking pristine and professional.
Presentation Ideas for Your Fudge Bars
– Suggestions for Serving: Present your fudge bars on decorative plates, and consider garnishing with extra marshmallows or chocolate chips for an enticing display. If you want to take it a step further, you can even create a s’mores-themed platter with graham crackers, chocolate, and toasted marshmallows.
– Creative Serving Options: Pair your fudge bars with a glass of cold milk or a cozy cup of hot cocoa. This nostalgic combination not only enhances the flavor experience but also evokes the warmth of campfire gatherings.
– Ideas for Sharing at Gatherings: No-Bake S’mores Fudge Bars are perfect for parties and picnics. Consider cutting them into smaller bite-sized pieces for easy sharing. Arrange them on a tray with other desserts for a sweet spread that’s sure to be a hit among guests.
Nutritional Information
While enjoying your No-Bake S’mores Fudge Bars, it’s important to be mindful of their nutritional aspects. Each bar contains roughly 150-200 calories, depending on the size and specific ingredients used. The combination of sweetened condensed milk, chocolate, and marshmallows contributes to the calorie content, but they also provide a delightful treat that can be enjoyed in moderation.
For those with dietary restrictions or preferences, consider some substitutions:
– Gluten-Free Options: Use gluten-free graham crackers to make these fudge bars suitable for those with gluten sensitivities.
– Dairy-Free Choices: Opt for dairy-free chocolate and condensed milk alternatives to accommodate vegan diets.
Exploring Variations of No-Bake S’mores Fudge Bars
One of the joys of cooking is creativity, and this recipe is no exception. Here are some exciting variations to consider:
– Ingredient Swaps: Experiment with different types of chocolate—dark, milk, or even white chocolate can change the flavor profile of your fudge bars. For a bit of crunch, consider adding nuts like walnuts or pecans into the fudge mixture.
– Seasonal Variations: As the seasons change, so can your fudge. In the fall, try incorporating pumpkin spice into the mixture for a seasonal twist. During the winter holidays, peppermint extract can be added for a festive flavor that aligns with holiday favorites.
Conclusion
Making and sharing No-Bake S’mores Fudge Bars brings joy and nostalgia to any occasion. This easy and versatile recipe offers a delicious treat that is perfect for gatherings, celebrations, or simply satisfying a sweet tooth. The blend of flavors and textures will transport you back to cherished campfire memories, allowing you to enjoy the essence of s’mores any time of the year.
Whether you keep it classic or experiment with variations, these fudge bars are sure to please family and friends alike. So gather your ingredients, roll up your sleeves, and create a batch of these irresistible delights to spark joy in your home. Enjoy the process, and happy baking!