Lemon Zest Delight: Cream Pie in a Jar – Introduction
Delightful and refreshing, the Lemon Zest Delight: Cream Pie in a Jar is the perfect dessert to tantalize your taste buds. This easy-to-follow recipe combines a buttery graham cracker crust, a luscious lemon filling, and a velvety whipped cream topping, all presented in charming individual jars. This unique presentation not only adds a playful touch but also makes serving easier, whether you’re hosting a summer picnic, a festive gathering, or simply indulging in a sweet treat at home.
The allure of this dessert lies in its bright, zesty flavors, which evoke the essence of sunny days and warm weather. Lemons, known for their vibrant taste and aromatic zest, serve as the star ingredient. They provide a refreshing contrast to the sweetness of the cream and the richness of the crust, making every bite a delightful experience. This dessert is not just a treat for the palate but also a feast for the eyes, as the layers of creamy filling and whipped topping create an inviting presentation.
Whether you are a seasoned baker or a beginner in the kitchen, this recipe is designed to be approachable and rewarding. With a few simple steps and readily available ingredients, you’ll be able to create a dessert that will impress friends and family alike. Let’s dive into the details of how to create this delectable treat that captures the essence of lemony bliss.
Understanding the Ingredients
Before diving into the preparation of our Lemon Zest Delight, it’s important to understand the key components that come together to create this exquisite dessert. Each ingredient plays a vital role in achieving the perfect flavor and texture.
– Crust Ingredients: The crust forms the foundation of our dessert and is made from graham cracker crumbs, melted butter, and sugar. The graham cracker crumbs provide a sweet and slightly nutty flavor, while the melted butter binds the crumbs together and adds richness. Sugar enhances the sweetness, balancing the tartness of the lemon filling. The combination results in a buttery, crumbly crust that holds its shape in the jars.
– Lemon Filling: The heart of the dessert, the lemon filling, is a delightful blend of sugar, cornstarch, salt, water, egg yolks, lemon juice, lemon zest, and butter. The sugar adds sweetness, while cornstarch acts as a thickening agent, ensuring the filling maintains a creamy consistency. Salt enhances the flavors, and the egg yolks provide richness and depth. Freshly squeezed lemon juice and zest deliver that characteristic tangy flavor we all love. Finally, a touch of butter adds a silky finish to the filling.
– Cream Topping: Topping off this delicious dessert is a fluffy layer of whipped cream, made from heavy whipping cream, powdered sugar, and vanilla extract. The heavy cream whips up to a light and airy consistency, providing a perfect contrast to the dense lemon filling. Powdered sugar sweetens the cream without the graininess of granulated sugar, while vanilla extract adds an aromatic note that complements the other flavors beautifully.
Creating the Perfect Crust
Now that we have a clear understanding of the ingredients, let’s move on to creating the perfect crust for our Lemon Zest Delight. The crust is essential, providing not just flavor but also structure to the dessert.
1. Mixing the Ingredients: Start by gathering your graham cracker crumbs, melted butter, and sugar in a mixing bowl. It’s best to use finely crushed graham crackers for a smoother texture. If you don’t have pre-made crumbs, you can easily crush whole graham crackers in a food processor or by placing them in a zip-top bag and rolling over them with a rolling pin.
2. Achieving the Right Texture: Once the crumbs, butter, and sugar are combined, mix them thoroughly until the mixture resembles wet sand. This texture is crucial as it indicates that the butter has been evenly distributed throughout the crumbs, which will help hold the crust together after baking.
3. Pressing the Crust into the Jars: The next step is to firmly press the crumb mixture into the bottom of your jars. It’s important to create an even layer that is compact enough to support the filling above it. You can use the back of a spoon or a small measuring cup to help pack the crumbs down. Make sure to press the mixture up the sides of the jars slightly, creating a little wall that will contain the filling and provide a nice visual layer when served.
This crust forms the base of our Lemon Zest Delight, setting the stage for the tangy lemon filling that will follow. Taking the time to create a well-formed crust will enhance the overall texture and flavor of the dessert.
Crafting the Lemon Filling
With our crust ready, it’s time to focus on crafting the star of the show: the lemon filling. This is where the bright, zesty flavor really shines.
1. Whisking the Dry Ingredients: Begin by whisking together the sugar, cornstarch, and salt in a medium saucepan. This step is crucial as it ensures that the dry ingredients are well combined and that the cornstarch can evenly thicken the filling as it cooks.
2. Tempering the Egg Yolks: In a separate bowl, lightly beat the egg yolks. To prevent scrambling, you will need to temper the yolks. Gradually add a small amount of the heated mixture from the saucepan into the yolks while whisking continuously. This process slowly raises the temperature of the yolks without cooking them. Once combined, pour the egg mixture back into the saucepan.
3. Cooking the Filling: Place the saucepan over medium heat and continue to cook while stirring constantly. You will notice the mixture begin to thicken; this is where patience is key. Keep stirring until the filling coats the back of a spoon and holds its shape. This usually takes about 5-7 minutes.
4. Incorporating the Zesty Flavors: Once your filling reaches the desired consistency, remove it from the heat and stir in the freshly squeezed lemon juice, lemon zest, and butter. The zest adds an aromatic punch, while the lemon juice provides the tartness that makes this dessert so refreshing. The butter will give the filling a smooth and silky texture, making each spoonful a delightful experience.
With the crust and filling complete, you are well on your way to assembling your Lemon Zest Delight: Cream Pie in a Jar. Stay tuned for the next steps, where we will explore how to layer the filling into the jars and top it off with a luscious whipped cream. This dessert is not only a treat for your taste buds but also a beautiful addition to any table setting.
{{image_2}}
Understanding the Chilling Process
One of the most critical steps in preparing the Lemon Zest Delight: Cream Pie in a Jar is the chilling process. Allowing the filling to cool and set properly is essential for achieving the right texture and flavor balance. When the lemon filling is warmed, it has a fluid consistency that will not hold its shape once served. Chilling helps the filling thicken as the gelatin or cornstarch sets, creating a stable base for the whipped cream topping.
Recommended Chilling Time: Why 2 Hours is Ideal for Texture
For the best results, you should aim to chill the pie filling for at least 2 hours. This duration allows the mixture to cool sufficiently, ensuring that it firms up without becoming overly dense. The cooling process also enhances the flavors, allowing the lemon zest and juice to infuse perfectly into the filling. If you’re short on time, a quick 30-minute chill in the freezer can help, but be cautious; you don’t want the filling to freeze. Ideally, stick to the full chilling time for optimal texture and taste.
Whipping the Cream Topping
Creating a Fluffy Finish
The whipped cream topping is what elevates this dessert and transforms it into a truly delightful experience. To whip cream properly, you’ll need a few essential tools: a mixing bowl, a whisk or an electric hand mixer, and a measuring cup. If possible, chill your mixing bowl and beaters beforehand; cold equipment helps the cream whip faster and achieve better volume.
Best Practices for Whipping Cream: Tools and Techniques
1. Chill Everything: As mentioned, cold tools lead to better whipping results. Place your mixing bowl and beaters in the refrigerator for about 15-20 minutes before whipping.
2. Choose the Right Cream: Use heavy whipping cream or heavy cream, which has a fat content of at least 36%. This fat is necessary for achieving the desired volume and stability in your whipped cream.
3. Start Slow: Begin whipping at a low speed to prevent splattering, gradually increasing to medium-high once the cream starts to thicken.
Recognizing the Right Consistency: Soft Peaks Versus Stiff Peaks
During the whipping process, you’ll notice the cream transforming. The key is to stop at the right consistency:
– Soft Peaks: This stage occurs when you lift the whisk out of the cream, and the peaks gently flop over. It’s perfect for folding into other mixtures.
– Stiff Peaks: When you lift the whisk, the peaks stand straight up without bending. This is the ideal consistency for topping your cream pie, as it holds its shape well.
Balancing Sweetness: Adjusting Powdered Sugar to Personal Taste
While some recipes may call for a specific amount of powdered sugar, taste is subjective. Start with about 2 tablespoons of powdered sugar for every cup of cream, and adjust according to your preference. You can always add more if you desire a sweeter topping, but remember that the filling itself has a zesty sweetness from the lemon.
Assembling the Jars
Layering Your Dessert for Visual Appeal
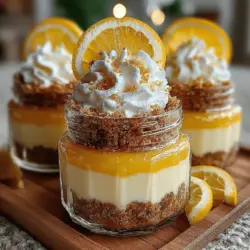
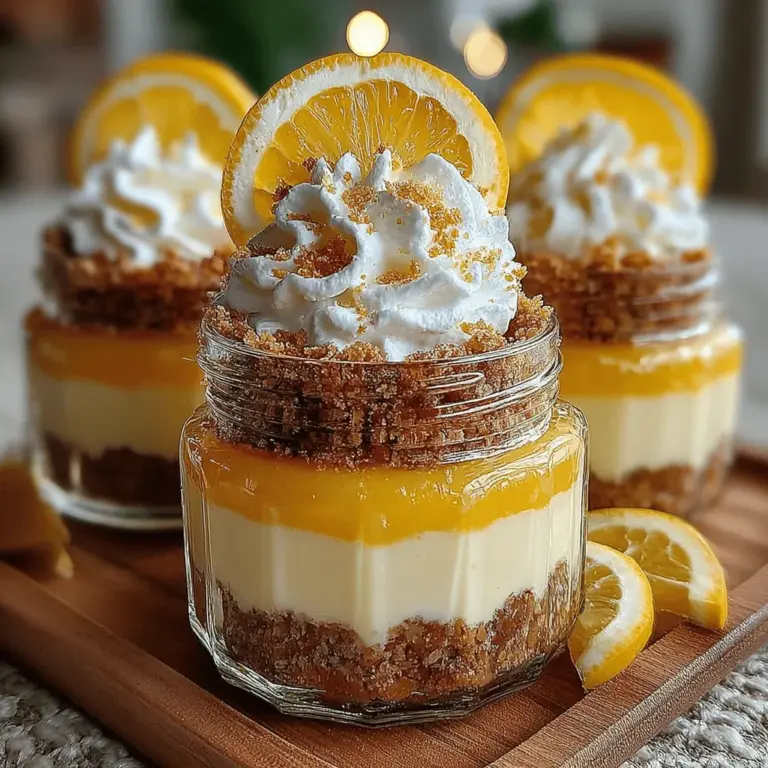
Now comes the fun part: assembling your Lemon Zest Delight in jars! This step not only adds to the visual appeal but also allows for individual servings that guests can enjoy.
Tips for Spooning or Piping the Whipped Cream
For a neat presentation, consider using a piping bag fitted with a star tip to pipe the whipped cream on top of the lemon filling. If you don’t have a piping bag, a zip-top bag with a corner snipped off can work just as well. For a more rustic look, you can simply spoon the whipped cream over the filling, making sure to create a generous layer.
The Art of Garnishing: Using Lemon Zest and Slices for Added Flair
Garnishing is where you can let your creativity shine. A sprinkle of fresh lemon zest on top adds a pop of color and enhances the lemon flavor. You can also add thin lemon slices or twists, placing them artfully on top or at the side of the jars. This not only looks appealing but also gives a hint of what flavors to expect.
Importance of Presentation in Enhancing the Dessert Experience
Remember, first impressions matter, especially when it comes to food. The visual presentation can elevate the dessert experience, making it feel special. Layering the filling and whipped cream to create distinct lines will make each jar a mini masterpiece, enticing your guests even before they take their first bite.
Serving Suggestions
Enhancing the Experience of Your Lemon Zest Delight
This delightful dessert is versatile enough to be served at various occasions, from casual family get-togethers to elegant dinner parties.
Ideal Occasions for Serving This Dessert
The Lemon Zest Delight: Cream Pie in a Jar is perfect for:
– Summer picnics and barbecues.
– Birthday parties, especially for those who love citrus flavors.
– Holiday gatherings where a refreshing dessert is needed to balance heavier fare.
– Casual brunches, serving as a light and zesty finish to your meal.
Pairing Suggestions: Beverages that Complement the Lemon Flavors
To enhance the zesty experience, consider pairing your dessert with:
– Iced Tea: A refreshing lemon or mint-infused iced tea complements the pie’s flavors beautifully.
– Sparkling Water: A splash of lemon or lime in sparkling water will echo the dessert’s citrus notes.
– White Wine: A chilled glass of Sauvignon Blanc or a light Prosecco can elevate the experience, adding a touch of sophistication.
– Coffee: A rich, dark roast coffee balances the sweetness and acidity, making for a comforting pairing.
Storing Leftovers: Best Practices for Keeping the Jars Fresh
If you have leftovers (which is rare, but possible!), store the jars in the refrigerator with a tight-fitting lid. The chilled filling and whipped cream can last up to 3 days, but keep in mind that the whipped cream may lose some of its texture. To refresh it, you can whip up another small batch of cream to add on top before serving.
Conclusion
The Lemon Zest Delight: Cream Pie in a Jar is not just a treat for the palate but also a feast for the eyes. With its combination of textures and flavors, this dessert encapsulates the essence of summer in a convenient jar. Perfect for any occasion, it offers a refreshing and satisfying experience that your guests will love. Whether you’re hosting a gathering or looking to indulge yourself, this recipe will consistently deliver a delightful dessert that is both easy to prepare and hard to resist. Enjoy the bright, zesty flavors and the creamy goodness of this charming dessert, and let it become a staple in your culinary repertoire.
Embrace the joy of creating something beautiful and delicious. With each layer of lemony filling and fluffy cream, you’re not just serving dessert—you’re sharing a moment of happiness and creativity. So roll up your sleeves, gather your ingredients, and get ready to delight your friends and family with this irresistible Lemon Zest Delight.