
Mini Grilled Cheese & Tomato Skewers: A Fun and Flavorful Twist on a Classic Snack
Introduction
In the world of appetizers and finger foods, few dishes can compete with the timeless appeal of grilled cheese sandwiches. This iconic comfort food has warmed hearts and filled bellies for generations, often evoking memories of childhood lunches and cozy family gatherings. However, as culinary creativity continues to flourish, it’s time to elevate this classic dish to new heights with a modern twist. Enter the Mini Grilled Cheese & Tomato Skewers—an inventive take that combines gooey cheddar cheese, crispy bread, and juicy cherry tomatoes on a stick, offering a delightful blend of flavors and textures.
Perfect for a variety of occasions, these skewers are not just for kids; they are a hit at parties, a charming addition to picnics, and a fun treat for a cozy night in. The combination of warm, melted cheese and the burst of tartness from fresh tomatoes creates a mouthwatering experience that is both satisfying and visually appealing. In this post, we will delve into the essential ingredients, detailed preparation methods, and serving suggestions for these Mini Grilled Cheese & Tomato Skewers, ensuring that you can easily recreate this delicious dish in your own kitchen.
Understanding the Ingredients
To achieve the perfect Mini Grilled Cheese & Tomato Skewers, it’s crucial to select the right ingredients. Each component plays a significant role in the overall flavor and texture of the dish, so let’s explore the key elements that come together to make this snack truly extraordinary.
– Bread Options: The foundation of any grilled cheese is the bread, and there are several enticing options to choose from. Sourdough bread offers a tangy flavor and a crispy crust that pairs beautifully with melted cheese. Whole grain bread adds a nutty taste and a hearty texture, making it a healthier alternative. Meanwhile, classic white bread provides a soft and fluffy base that allows the cheese to shine. Each type of bread brings its own unique characteristics to the skewers, so consider your personal preference and the overall flavor profile you wish to achieve.
– Cheese Selection: When it comes to cheese, cheddar is the star of the show in this recipe. Its sharp, rich flavor and excellent melting properties make it a perfect choice for grilled cheese. However, there are plenty of alternatives if you’re looking to mix things up. Gouda, fontina, or even pepper jack cheese can add a unique twist, introducing different flavor nuances that cater to diverse palates. Feel free to experiment with combinations to find the perfect blend that suits your taste.
– Cherry Tomatoes: The freshness of cherry tomatoes is key to balancing the richness of the cheese. Their sweet, juicy burst adds an element of brightness and acidity to the dish, making each bite a harmonious experience. Opt for in-season tomatoes for the best flavor, as they will provide that sought-after freshness. Additionally, consider using heirloom varieties for an extra pop of color and taste.
– Garlic Butter Mixture: To elevate the flavors of your skewers, a garlic butter mixture is essential. Combining butter with garlic powder, salt, and pepper creates a savory spread that enhances the bread and adds depth to the overall flavor profile. The garlic brings an aromatic quality that complements the cheese and tomatoes perfectly. You can also customize this mixture with herbs or spices to suit your preferences.
– Basil Garnish: While optional, a sprinkle of fresh basil can transform your Mini Grilled Cheese & Tomato Skewers from ordinary to extraordinary. Basil adds a vibrant note and a fragrant aroma that enhances the dish’s appeal. When selecting basil, choose leaves that are bright and fragrant, as they will contribute to the overall freshness of the skewers.
Preparation Steps
Crafting Mini Grilled Cheese & Tomato Skewers is not only easy but also incredibly enjoyable. Follow these detailed steps to prepare your skewers for a delightful snacking experience.
1. Cutting the Bread and Cheese: Start by preparing your bread and cheese. Depending on the type of bread you choose, cut it into bite-sized squares, typically around 1 to 1.5 inches. This size ensures that they fit perfectly on the skewers and are easy to handle. For the cheese, slice it into cubes of similar size to the bread. This uniformity is essential for even melting and consistent flavor in each skewer. If you’re using a softer cheese like Gouda or fontina, be gentle while slicing to maintain the integrity of the cheese.
2. Assembling the Skewers: Once you have your bread and cheese cut, it’s time to assemble the skewers. Take a skewer and thread a piece of bread onto it, followed by a cube of cheese, and then a cherry tomato. Repeat this pattern until the skewer is filled, leaving enough space at each end for easy handling. A good rule of thumb is to aim for three to four sets of bread, cheese, and a tomato on each skewer, depending on the length of your skewers.
3. Applying the Garlic Butter Mixture: In a small bowl, prepare your garlic butter mixture by combining softened butter, garlic powder, salt, and pepper. Mix thoroughly until well combined. Using a brush or a spatula, generously coat the assembled skewers with the garlic butter mixture, ensuring that both the bread and cheese are well covered. This step not only enhances the flavor but also helps achieve a beautifully golden-brown crust when grilled.
4. Grilling the Skewers: Preheat your grill or grill pan over medium heat. Once heated, place the skewers on the grill, making sure they have enough space between them to cook evenly. Grill for about 2-3 minutes on each side, or until the bread is golden brown and the cheese is melty. Keep a close eye on them, as grilling times can vary based on the heat of your grill and the thickness of your bread.
By following these initial steps, you are well on your way to creating a delicious and visually stunning appetizer that will impress your guests and satisfy your cravings. Stay tuned for the next part of this article, where we will explore serving suggestions and tips for making the most of your Mini Grilled Cheese & Tomato Skewers.
{{image_2}}
Creating the Garlic Butter
To elevate the flavor of your Mini Grilled Cheese & Tomato Skewers, it all begins with a delicious garlic butter mixture. This simple yet effective combination not only enhances the taste but also provides a beautiful golden crust when grilled.
Ingredients for Garlic Butter
– 1/2 cup unsalted butter, softened
– 3-4 cloves of fresh garlic, minced
– 1 tablespoon fresh parsley, chopped (optional)
– Salt and pepper to taste
Instructions for Garlic Butter
1. Combine Ingredients: In a medium-sized mixing bowl, add the softened butter, minced garlic, and chopped parsley. Mix thoroughly using a fork or spatula until the garlic is evenly distributed throughout the butter.
2. Season: Add a pinch of salt and pepper to taste. This seasoning will enhance the overall flavor of the skewers, so don’t skip this step!
3. Taste Test: It’s always a good idea to taste your garlic butter. Adjust the seasoning if necessary, adding more garlic for a bolder flavor or more butter if you prefer a milder taste.
4. Set Aside: Once mixed, set the garlic butter aside. This will be used to brush the skewers before grilling, ensuring they achieve that irresistible flavor and aroma.
Assembling the Skewers
Now that you have your garlic butter ready, it’s time to assemble the skewers. This step is crucial for ensuring that each bite delivers the perfect combination of melted cheese, juicy tomato, and crunchy bread.
Ingredients for Skewers
– Crusty bread, cut into bite-sized cubes
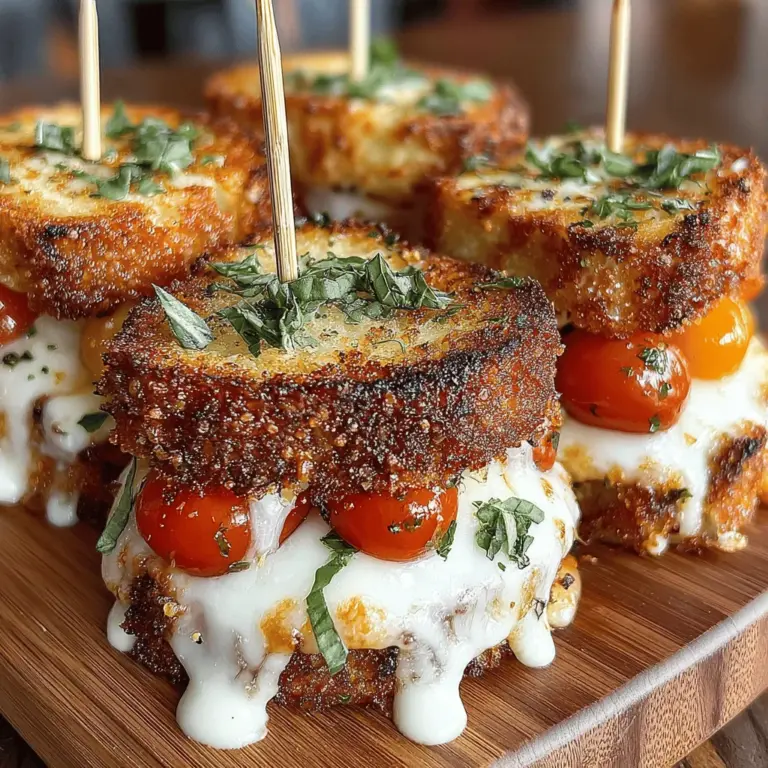
– Fresh mozzarella cheese, cut into cubes
– Cherry tomatoes
– Fresh basil leaves (optional)
Instructions for Assembling
1. Prepare the Skewers: If you’re using wooden skewers, soak them in water for about 30 minutes before grilling to prevent burning. Metal skewers can be used directly.
2. Threading the Ingredients: Begin by threading a cube of bread onto the skewer, followed by a cube of mozzarella cheese, a cherry tomato, and a basil leaf if desired. Repeat this process until the skewer is filled, leaving a little space at each end for easy handling.
3. Optimize for Flavor: Ensure that the cheese is nestled snugly between the bread and tomato to help it melt beautifully during grilling. The layering creates a delightful balance of flavors in each bite.
4. Repeat: Continue assembling skewers until you’ve used up all your ingredients. Aim for about 4-5 pieces per skewer for a hearty bite.
Cooking Techniques
Preheating the Grill or Skillet
Before you start grilling, it’s essential to preheat your grill or skillet. This step is vital to achieving that perfect golden crust while ensuring the cheese melts adequately.
1. Grill: Preheat your outdoor grill over medium heat for about 10 minutes. If using a grill pan, heat it over medium heat on the stovetop.
2. Skillet: If opting for a skillet, add a little oil or cooking spray to prevent sticking and heat it until hot.
Grilling Process
With your skewers assembled and the cooking surface hot, it’s time to grill!
1. Brush with Garlic Butter: Generously brush each skewer with the prepared garlic butter mixture. This not only adds flavor but also helps achieve a beautiful crust.
2. Grill the Skewers: Place the skewers on the grill or skillet. Cook each side for about 2-3 minutes, turning until all sides are golden brown.
3. Monitor the Temperature: Keep an eye on the heat; if it’s too high, the bread may burn before the cheese melts. A medium heat allows for a nice golden finish while ensuring the cheese becomes gooey.
Visual Cues
– Color: Look for a deep golden-brown color on the bread as an indicator that they are nearly finished.
– Cheese Melting: Check for signs of melted cheese oozing out of the sides. This means it’s time to remove them from the grill.
– Timing: On average, the entire grilling process should take about 6-8 minutes, but times may vary based on your grill or skillet.
Serving Suggestions
Presenting your Mini Grilled Cheese & Tomato Skewers in an appealing manner will enhance the overall dining experience.
Plating the Skewers
– Arrange Thoughtfully: Place the skewers on a large platter, alternating directions for visual interest.
– Garnish: Sprinkle fresh herbs like parsley or basil on top for a touch of color and freshness.
Dipping Sauces
Enhance the flavor experience by offering complementary dipping sauces:
– Marinara Sauce: A classic choice for a tomato-based dip that pairs well with cheese.
– Balsamic Reduction: Drizzle a balsamic reduction on the side for a tangy contrast.
– Pesto: A fresh basil pesto can add a delightful flavor dimension.
Pairing Suggestions
To create a well-rounded meal, consider pairing your skewers with:
– Beverages: A crisp white wine, such as Sauvignon Blanc, or a refreshing iced tea will complement the flavors beautifully.
– Side Dishes: A simple side salad or roasted vegetables can provide a nice contrast to the richness of the skewers, making for a complete meal.
Conclusion
Mini Grilled Cheese & Tomato Skewers are not only a fun twist on a classic favorite but also a versatile dish that can be enjoyed in various settings. With the perfect balance of flavors and textures, this recipe is sure to please both kids and adults alike. Whether you’re hosting a gathering or looking for a simple snack, these skewers are an excellent choice that brings joy to any occasion. Enjoy the process, and savor the delightful bites of this beloved comfort food transformed into a new experience. With the right ingredients and a little creativity, you can elevate this classic dish into a memorable culinary experience that will keep your friends and family coming back for more.
