
Title: Crunchy Garlic Bliss Chips: A Deliciously Simple Recipe for Any Occasion
Introduction
In the world of snacking, few delights can rival the irresistible allure of Crunchy Garlic Bliss Chips. This versatile and delicious recipe transforms everyday ingredients into a mouthwatering treat that is perfect for any occasion. Whether you’re hosting a casual gathering, enjoying a cozy night in, or simply seeking a satisfying snack, these homemade chips promise to elevate your culinary experience.
The charm of homemade chips lies in their ability to combine simplicity with flavor, allowing you to indulge without the guilt associated with store-bought snacks. Crunchy Garlic Bliss Chips harness the aromatic appeal of garlic, offering a fragrant, savory experience that will tantalize your taste buds. The ease of preparation makes this recipe accessible to cooks of all skill levels, while the perfect balance of flavors ensures that every bite is a delightful journey.
As we delve into the preparation of this delectable snack, you’ll discover how a handful of common ingredients can come together to create a gourmet experience in your own kitchen.
Understanding the Ingredients
To create the perfect Crunchy Garlic Bliss Chips, it’s essential to understand the role of each ingredient in this tantalizing recipe. The heart of the dish lies in its simplicity, relying on a few key components that work harmoniously to deliver an explosion of flavor.
Bread: The Perfect Base for Chips
The foundation of any great chip is, of course, the bread. When it comes to selecting the ideal bread for this recipe, both French baguettes and Italian loaves are excellent choices. Their sturdy crusts provide a satisfying crunch, while their interiors are soft enough to absorb the flavors of the accompanying ingredients. The choice between these two types can influence the overall texture and taste of your chips, so consider your preferences carefully.
For the best results, aim for bread that is slightly stale or day-old. Stale bread not only holds up better in the baking process but also enhances the overall crunchiness of the chips. Fresh bread, while tempting, may result in a chewy texture that doesn’t achieve the crispy perfection desired in a chip.
Unsalted Butter: Flavor Control
Unsalted butter plays a crucial role in this recipe, serving as a rich and creamy base for the garlic and herbs. Opting for unsalted butter gives you greater control over the overall flavor profile of your chips. Salted butter can lead to an overpowering saltiness that masks the delicate nuances of garlic and herbs. By using unsalted butter, you can adjust the seasoning according to your taste, ensuring a perfectly balanced chip.
Garlic: The Star Ingredient
Garlic is undoubtedly the star of the show in Crunchy Garlic Bliss Chips. Its robust flavor adds depth and aroma, transforming the humble chip into a culinary delight. Fresh garlic is highly recommended for this recipe, as it delivers a pungent, vibrant flavor that pre-minced options simply cannot match. When preparing the garlic, consider mincing it finely to allow its oils to infuse the butter fully, creating a luscious garlic butter that coats each chip evenly.
Herbs: Enhancing Taste with Oregano and Basil
To elevate the flavor profile even further, herbs like oregano and basil are introduced into the mix. These herbs complement the garlic beautifully, adding layers of complexity and an aromatic freshness that enhances the overall taste of the chips. Oregano brings a warm, earthy note, while basil contributes a sweet, slightly peppery flavor. Together, they create a delightful harmony that takes these chips from ordinary to extraordinary.
Optional Red Pepper Flakes: Adding Spice
For those who enjoy a little heat, optional red pepper flakes can be sprinkled into the garlic butter mixture. This addition introduces a subtle kick that balances the richness of the butter and the sharpness of the garlic. Adjust the amount according to your personal preference—just a pinch can go a long way in transforming the flavor profile of your chips.
Parmesan Cheese: Richness and Depth
Finally, for a touch of indulgence, grated Parmesan cheese can be incorporated into the garlic butter mixture. This ingredient not only adds a savory richness but also contributes a delightful umami flavor that enhances the overall depth of the chips. The cheese will melt slightly during baking, creating a golden, crispy layer that clings to each chip, ensuring that every bite is packed with flavor.
Nutritional Benefits of the Ingredients
Beyond their deliciousness, Crunchy Garlic Bliss Chips also offer some nutritional benefits worth noting. Whole-grain bread provides fiber and essential nutrients, while garlic is renowned for its health benefits, including potential immune system support and cardiovascular health. Herbs like oregano and basil are not only flavorful but also rich in antioxidants. By making these chips at home, you can enjoy a snack that is not only satisfying but also aligned with a more wholesome approach to eating.
Preparation Steps in Detail
Preheating the Oven: The Importance of Proper Temperature
Before diving into the preparation of your Crunchy Garlic Bliss Chips, the first step is to preheat your oven. Setting the oven to the right temperature is crucial for achieving that perfect crispy texture. A preheated oven ensures that the chips cook evenly and develop a desirable golden-brown color without becoming overly dry. Aim for a temperature of around 375°F (190°C) to strike the right balance between crispiness and flavor.
Preparing the Bread: Techniques for Perfect Slices
Once the oven is preheated, it’s time to prepare the bread. To create the ideal chips, uniformity in thickness is key. The best types of bread for this recipe include a fresh French baguette or a classic Italian loaf.
Using a sharp bread knife, slice the bread into even pieces, ideally about 1/4 inch thick. This thickness allows for optimal crunch without sacrificing the bread’s soft interior. If you’re using a baguette, consider cutting it diagonally to create larger chips that are perfect for dipping. For an Italian loaf, straight cuts will yield delightful, bite-sized pieces.
Remember that even slices will bake more uniformly, so take your time with this step for the best results.
Creating the Garlic Butter: Flavor Fusion
Now that your bread is ready, it’s time to create the garlic butter that will bring your Crunchy Garlic Bliss Chips to life. In a mixing bowl, combine softened unsalted butter with minced fresh garlic, dried oregano, dried basil, and, if desired, a sprinkle of red pepper flakes.
The proportions can be adjusted based on your taste preferences, but a good starting point is about 1/2 cup of butter, 4-5 cloves of garlic, and a teaspoon each of oregano and basil. Mix these ingredients thoroughly until you achieve a smooth, fragrant garlic butter.
It’s important to use fresh garlic in this mixture, as it provides a vibrant flavor that elevates the chips. Pre-minced garlic lacks the same potency and can introduce a metallic taste that detracts from the overall experience. Once the garlic butter is well combined, you’re ready to move on to the next step of assembling your chips.
With these foundational steps laid out, you are well on your way to creating a batch of Crunchy Garlic Bliss Chips that are sure to impress. The combination of fresh ingredients and simple techniques will yield a snack that is both satisfying and full of flavor, making it a perfect addition to any gathering or a delightful treat for yourself. Stay tuned for the next part of this article, where we will delve into the final preparation steps, baking process, and serving suggestions that will make your homemade chips a standout snack.
{{image_2}}
Coating the Bread: Achieving Maximum Flavor
The foundation of your Crunchy Garlic Bliss Chips lies in the garlic butter coating. This step is crucial for infusing the bread with a rich, savory flavor that will shine through after baking. Begin by preparing your garlic butter mixture, ensuring that it is well-blended. A smooth consistency helps in achieving an even application across the bread pieces.
Techniques for Even Application of the Garlic Butter
To achieve a perfect coating, use a pastry brush to apply the garlic butter evenly on both sides of each bread slice. This method not only ensures that every bite is packed with flavor but also helps the chips crisp up beautifully in the oven. If you don’t have a pastry brush, a spoon can also do the trick—just make sure to spread the mixture generously.
The Impact of Thorough Coating on Flavor Absorption
A thorough coating is key to flavor absorption. When the garlic butter seeps into the bread, it enhances the overall taste profile of your chips. The garlic and herbs meld together, creating a harmonious blend that will elevate your snack. Leaving some butter behind on the baking sheet is permissible; it will melt and bubble as the chips bake, adding extra flavor and crunch.
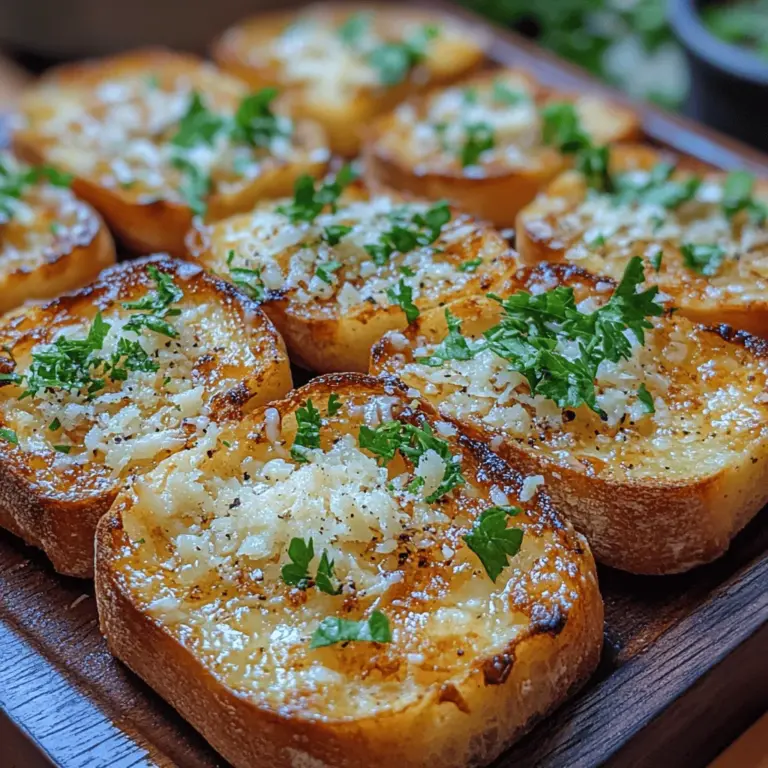
Adding Cheese: Understanding Cheese Melting
Once your bread is coated, it’s time to elevate the flavor profile by adding cheese. Grated Parmesan is a perfect choice for this recipe due to its excellent melting properties and rich, nutty flavor.
The Importance of Grated Parmesan versus Block Cheese
Using grated Parmesan rather than block cheese is essential for even distribution across the bread. Grated cheese melts more uniformly and adheres better to the garlic butter, ensuring that every chip gets a delightful cheesy crunch. While block cheese can be used, it may not melt as evenly, resulting in inconsistent flavor and texture throughout the batch.
Impact of Cheese on the Overall Flavor and Texture
Cheese contributes significantly to both flavor and texture. The nutty, salty notes of Parmesan complement the garlic, while the melting process adds a creamy texture that contrasts beautifully with the crispy chips. This combination creates a satisfying mouthfeel that keeps you reaching for more.
Baking: The Perfect Timing for Crunchiness
The baking process is where your Crunchy Garlic Bliss Chips transform from simple bread slices into a crunchy, flavorful snack. Preheat your oven to 375°F (190°C) to ensure even cooking.
Discuss the Baking Process and How to Monitor for Doneness
Arrange the prepared bread slices on a baking sheet lined with parchment paper, ensuring they are spaced out evenly. This allows hot air to circulate and promote even browning. Bake for about 10-15 minutes, keeping a close eye on the chips as they approach the end of the baking time. The goal is to achieve a golden-brown color and a crispy texture.
Tips for Achieving the Ideal Golden-Brown Color
To achieve the ideal golden-brown color, consider flipping the chips halfway through the baking process. This allows both sides to brown evenly. If you prefer an extra crunch, you can turn on the broiler for the last 1-2 minutes of baking—just be cautious to avoid burning.
Cooling and Garnishing: Final Touches
Once your chips are baked to perfection, it’s crucial to allow them to cool before serving. Cooling helps firm up the chips, ensuring they maintain their crispness.
The Importance of Cooling for Texture
Allow the chips to cool on the baking sheet for a few minutes before transferring them to a wire rack. This prevents steam from building up underneath, which can lead to sogginess. A wire rack allows air to circulate around the chips, keeping them crunchy.
Discuss the Visual Appeal of Fresh Parsley as a Garnish
For a finishing touch, consider garnishing your Crunchy Garlic Bliss Chips with freshly chopped parsley. Not only does it add a pop of vibrant color, but the herb also provides a fresh contrast to the rich flavors of garlic and cheese. A sprinkle of parsley elevates the dish visually and adds an aromatic quality that enhances the overall dining experience.
Serving Suggestions
Ideal Pairings: What to Serve with Crunchy Garlic Bliss Chips
These chips are versatile and can be served in numerous ways. They make for an excellent appetizer or snack, perfect for sharing at gatherings or enjoying during a cozy movie night at home.
Explore Various Dips that Complement the Chips
Consider pairing your Crunchy Garlic Bliss Chips with a variety of dips to enhance their flavor. Some excellent options include:
– Hummus: The creamy texture and nutty flavor of hummus provide a great balance to the crisp chips.
– Guacamole: The rich and creamy avocado dip pairs beautifully with the garlic and cheese flavors.
– Salsa: A fresh tomato salsa adds a zesty punch that complements the savory chips perfectly.
Suggestions for Serving at Gatherings, Parties, or as a Snack
For gatherings, serve the chips in a large bowl, family-style, encouraging guests to dig in. For a more refined presentation, consider serving them on a wooden platter with small bowls of dips. These chips can also be enjoyed solo as a satisfying snack any time of day.
Storing Leftovers
Best Practices for Storing Chips
If you happen to have any leftover Crunchy Garlic Bliss Chips, storing them properly is essential to maintain their crunch. Allow the chips to cool completely before storing them in an airtight container. This helps prevent moisture from making them soggy.
Tips for Reheating to Restore Texture
If you want to enjoy them later, reheating is key to restoring their original texture. Preheat your oven to 350°F (175°C) and spread the chips on a baking sheet. Heat them for about 5-7 minutes, or until they are crispy again. Avoid using the microwave, as it can lead to a chewy, undesirable texture.
Conclusion
Making Crunchy Garlic Bliss Chips at home is not only a simple process but also a rewarding one. With just a few ingredients and minimal effort, you can create a delicious and flavorful snack that impresses family and friends alike. The satisfaction of crafting your own chips, infused with garlic and cheese, is a culinary experience worth exploring.
I encourage you to experiment with variations—try different herbs, spices, or even types of cheese to discover your perfect blend. Enjoy the process of cooking, and most importantly, savor every crunchy bite of your homemade Garlic Bliss Chips.
