Introduction
Chicken Parmesan is a cherished dish that has won the hearts of many food lovers around the globe. Its roots trace back to Italian-American cuisine, where tender chicken cutlets are coated in breadcrumbs, fried to a golden crisp, and smothered in marinara sauce and melted cheese. This classic comfort food is not only delicious but also versatile, making it a favorite for both casual family dinners and special occasions.
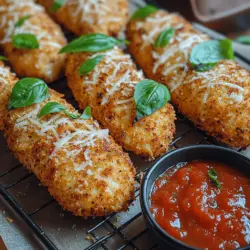
Enter Chicken Parmesan Fingers—a fun and innovative twist on the beloved classic. These crispy chicken strips maintain the essence of the traditional dish while offering a convenient and playful presentation. Perfect for dipping in marinara sauce or enjoying as a satisfying snack, Chicken Parmesan Fingers make for an ideal appetizer or a quick meal that will please both adults and kids alike.
Homemade versions of Chicken Parmesan Fingers allow you to control the ingredients, ensuring better taste and healthier options than many store-bought alternatives. In this article, we’ll guide you through the process of creating your own crispy chicken delights, detailing each ingredient’s role, nutritional benefits, and the steps to achieve that perfect crunch. Get ready to dive into a mouthwatering recipe that brings the classic flavors of Chicken Parmesan into a fun finger food format.
Understanding Chicken Parmesan
History and Origins of Chicken Parmesan
The origins of Chicken Parmesan can be linked to the culinary traditions of Southern Italy, where dishes featuring breaded and fried meats are commonplace. However, it was in the United States, particularly within Italian-American communities, that Chicken Parmesan truly flourished. The dish typically features breaded chicken cutlets topped with marinara sauce and a generous layer of mozzarella cheese, baked until bubbly. Its rise in popularity coincided with the increase in Italian immigration during the late 19th and early 20th centuries, as these immigrants brought their rich culinary traditions to American shores.
Traditional Chicken Parmesan Versus Chicken Parmesan Fingers
While the traditional Chicken Parmesan is often served as a hearty entree, the Chicken Parmesan Fingers transform this classic dish into bite-sized delights. This variation allows for easier eating, making it a perfect option for parties, game day snacks, or a quick meal on-the-go. The flavors remain the same, with the crispy breading and savory cheese that fans adore, but the presentation is more casual. Moreover, Chicken Parmesan Fingers can be tailored to different preferences, offering a fun way to enjoy a familiar taste in a new form.
Nutritional Benefits of Homemade Chicken Recipes
One of the significant advantages of preparing Chicken Parmesan Fingers at home is the ability to customize the ingredients according to your dietary needs and preferences. Homemade versions allow you to select fresh, high-quality chicken, control the amount of oil used for frying, and choose healthier alternatives for breading. By opting for whole-grain breadcrumbs or adding herbs and spices, you can enhance the nutritional profile of the dish. Additionally, making chicken dishes at home can help reduce sodium and preservatives that are often found in store-bought options, making your meal not only tastier but also healthier.
Ingredients Breakdown
Creating the perfect Crispy Chicken Parmesan Fingers starts with selecting the right ingredients. Each component plays a vital role in achieving the desired flavor and texture. Here’s a breakdown of the essential ingredients you’ll need:
Boneless, Skinless Chicken Breasts
The star of the dish, boneless, skinless chicken breasts, is favored for its lean protein content and versatility. When selecting chicken breasts, look for ones that are firm and have a pinkish hue. Avoid those that appear discolored or have a foul odor. To ensure even cooking and optimal tenderness, slice the chicken breasts into uniform strips.
All-Purpose Flour
All-purpose flour serves an essential role in the breading process, helping the egg mixture adhere to the chicken strips. A light dusting of flour creates a barrier that keeps the moisture inside the chicken while contributing to the overall crispiness of the coating. When using flour, make sure to season it lightly with salt and pepper, as this will help enhance the flavors of the chicken.
Eggs
Eggs are crucial for binding the breadcrumbs to the chicken. They provide moisture and act as an adhesive, ensuring that the breading sticks during the cooking process. Beating the eggs until they are well-combined creates a smooth mixture that envelopes the chicken strips evenly.
Panko Breadcrumbs
Panko breadcrumbs are a game-changer when it comes to achieving that coveted crispy texture. Unlike traditional breadcrumbs, panko is larger and coarser, resulting in a lighter, crunchier coating. This Japanese-style breadcrumb adds an extra layer of crispness that elevates the Chicken Parmesan Fingers to another level of deliciousness.
Parmesan Cheese
Parmesan cheese is essential for flavor enhancement. Its sharp, nutty taste pairs perfectly with the chicken and adds depth to the dish. When selecting Parmesan, opt for a block that you can grate yourself for the best flavor and freshness. You can also use a blend of cheeses, such as mozzarella or provolone, to introduce additional flavors and textures.
Italian Seasoning Blend, Garlic Powder, Salt, and Pepper
The magic of this recipe truly shines through the seasoning. A blend of Italian herbs, garlic powder, salt, and pepper not only enhances the flavor of the chicken but also infuses it with the classic Italian essence that Chicken Parmesan is known for. Feel free to adjust the seasoning according to your taste preferences, and consider adding a pinch of red pepper flakes for a spicy kick.
Optional Ingredients and Variations
While the ingredients listed above form the foundation of the dish, there are numerous ways to customize your Chicken Parmesan Fingers. For a different flavor profile, consider using different types of cheese such as smoked gouda or feta. You can also experiment with various spices, such as paprika or oregano, to create a unique twist. For a healthier option, try baking the chicken fingers instead of frying them, or substitute the all-purpose flour with almond flour or whole wheat flour for added nutrition.
Preparation Steps
Now that we’ve covered the ingredients, it’s time to dive into the preparation process. Following these steps carefully will ensure that your Crispy Chicken Parmesan Fingers turn out perfectly every time.
Preheating the Oven
Before you get started on the breading process, it’s essential to preheat your oven to the right temperature—typically around 400°F (200°C). Preheating ensures that the chicken fingers cook evenly and achieve that perfect crispy texture. If you plan to bake the chicken instead of frying it, preheating is crucial for proper cooking and browning.
Setting Up the Breading Station
Creating a well-organized breading station is key to successfully coating your chicken strips. Set up three shallow bowls: one for the seasoned flour, one for the beaten eggs, and one for the panko breadcrumbs mixed with grated Parmesan cheese and additional spices. This assembly line approach will streamline the breading process and help you maintain a clean workspace.
Step-by-Step Guide on Coating the Chicken Strips
1. Prepare the Chicken: Take your sliced chicken strips and season them lightly with salt and pepper. This initial seasoning will enhance the overall flavor of the chicken.
2. Coat in Flour: Working with one chicken strip at a time, dredge it in the seasoned flour, ensuring that it’s evenly coated. Shake off any excess flour before moving on to the next step.
3. Dip in Eggs: Next, dip the floured chicken strip into the beaten eggs, making sure it’s fully submerged. Allow any excess egg to drip off before proceeding.
4. Coat in Panko Mixture: Finally, roll the chicken strip in the panko and Parmesan mixture, pressing gently to ensure a good coating. This step is crucial for achieving that crunchy texture. Place the coated chicken fingers on a baking sheet lined with parchment paper or a lightly greased baking dish.
5. Repeat the Process: Continue this process until all chicken strips are coated and ready for cooking.
With each step meticulously followed, your Crispy Chicken Parmesan Fingers will be primed for cooking, whether you choose to fry them for a golden crunch or bake them for a healthier option. Stay tuned for the next part of this article, where we’ll cover the cooking methods and serving suggestions to complete your delicious platter of Chicken Parmesan Fingers.
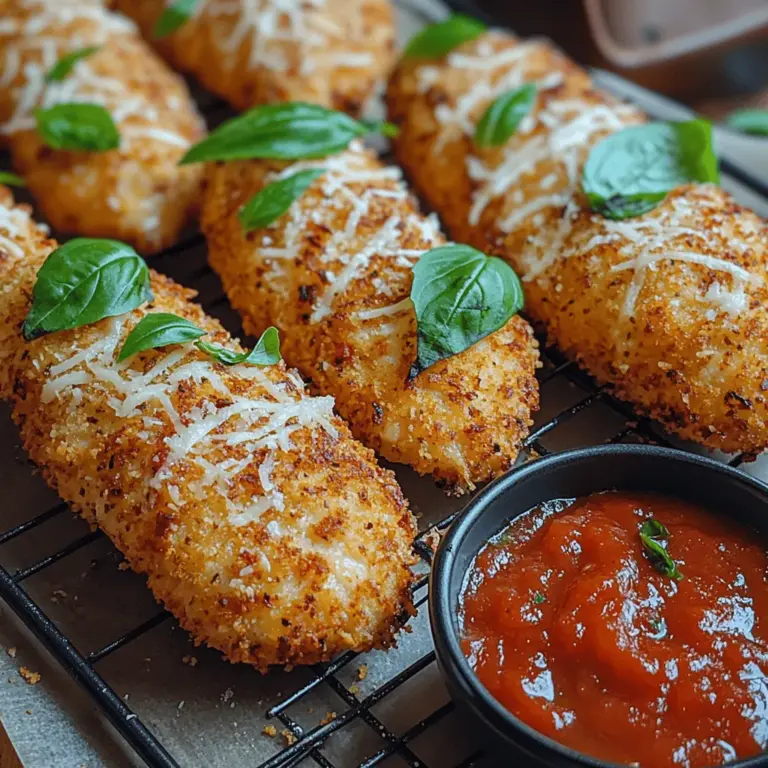
{{image_2}}
Crispy Chicken Parmesan Fingers are not just a delicious dish; they are a testament to the joy of home cooking. With a perfect crunch, melty cheese, and rich marinara, these chicken fingers elevate the classic chicken parmesan into a finger-food delight. Let’s delve into the essential steps to achieve the perfect crispy texture, explore tips for maintaining a clean workspace, and discover how to serve this dish beautifully.
Importance of Coating Technique for Texture
The coating technique is crucial for achieving the desired crispy texture of Chicken Parmesan Fingers. The classic three-step breading process involves dredging the chicken in flour, dipping it in egg, and then coating it with breadcrumbs mixed with grated Parmesan cheese. Each step plays a significant role:
1. Flour: This first layer helps the egg adhere to the chicken. It should be seasoned with salt and pepper for added flavor.
2. Egg: The egg wash binds the breadcrumbs to the chicken, ensuring a thick, crunchy coating.
3. Breadcrumbs: Using a combination of regular and panko breadcrumbs can enhance texture, as panko provides a lighter, airier crunch.
By carefully following this coating technique, your Chicken Parmesan Fingers will have an irresistible crunch that perfectly contrasts with the juicy chicken inside.
Tips for Maintaining a Clean Workspace
Cooking can be messy, but maintaining a clean workspace will make your cooking experience more enjoyable. Here are some practical tips:
– Mise en Place: Before you start cooking, prepare all your ingredients. This organization will minimize mess and prevent confusion while cooking.
– Use Separate Bowls: Use different bowls for flour, egg, and breadcrumbs to avoid cross-contamination. This also makes the breading process more efficient.
– Clean as You Go: Keep a damp cloth or paper towel nearby to wipe down surfaces as you work. This practice will ensure that your workspace remains tidy and safe.
– Designate Cleanup Time: Set aside a few minutes at the end of cooking to clean up any spills or messes. This will help you enjoy your meal without the stress of a messy kitchen.
Placing on Baking Rack: Benefits of Using a Wire Rack for Cooking
When preparing to bake your Chicken Parmesan Fingers, using a wire rack is highly beneficial. Here’s why:
– Air Circulation: A wire rack elevates the chicken fingers, allowing hot air to circulate around them during baking. This technique ensures that all sides of the chicken cook evenly and remain crispy, rather than becoming soggy from sitting in excess oil or moisture.
– Even Cooking: By preventing direct contact with the baking sheet, a wire rack helps maintain an even temperature, resulting in a perfectly cooked product.
– Easy Clean-Up: Using a wire rack can also simplify clean-up, as drippings are contained below, making washing the baking sheet easier.
Baking Process
Baking the Chicken Fingers
To bake your Chicken Parmesan Fingers to perfection, follow these steps:
1. Preheat your oven to 400°F (200°C). This temperature is ideal for achieving a crispy exterior while ensuring the chicken cooks through.
2. Arrange the coated chicken fingers on the prepared wire rack, ensuring they are spaced apart to allow for air circulation.
3. Bake for 15-20 minutes, flipping the chicken fingers halfway through. Flipping is essential for even cooking; it allows both sides to brown and crisp up perfectly.
Importance of Flipping Halfway for Even Cooking
Flipping the chicken fingers halfway through the baking process ensures that both sides receive equal heat exposure. This step is critical for achieving that golden-brown color and crispy texture that everyone loves.
Visual Cues for Doneness: Golden Color and Internal Temperature
You’ll know your Chicken Parmesan Fingers are done when they reach a golden-brown color and an internal temperature of 165°F (75°C). Use a meat thermometer to check the temperature at the thickest part of the chicken. If you don’t have a thermometer, look for a crispy exterior and ensure that the juices run clear when pierced with a fork.
Heating the Marinara Sauce
While the chicken fingers are baking, it’s time to heat the marinara sauce. Here’s how to enhance store-bought sauces:
– Fresh Ingredients: Add sautéed garlic, chopped onions, or fresh basil to the sauce to elevate its flavor. Simmer the sauce on medium heat until warmed through.
– Spices: Enhance the taste with a pinch of Italian seasoning, red pepper flakes for heat, or a splash of balsamic vinegar for brightness.
Alternative Dipping Sauces for Variety
While marinara is a classic choice, consider offering a variety of dipping sauces to cater to different tastes:
– Garlic Aioli: A creamy garlic sauce that pairs beautifully with the crispy chicken.
– Honey Mustard: The sweetness of honey mustard contrasts nicely with the savory chicken.
– Buffalo Sauce: For those who like a kick, serve with spicy buffalo sauce for a flavorful twist.
Serving Suggestions
Presentation Tips for an Attractive Serving
Presentation can elevate your meal, making it more appealing. Here are some tips:
– Vibrant Plates: Use colorful plates that contrast with the golden chicken fingers. White plates can make the colors pop, while dark plates add elegance.
– Garnishes: Fresh herbs, such as parsley or basil, can add a touch of color and freshness. A sprinkle of grated Parmesan over the top right before serving can enhance the visual appeal.
Suggestions for Side Dishes that Pair Well with Chicken Parmesan Fingers
Complement your Chicken Parmesan Fingers with side dishes that balance the meal. Consider:
– Garlic Bread: A classic pairing that complements the marinara sauce.
– Mixed Green Salad: A fresh salad with a light vinaigrette can offset the richness of the chicken.
– Roasted Vegetables: Seasonal roasted vegetables can add color and nutrition to the plate.
Ideas for Incorporating Leftovers into Other Meals
If you have leftovers, here are some creative ways to incorporate them:
– Chicken Parmesan Wrap: Place the leftover chicken fingers in a wrap with lettuce, tomatoes, and ranch dressing for a quick meal.
– Pasta Dish: Chop the chicken fingers and toss them with pasta, marinara sauce, and cheese for a hearty pasta bake.
– Chicken Parmesan Salad: Slice the fingers over a bed of mixed greens with your favorite dressing for a delicious salad.
Nutritional Information
Breakdown of Calories and Macronutrients per Serving
For those watching their dietary intake, here’s a breakdown of the nutritional information for one serving of Chicken Parmesan Fingers (approximately 3 pieces):
– Calories: 325
– Protein: 30g
– Carbohydrates: 30g
– Fat: 10g
Comparison with Traditional Chicken Parmesan
Comparing this baked version with traditional fried Chicken Parmesan reveals significant health benefits. Traditional recipes often exceed 600 calories per serving, with higher fat and carbohydrate content due to frying and heavy sauces. By baking, you cut calories and fat while retaining flavors.
Discussion on Healthier Substitutions (e.g., Baking vs. Frying)
Baking Chicken Parmesan Fingers instead of frying not only reduces fat content but also results in a lighter texture. Consider these additional substitutions for a healthier meal:
– Whole Wheat Breadcrumbs: Substitute regular breadcrumbs with whole wheat for added fiber.
– Low-Fat Cheese: Use part-skim mozzarella for a lower-fat option without sacrificing flavor.
– Zucchini Noodles: Serve with spiralized zucchini instead of pasta for a low-carb alternative.
Conclusion
Making Chicken Parmesan Fingers at home is not just about preparing a meal; it’s about creating an experience filled with joy and satisfaction. The crispy texture, melty cheese, and flavorful marinara come together to form a dish that is sure to become a family favorite.
We encourage you to experiment with this recipe, adding your own twist to make it uniquely yours. Whether you’re serving it for a family dinner or a game day snack, Chicken Parmesan Fingers are a delightful option that proves meals can be both delicious and healthy. Embrace the kitchen, enjoy the process, and savor the rewards of your culinary efforts. Happy cooking!