Introduction
As the sun shines brightly and the temperature rises, there’s nothing quite like a refreshing treat to cool you down. Enter the Crunchy Peanut Butter Cookie Ice Cream Sandwiches—a delightful blend of two all-time favorites: peanut butter cookies and ice cream. This recipe embodies the essence of summer indulgence, offering a perfect combination of creamy, nutty flavors and a satisfying crunch. Whether enjoyed at a backyard barbecue, a picnic in the park, or simply as an after-dinner dessert, these ice cream sandwiches are sure to bring smiles to faces of all ages.
The base of our ice cream sandwiches consists of rich, buttery peanut butter cookies, which provide a wonderful foundation for the smooth and creamy ice cream filling. The balance of flavors and textures between the cookies and ice cream creates a deliciously harmonious experience that is both satisfying and refreshing. In this article, we will delve into the specifics of this recipe, breaking down each ingredient and the steps involved in crafting these delightful treats. We’ll also explore the history and variations of this classic dessert that has captured the hearts (and taste buds) of dessert lovers everywhere.
Understanding the Ingredients
To master the art of making Crunchy Peanut Butter Cookie Ice Cream Sandwiches, it is essential to understand the core components that contribute to their delightful taste and texture. Let’s take a closer look at the ingredients involved.
Exploring the Core Components of Peanut Butter Cookies
Peanut butter cookies are a beloved staple in the world of baking. Their rich flavor and satisfying texture make them an ideal choice for our ice cream sandwiches. Here’s a breakdown of the key ingredients that make these cookies so special:
The Role of Peanut Butter: Flavor and Texture
Peanut butter is the star ingredient in this recipe, providing both flavor and texture. It contributes a nutty richness that pairs beautifully with the sweetness of the cookies. When selecting peanut butter for this recipe, consider using a natural version that contains only peanuts and salt to ensure a more authentic peanut flavor. The creamy or crunchy variety can be used depending on your preference, with crunchy peanut butter adding an extra layer of texture.
Sugar: Sweetness and Structure
Sugar is not just a sweetener; it plays a crucial role in the structure of baked goods. In our peanut butter cookies, granulated sugar adds sweetness, while brown sugar contributes moisture and a hint of caramel flavor. The combination of both sugars creates a chewy, soft cookie that contrasts nicely with the cold ice cream filling.
The Importance of Eggs in Baking
Eggs are fundamental in baking as they help bind the ingredients together while also providing moisture. In this recipe, eggs contribute to the overall structure and texture of the cookies. When baked, the proteins in the eggs coagulate, helping the cookies hold their shape and achieve a tender crumb.
Flavor Enhancers: Vanilla Extract and Salt
Vanilla extract is a must-have flavor enhancer in many baking recipes, including peanut butter cookies. It adds a warm, aromatic essence that elevates the overall flavor profile. On the other hand, a pinch of salt balances the sweetness and enhances the nutty flavor of the peanut butter, making each bite even more delightful.
Leavening Agent: Baking Soda and Its Function
Baking soda serves as the leavening agent in our cookie recipe, helping the cookies rise and develop a light texture. It reacts with the acidity of the brown sugar and the natural oils in the peanut butter, creating carbon dioxide bubbles that give the cookies their fluffy appearance.
Examining the Ice Cream Filling
While the peanut butter cookies are undeniably delicious on their own, the ice cream filling is what truly transforms them into an indulgent treat. Here’s what to consider when selecting your ice cream:
Choosing the Right Ice Cream: Vanilla vs. Peanut Butter
The choice of ice cream is critical in achieving the perfect balance in our sandwiches. Vanilla ice cream provides a classic creamy base that complements the flavors of the peanut butter cookies. However, if you want to intensify the peanut flavor, consider using peanut butter ice cream. The combination of peanut butter cookies with peanut butter ice cream creates a rich and decadent experience that peanut butter lovers will adore.
Enhancing Texture and Flavor: Optional Add-ins
For an extra touch of flavor and texture, you can consider adding mix-ins to your ice cream before assembling the sandwiches. Chopped chocolate, crushed cookies, or even swirls of fudge can enhance the overall experience, providing delightful bursts of flavor in every bite.
The Science Behind Ice Cream Consistency
When making ice cream sandwiches, the consistency of the ice cream is crucial. You want it to be soft enough to spread easily between the cookies but firm enough to hold its shape. Allow your ice cream to soften at room temperature for about 5-10 minutes before assembling the sandwiches. This will make the process easier and ensure that the ice cream doesn’t melt too quickly once sandwiched between the cookies.
Coating Options for the Sandwiches
To take your Crunchy Peanut Butter Cookie Ice Cream Sandwiches to the next level, consider the finishing touches. Coating the edges of the sandwiches can add an appealing crunch and enhance the overall flavor.
The Crunch Factor: Chopped Peanuts and Other Toppings
Chopped peanuts are a natural choice for coating these sandwiches, as they complement the peanut butter flavor perfectly. When pressed into the sides of the ice cream sandwiches, they add a delightful crunch that contrasts beautifully with the creamy ice cream. Additionally, you can experiment with other toppings such as crushed pretzels or granola for a unique twist.
Creative Coating Alternatives: Sprinkles and Chocolate Chips
If you’re feeling adventurous, why not try some creative coating options? Colorful sprinkles can add a fun pop of color, making these sandwiches even more visually appealing—perfect for parties or special occasions. Chocolate chips, whether mini or regular-sized, can also provide an extra layer of sweetness and richness that complements the peanut butter flavor beautifully.
Step-by-Step Instructions
Now that we’ve covered the essential ingredients and considerations, it’s time to dive into the step-by-step instructions for creating your Crunchy Peanut Butter Cookie Ice Cream Sandwiches. Let’s get started!
Preheating and Preparing Your Workspace
Before you begin baking, it’s crucial to set up your workspace and preheat your oven. Proper preparation ensures that your cookies will turn out perfectly every time.
Importance of Preheating: The Science Behind Baking
Preheating your oven is a vital step in the baking process. It allows the cookies to bake evenly and achieve the right texture. When cookies are placed in a hot oven, the heat causes the fats to melt, creating steam that helps leaven the dough. This results in a chewy and tender cookie. Aim to preheat your oven to 350°F (175°C) before you start mixing your ingredients.
Setting Up Your Baking Sheets: Why Parchment Paper Matters
While the oven is preheating, prepare your baking sheets by lining them with parchment paper. This step is essential as it prevents the cookies from sticking to the pan and ensures even baking. Parchment paper also helps with cleanup, making your baking experience smoother and more enjoyable.
Creating the Peanut Butter Cookie Dough
With your oven preheated and your baking sheets prepared, it’s time to make the peanut butter cookie dough. Follow these steps to achieve the perfect consistency.
Mixing Techniques for Optimal Dough Consistency
In a large mixing bowl, start by creaming together the peanut butter, granulated sugar, and brown sugar until the mixture is light and fluffy. This step helps incorporate air into the dough, which is essential for achieving a tender texture. Next, add in the eggs and vanilla extract, mixing until well combined. Finally, gradually add in the dry ingredients—flour, baking soda, and salt—until just combined. Be careful not to overmix, as this can lead to a denser cookie.
Checking for the Right Texture: Signs of Properly Combined Ingredients
Once your dough is mixed, take a moment to assess its texture. The dough should be soft and slightly sticky but still hold its shape when scooped. If it appears too dry, you can add a tablespoon of milk to achieve the desired consistency. Conversely, if it’s too wet, you may want to sprinkle in a little extra flour. Remember, the right dough consistency is key to achieving perfect cookies.
Shaping and Baking the Cookies
Now that you have your cookie dough ready, it’s time to shape and bake the cookies.
1. Scoop the Dough: Using a cookie scoop or tablespoon, portion out the dough onto your prepared baking sheets. Leave enough space between each scoop, as the cookies will spread while baking.
2. Flatten the Dough: For a more uniform shape, gently flatten the tops of the cookie dough balls with the palm of your hand or a fork. This step is optional but can help create a more even surface for the ice cream filling.
3. Bake: Place the baking sheets in the preheated oven and bake for 10-12 minutes or until the edges are lightly golden. The centers may still look slightly underbaked, but they will firm up as they cool.
4. Cool the Cookies: Once baked, remove the cookies from the oven and allow them to cool on the baking sheets for a few minutes before transferring them to a wire rack to cool completely. This cooling process is essential, as warm cookies can cause the ice cream to melt faster when assembled.
As you prepare your peanut butter cookies, the anticipation of creating the perfect ice cream sandwich builds. With each step, you’re one step closer to enjoying this delightful summer treat that captures the hearts of all who indulge in it. Stay tuned for the next section, where we will delve into assembling these delicious Crunchy Peanut Butter Cookie Ice Cream Sandwiches and explore additional tips for making them even more special.
{{image_2}}
Techniques for Portioning Cookie Dough
When it comes to creating perfectly sized cookies for your ice cream sandwiches, proper portioning of cookie dough is essential. The goal is to ensure uniformity so that each sandwich maintains a consistent size and shape. Here are some techniques to help you portion your cookie dough effectively:
1. Using a Cookie Scoop: A cookie scoop is an invaluable tool in the kitchen. It allows for quick and accurate portioning. Choose a scoop that holds about 2 tablespoons of dough for a generous cookie size. Simply fill the scoop, release the dough onto your baking sheet, and repeat.
2. Weighing the Dough: For those looking for precision, consider weighing your cookie dough portions. A kitchen scale can help you achieve uniformity by measuring each cookie portion to around 30 grams. This method ensures that every cookie bakes evenly.
3. Rolling by Hand: If you prefer a more hands-on approach, you can roll the dough into balls by hand. Take a tablespoon of dough, roll it between your palms, and place it on the baking sheet. This technique gives you a tactile connection to your baking process.
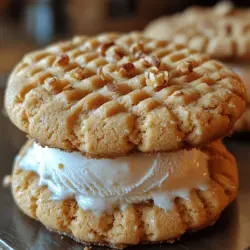
The Crisscross Pattern: A Traditional Touch
One of the hallmark techniques for peanut butter cookies is the classic crisscross pattern. Not only does it add a visual appeal, but it also helps flatten the dough for even baking. To create this pattern:
1. Once you’ve portioned the dough and placed it on the baking sheet, take a fork and press down gently on the top of each cookie ball.
2. Rotate the fork 90 degrees and press down again. This will create a crisscross pattern that is both decorative and functional.
This technique also helps the cookies spread out properly, leading to a delightful texture that balances crunchiness with chewiness.
Baking Time and Visual Cues for Perfect Cookies
Baking peanut butter cookies requires attention to detail, particularly regarding baking time. Here’s how to achieve the perfect cookie:
1. Preheat Your Oven: Ensure your oven is preheated to 350°F (175°C). This is crucial for even baking.
2. Baking Time: Generally, your cookies should bake for about 10-12 minutes. However, keep an eye on them!
3. Visual Cues: Watch for the edges to turn a golden brown while the centers remain slightly soft. Once you see this, remove them from the oven. They will continue to firm up as they cool on the baking sheet.
Preparing the Ice Cream Filling
While the cookies are cooling, it’s time to prepare the ice cream filling. This step is crucial for achieving that creamy, appealing texture that compliments the crunchy cookies.
Softening Ice Cream: Tips for Easy Assembly
To ensure easy assembly of your ice cream sandwiches, you’ll need to soften the ice cream slightly:
1. Leave it at Room Temperature: Let the ice cream sit out for about 10-15 minutes. This will make it spreadable without melting excessively.
2. Stirring: For an even softer texture, use a spatula to stir the ice cream in its container before scooping. This will help break up any ice crystals.
Incorporating Add-ins: Step-by-Step Guide
Enhance your ice cream filling with add-ins for added flavor and texture. Here’s how to do it:
1. Choose Your Add-ins: Consider mini chocolate chips, crushed cookies, or even swirls of fudge or caramel.
2. Mixing: In a separate bowl, combine the softened ice cream with your chosen add-ins. Use a spatula to gently fold them in, ensuring they’re evenly distributed without melting the ice cream too much.
Assembling the Ice Cream Sandwiches
With your cookies baked and cooled, and your ice cream prepared, it’s time to assemble your sandwiches!
Techniques for Layering: Ensuring a Balanced Sandwich
Achieving a balanced ice cream sandwich is all about layering:
1. Select Your Cookies: Pair cookies by size and shape after they’ve cooled. Look for the flattest sides to face each other.
2. Scoop the Ice Cream: Using a cookie scoop, place a generous amount of ice cream on the bottom side of one cookie.
3. Top It Off: Place another cookie, bottom side down, on top of the ice cream. Gently press down until the ice cream begins to squish out the sides.
Pressing Techniques: Achieving the Perfect Seal
To ensure your ice cream stays contained within the cookie:
1. Gentle Pressure: Apply even pressure when pressing the cookie on top of the ice cream. If the cookie is too soft, consider placing the assembled sandwich in the freezer for a few minutes to firm up.
2. Cleanup: Use a spatula to smooth out any ice cream that spills over the edges for a neater presentation.
Coating for Extra Crunch
For an extra layer of texture and flavor, consider coating the edges of your ice cream sandwiches.
The Process of Rolling: Tips for Even Coverage
1. Choose Your Coating: Options include crushed nuts, sprinkles, or mini chocolate chips.
2. Rolling Technique: After assembling the sandwiches, gently roll the edges in your chosen coating. This step not only adds crunch but also visual appeal.
Exploring Alternative Coatings
Feel free to get creative with coatings! Consider using:
– Shredded Coconut: For a tropical twist.
– Crushed Pretzels: For a salty-sweet combination.
– Ground Cinnamon Sugar: For a sweet, spiced finish.
Setting and Serving the Sandwiches
Once your sandwiches are assembled and coated, proper setting is key to ensure they hold together perfectly.
Freezing Techniques for Best Results
1. Initial Freeze: Place the assembled sandwiches on a baking sheet lined with parchment paper, and freeze for at least 30 minutes. This helps them set properly.
2. Long-term Storage: After they have firmed up, wrap each sandwich in plastic wrap or foil, and store them in an airtight container in the freezer for up to two weeks.
Presentation Ideas for Serving
When it comes time to serve these delicious treats, presentation can elevate the experience:
1. Serve on a Platter: Arrange your ice cream sandwiches on a decorative platter. Add fresh berries or mint leaves for color.
2. Individual Wrapping: For a fun and personal touch, wrap each sandwich in parchment paper and tie with twine for a rustic look.
The Joy of Homemade Ice Cream Sandwiches
Exploring the Comfort of Nostalgia
Homemade ice cream sandwiches capture the essence of summer and childhood memories. The simple joy of biting into a chilled treat, with the crunch of cookies and the creaminess of ice cream, evokes nostalgia for many.
The Cultural Significance of Ice Cream Sandwiches
Ice cream sandwiches have a rich history, often associated with fairs, summer outings, and family gatherings. They serve as a reminder of simpler times, where enjoying dessert was part of cherished summer traditions.
Memories and Traditions Associated with This Dessert
For many families, making ice cream sandwiches together is a beloved tradition. It’s a chance to bond over baking and creativity, allowing everyone to customize their sandwiches as they wish. These memories create a lasting connection to the dessert, ensuring it remains a favorite for generations.
Customizing Your Ice Cream Sandwiches
Flavor Variations: Experimenting Beyond Peanut Butter
While the peanut butter cookie base is delightful, do not hesitate to experiment with flavors:
– Chocolate Chip Cookies: Pair with vanilla or mint chocolate chip ice cream for a classic combination.
– Oatmeal Cookies: Choose cinnamon ice cream for a comforting twist.
– Sugar Cookies: Opt for fruit-flavored ice creams to enhance the sweetness.
Dietary Considerations: Vegan and Gluten-Free Options
To cater to dietary restrictions, consider these alternatives:
– Vegan Cookies: Substitute eggs with flaxseed meal and use dairy-free butter to create a vegan cookie base. Pair with coconut or almond milk ice cream for a delicious treat.
– Gluten-Free Cookies: Use gluten-free flour blends to create your cookie dough without sacrificing flavor or texture.
Conclusion
Crunchy Peanut Butter Cookie Ice Cream Sandwiches are not just a treat; they are a celebration of flavors and textures that can be enjoyed in various ways. This comprehensive recipe guides you through every step, ensuring that even novice bakers can create this delightful dessert. With the potential for customization and creativity, these sandwiches can easily become a staple in your dessert repertoire, perfect for any occasion. Enjoy the process, share the joy, and indulge in each bite of this delicious creation.