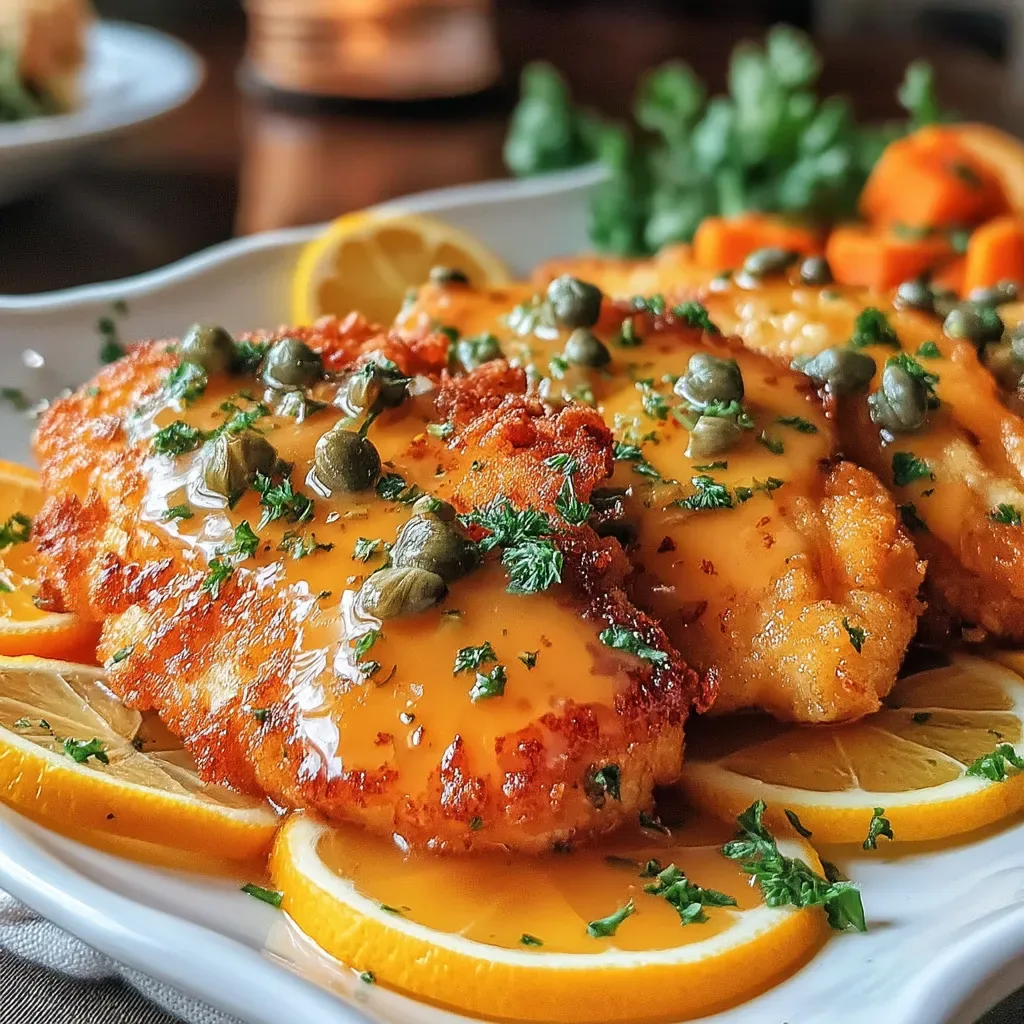
Imagine a sunny morning where the aroma of lemon and butter fills the kitchen, and a golden‑crisp chicken cutlet lands on your plate with a burst of tangy sauce. That’s the magic of Lemony Crispy Chicken Piccata, a breakfast‑and‑brunch star that feels both elegant and comforting.
This dish stands out because the chicken is first dusted in seasoned flour, then pan‑fried to a satisfying crunch before being bathed in a bright, buttery lemon‑caper sauce. The contrast of textures and the zing of fresh lemon make each bite unforgettable.
Whether you’re feeding a sleepy family, impressing brunch guests, or simply craving a hearty start to the day, this recipe fits every occasion. Its bright flavors pair beautifully with eggs, toast, or a light salad, turning an ordinary morning into a celebration.
The process is straightforward: season and coat the chicken, fry it to perfection, deglaze the pan with white wine, add lemon juice, capers, and butter, then finish with a sprinkle of parsley. In under an hour you’ll have a restaurant‑quality plate ready to serve.
Why You'll Love This Recipe
Bright Citrus Flavor: Fresh lemon juice and zest lift the dish, creating a lively palate that wakes up your taste buds without overwhelming the chicken.
Crispy Yet Tender: A light flour coating gives the chicken a satisfying crunch while the interior stays juicy, delivering the best of both worlds.
Quick Week‑Day Turn‑Around: With just 20 minutes of prep and 30 minutes of cooking, this recipe fits perfectly into busy mornings or lazy weekend brunches.
Versatile Pairings: Serve it over toast, alongside roasted potatoes, or with a simple green salad—each option highlights the sauce in a new way.
Ingredients
The foundation of this piccata is fresh, high‑quality chicken and a simple yet flavorful sauce. The chicken breasts provide lean protein, while the flour coating creates the signature crunch. Lemon juice, capers, and white wine form the bright, briny sauce, and butter adds richness. Finishing with parsley gives a pop of color and fresh herbal note that ties everything together.
Main Ingredients
- 4 boneless, skinless chicken breasts (about 6 oz each)
- ½ cup all‑purpose flour
- 1 teaspoon kosher salt
- ½ teaspoon freshly ground black pepper
Sauce & Marinade
- 3 tablespoons olive oil
- 3 tablespoons unsalted butter, divided
- ¼ cup dry white wine (such as Sauvignon Blanc)
- ⅓ cup fresh lemon juice (about 2 lemons)
- 2 tablespoons capers, rinsed and drained
- ¼ cup low‑sodium chicken broth
Seasonings & Garnish
- 2 cloves garlic, minced
- 1 teaspoon lemon zest
- ¼ cup fresh parsley, chopped
Each component plays a specific role: the flour creates a light crust, the butter enriches the sauce, and the lemon provides acidity that cuts through the richness. Capers add a briny punch, while the garlic and parsley bring depth and freshness. Together they form a balanced, mouth‑watering piccata that shines at any brunch table.
Step-by-Step Instructions
Preparing the Chicken
Pat the chicken breasts dry with paper towels, then place them between two sheets of plastic wrap. Using a meat mallet, pound each piece to an even ½‑inch thickness; this guarantees uniform cooking and a tender bite. Season both sides with the kosher salt and freshly ground black pepper, allowing the seasoning to sit for a few minutes while you prep the coating.
Coating & Frying
- Set Up a Dredging Station. Place the flour in a shallow dish. Lightly press each seasoned chicken piece into the flour, shaking off excess. The thin flour layer is key to achieving a golden crust without becoming doughy.
- Heat the Skillet. Over medium‑high heat, add the olive oil and 1 tablespoon of butter to a large skillet. When the butter foams and the oil shimmers (about 3 minutes), the pan is hot enough for a quick sear.
- Sear the Chicken. Lay the floured breasts in the pan without crowding them. Cook 4‑5 minutes per side, or until each side turns a deep golden‑brown and the interior reaches 160°F. Use a spatula to flip only once; this preserves the crust.
- Rest the Meat. Transfer the cooked chicken to a warm plate, tent with foil, and let it rest while you build the sauce. Resting keeps the juices inside, ensuring every bite stays moist.
Building the Lemon‑Caper Sauce
- Deglaze the Pan. Reduce heat to medium and add the minced garlic, stirring for 30 seconds until fragrant. Carefully pour in the white wine, scraping the browned bits (fond) from the bottom of the skillet; these add depth to the sauce.
- Incorporate Liquids. Stir in the lemon juice, chicken broth, and capers. Bring the mixture to a gentle simmer; let it reduce for 3‑4 minutes until it thickens slightly and coats the back of a spoon.
- Finish with Butter & Zest. Whisk in the remaining 2 tablespoons of butter and the lemon zest. The butter emulsifies the sauce, giving it a silky texture and a glossy finish.
- Combine & Serve. Return the rested chicken to the skillet, spooning the sauce over each piece. Allow the meat to heat through for 1‑2 minutes, then sprinkle the chopped parsley across the top for a fresh burst of color.
Tips & Tricks
Perfecting the Recipe
Room‑Temperature Chicken: Let the breasts sit out for 15 minutes before seasoning. This prevents a cold center and promotes even browning.
Pat Dry Thoroughly: Moisture on the surface hinders crust formation. A dry surface yields a crispier, more golden exterior.
Use a Heavy Skillet: Cast iron or stainless steel retains heat better, ensuring a consistent sear.
Don’t Over‑Cook the Sauce: Simmer just until slightly thickened; over‑reduction can make it bitter.
Flavor Enhancements
Add a splash of good‑quality extra‑virgin olive oil at the end for extra fruitiness, or stir in a pinch of red‑pepper flakes for subtle heat. For a richer mouthfeel, finish with a teaspoon of cream just before serving.
Common Mistakes to Avoid
Skipping the resting step lets juices escape, resulting in dry chicken. Also, avoid moving the chicken while it sears; constant flipping prevents the crust from forming and can cause soggy pieces.
Pro Tips
Fresh Lemon Only: Use freshly squeezed juice and zest; bottled lemon loses bright acidity and aromatic oils.
Butter Emulsion: Add butter off the heat, whisking continuously to create a velvety sauce that clings to the chicken.
Measure Wine Precisely: Too much liquid dilutes the sauce; a ¼‑cup pour is perfect for deglazing without drowning the flavors.
Prep All Elements First: Have the sauce ingredients measured and ready before the chicken hits the pan to keep the workflow smooth.
Variations
Ingredient Swaps
Replace chicken with thin‑sliced pork tenderloin or veal cutlets for a different protein profile. For a vegetarian spin, use firm tofu slices, pressing them first and then following the same coating and frying steps. Swap capers for chopped green olives to introduce a Mediterranean nuance.
Dietary Adjustments
Make it gluten‑free by using almond flour or a certified gluten‑free flour blend. For dairy‑free, substitute butter with a plant‑based butter or extra olive oil, and use a splash of coconut cream for richness. Keto diners can replace the flour coating with crushed pork rinds or almond meal.
Serving Suggestions
Pair the piccata with herb‑infused quinoa, buttery sourdough toast, or a light arugula salad tossed in a lemon vinaigrette. For a brunch spread, add poached eggs on top and a side of roasted asparagus to round out the meal.
Storage Info
Leftover Storage
Allow the chicken and sauce to cool to room temperature (no longer than 2 hours). Transfer the pieces to an airtight container, pouring any remaining sauce over them. Refrigerate for up to 3 days. For longer keeping, portion into freezer‑safe bags, squeeze out excess air, and freeze for up to 3 months.
Reheating Instructions
Reheat in a 350°F oven, covered with foil, for 12‑15 minutes until the interior reaches 165°F; this preserves the crust while warming the sauce gently. In a pinch, microwave on medium power for 2‑3 minutes, stirring halfway and adding a splash of broth to keep the meat moist.
Frequently Asked Questions
This Lemony Crispy Chicken Piccata brings together bright citrus, buttery richness, and a satisfyingly crunchy crust—all in a time‑friendly package perfect for breakfast or brunch. By following the detailed steps, using fresh ingredients, and applying the pro tips, you’ll achieve a restaurant‑level dish every time. Feel free to experiment with the suggested swaps or pairings, and make the recipe truly your own. Enjoy the sunshine on a plate and share the delight with family or friends!