Introduction
Heavenly Nun’s Puffs, a delightful pastry that has enchanted taste buds for centuries, are a perfect blend of airy texture and rich flavors. These light and fluffy treats have roots that trace back to French culinary traditions, making them a beloved pastry in many cultures. Often referred to as “choux pastry” or “pâte à choux,” Nun’s Puffs are versatile enough to be enjoyed in various forms, whether filled with cream, drizzled with chocolate, or served plain with a dusting of powdered sugar.
The history of Nun’s Puffs is as rich as their taste. Legend has it that these pastries were originally created by nuns in convents, hence the name. The simplicity of the ingredients combined with the technique of steam cooking has allowed these pastries to remain popular over time, transcending generations and geographical boundaries. Their cultural significance lies in their ability to bring joy and comfort—a true testament to the art of pastry-making.
What makes Nun’s Puffs particularly special is their unique texture. When baked correctly, they puff up beautifully, creating a hollow center that can be filled with a variety of delicious fillings or enjoyed on their own. The flavor profile is equally enchanting, with a subtle sweetness enhanced by the richness of butter and the warmth of vanilla. Whether served as a dessert or a sweet snack, these pastries are sure to impress both family and friends.
In this article, we will take you step-by-step through the process of making Heavenly Nun’s Puffs, from understanding the key ingredients to mastering the technique required for the perfect batch.
Understanding the Ingredients
To create Heavenly Nun’s Puffs, it’s essential to understand the role each ingredient plays in achieving the light and airy texture that characterizes this pastry. Here’s a detailed breakdown of the ingredients you will need:
Water
Water is a vital component in the Nun’s Puffs recipe, as it plays a crucial role in generating steam during the baking process. When heated, the water converts to steam, which expands and puffs up the pastry, giving it that characteristic airy structure. The amount of water used must be measured precisely; too little water can result in dense pastries, while too much can lead to excessive moisture, affecting the final product.
Unsalted Butter
Using unsalted butter in this recipe is essential for flavor control. Salted butter can introduce a variable level of saltiness that can overshadow the sweetness of the pastry. Unsalted butter allows you to have complete control over the salt content, ensuring that the flavors remain balanced. The butter also adds richness and contributes to the tender texture of the puffs.
All-Purpose Flour
All-purpose flour is the best choice for this recipe due to its moderate protein content, which strikes the right balance between structure and tenderness. This type of flour helps create the necessary gluten structure to hold the puffs together while maintaining their lightness. It’s important to measure the flour accurately, as too much can lead to a heavy dough that does not rise properly.
Salt
While Nun’s Puffs are sweet, a pinch of salt is crucial in enhancing the overall flavor. Salt acts as a flavor enhancer, bringing out the sweetness of the sugar and the richness of the butter. It helps to balance the flavors in sweet dishes and ensures that the final product is well-rounded and delicious.
Eggs
Eggs are indispensable in creating the structure and moisture of Nun’s Puffs. They provide the necessary binding properties, helping the pastry hold its shape while also contributing to the leavening process. The proteins in eggs coagulate when heated, further assisting in creating a stable structure as the pastries puff up during baking.
Vanilla Extract
Vanilla extract adds depth to the flavor profile of Nun’s Puffs. Its warm, aromatic qualities complement the sweetness and richness of the pastry, making each bite more enjoyable. It’s best to use pure vanilla extract for the most authentic flavor, though imitation vanilla can work in a pinch.
Baking Powder
Baking powder is another essential ingredient that aids in achieving the right puffiness. It acts as a leavening agent, releasing carbon dioxide when heated, which contributes to the overall rise of the pastry. Using baking powder helps ensure that the Nun’s Puffs achieve their signature light and airy texture.
Powdered Sugar
Finally, powdered sugar is the finishing touch for these delightful pastries. It adds sweetness and can be dusted on top of the baked Nun’s Puffs for a beautiful presentation. The fine texture of powdered sugar dissolves easily, ensuring a smooth finish that enhances the aesthetic appeal of the pastries.
Step-by-Step Instructions
Now that we understand the ingredients and their roles, let’s dive into the step-by-step process of making Heavenly Nun’s Puffs.
Preparing the Batter
1. Start by Preheating the Oven: Begin by preheating your oven to 400°F (200°C). A hot oven is crucial for the initial rise of the pastries, as the steam generated will help them puff up beautifully.
2. Combine Water and Butter: In a medium saucepan, combine 1 cup of water and 1/2 cup of unsalted butter. Heat this mixture over medium heat until the butter has completely melted and the water reaches a gentle boil.
3. Achieve the Right Temperature: It is essential to bring the water and butter mixture to a rolling boil before adding the flour. This step is critical because it ensures that the flour will absorb the water efficiently, leading to the right consistency in the dough.
Incorporating the Flour
4. Add the Flour: Once the mixture is boiling, remove the saucepan from heat. Immediately add 1 cup of all-purpose flour and a pinch of salt to the saucepan. Stir vigorously with a wooden spoon until the mixture is well combined and forms a cohesive dough.
5. Mixing Techniques: The goal here is to mix the dough effectively. Continue to stir for about 2-3 minutes, allowing the heat from the saucepan to cook the flour slightly. This technique also helps to remove excess moisture, resulting in a puffy pastry.
6. Signs the Dough is Ready: You’ll know the dough is ready when it pulls away from the sides of the pan and forms a smooth ball. If the dough feels too sticky, you may need to cook it for an additional minute or two.
Cooling the Mixture
7. Let the Dough Cool: Transfer the dough to a mixing bowl and let it cool for about 5-10 minutes. Cooling the dough is crucial before adding the eggs; it prevents the eggs from cooking when incorporated.
8. How Temperature Affects Egg Incorporation: If the dough is too hot when you add the eggs, they can cook and scramble, leading to a less desirable texture. Allowing the dough to cool ensures a smooth incorporation of the eggs.
Adding Eggs for Structure
9. Incorporate the Eggs: After the dough has cooled, add four large eggs one at a time, mixing well after each addition. It’s best to use a hand mixer or stand mixer for this step, as it helps to aerate the dough and achieve a lighter texture.
10. Mixing for the Right Consistency: The dough should be glossy and smooth, with a thick yet pipeable consistency. If you find it too stiff, you can add a little more water or an additional egg to loosen it up.
As we progress through this delightful recipe, you will discover just how simple it is to create these heavenly pastries. The combination of quality ingredients, precise technique, and a little patience will lead to a batch of Nun’s Puffs that is sure to impress. In the next part of our article, we will cover the baking process and finishing touches to make these pastries truly shine. Stay tuned for the continuation of this delicious adventure!
{{image_2}}
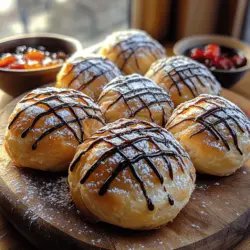
Heavenly Nun’s Puffs Recipe: The Perfect Pastry Experience
Adding Eggs to the Dough
Once your choux pastry base has reached the right consistency, it’s time to introduce the eggs. This step is crucial as eggs are the key to achieving that signature light and airy texture of Nun’s Puffs. Begin by cracking the eggs into a bowl and lightly whisking them together. Gradually add the eggs to the cooled dough, one at a time, mixing vigorously after each addition.
Using a wooden spoon or a sturdy spatula, incorporate the eggs thoroughly until the mixture is smooth and glossy. It’s important to ensure that each egg is fully integrated before adding the next; this process helps the dough to rise properly during baking. The dough should eventually become silky and hold its shape while still being soft enough to pipe.
Importance of Achieving a Smooth, Glossy Texture
The texture of your dough is pivotal in the success of your Nun’s Puffs. A well-mixed dough that is smooth and glossy indicates that you’ve incorporated enough air and moisture, which are essential for the puffs to rise beautifully in the oven. If the dough appears grainy or clumpy, it may not rise properly, resulting in dense pastries instead of the light, airy puffs you desire.
Prepping for Baking
Before you head to the oven, proper preparation is key. Preheat your oven to 425°F (220°C) to ensure that it reaches the right temperature before your Nun’s Puffs go in. This high heat is essential for creating steam, which will help the pastries puff up dramatically.
While the oven is preheating, prepare your baking sheet. Line it with parchment paper to prevent sticking and ensure even baking. If you don’t have parchment paper, you can lightly grease the sheet, but parchment is preferred for its non-stick properties.
Tips for Using Piping Bags Effectively
Using a piping bag can seem daunting, but with a few simple tips, you can achieve beautiful results. First, attach a large star tip to your piping bag if you want that classic Nun’s Puff shape. Place the tip inside the bag and fold the top down to avoid spills.
Fill the bag with your dough, but do not overfill it. About two-thirds full is ideal to allow for easy squeezing. Twist the top of the bag to push the dough down towards the tip and create even pressure when piping. Hold the bag at a 90-degree angle to the baking sheet and squeeze gently while lifting to create small mounds of dough about 1.5 inches wide.
Baking the Nun’s Puffs
Once your dough is piped out onto the baking sheet, it’s time to bake! Place the sheet in the preheated oven and bake for approximately 20-25 minutes. During this time, keep a close eye on your Nun’s Puffs. They should begin to rise and develop a beautiful golden-brown color.
Desired Visual Cues During Baking
The ideal Nun’s Puffs will be puffed up, golden, and firm to the touch. The outer layer should be crispy while the inside remains airy and light. Avoid opening the oven door during the first 15 minutes of baking, as this can disrupt the steam needed for puffing and cause them to collapse.
Ideal Baking Time and Temperature for Optimal Results
As a rule of thumb, the perfect baking temperature for Nun’s Puffs is 425°F (220°C), and the ideal baking time is between 20 to 25 minutes. However, ovens can vary, so it’s wise to check for visual cues. If they look golden and have puffed up nicely, they are likely done.
Cooling and Final Touches
Once baked, remove the Nun’s Puffs from the oven and allow them to cool on a wire rack. This step is crucial to avoid soggy bottoms. Cooling on the rack allows air to circulate around the pastries, preventing moisture buildup.
After they’ve cooled, it’s time for the final touch! Dust the cooled Nun’s Puffs generously with powdered sugar for a sweet finish. Use a fine mesh sieve to achieve a light and even coating.
Serving Suggestions
Nun’s Puffs can be enjoyed in various delightful ways, enhancing their appeal for any occasion.
– Varieties of Serving Options: Serve them plain as a delightful dessert, or elevate them with fillings. You can split them open and add a dollop of whipped cream, a drizzle of chocolate sauce, or a spoonful of fruit preserves for a burst of flavor.
– Pairing Ideas: These pastries pair wonderfully with a variety of beverages. A cup of hot coffee or tea complements the sweetness of the Nun’s Puffs perfectly. For a festive touch, consider serving them alongside other desserts like fruit tarts or chocolate-dipped strawberries.
Nutritional Information
When made at home, Nun’s Puffs can be a delightful treat without the preservatives often found in store-bought pastries. While the exact nutritional content will vary based on ingredients and serving size, a typical serving contains approximately:
– Calories: 150
– Total Fat: 10g
– Saturated Fat: 3g
– Cholesterol: 60mg
– Sodium: 50mg
– Total Carbohydrate: 15g
– Dietary Fiber: 0g
– Sugars: 2g
– Protein: 3g
Making pastries from scratch allows you to control the ingredients, making them a healthier option. Homemade Nun’s Puffs are free from artificial additives, ensuring a more wholesome treat.
Common Mistakes to Avoid
Creating the perfect Nun’s Puffs is achievable, but there are common pitfalls to watch out for:
– Overmixing or Undermixing Dough: Ensure to mix the dough just until smooth. Overmixing can lead to dense pastries, while undermixing will prevent proper puffing.
– Incorrect Baking Temperature and Time: Make sure to preheat your oven adequately and adjust baking times as needed. Baking at too low a temperature can cause the puffs to not rise properly, while too high can result in burnt exteriors and raw interiors.
Conclusion
Making Heavenly Nun’s Puffs is not just about following a recipe; it’s an experience filled with joy and satisfaction. The delightful combination of a crisp outer layer and a soft, airy interior makes these pastries a true delight for any occasion. Whether you enjoy them as a sweet dessert or as part of a festive gathering, the results are sure to impress.
Encourage yourself to try this recipe, and you’ll soon find that the effort is well worth it. The versatility of Nun’s Puffs allows you to experiment with different fillings and toppings, making them a favorite for both casual and special events. Embrace the joy of creating these heavenly pastries, and share them with family and friends for an unforgettable treat!