Caramel Apple Cinnamon Cheesecake Bars: A Delicious Indulgence
When it comes to desserts that evoke the warmth of home and the joy of sharing, Caramel Apple Cinnamon Cheesecake Bars stand out as a beloved favorite. These bars encapsulate the essence of fall, combining the classic flavors of caramel, tart apples, and warm cinnamon into a delightful treat that appeals to both young and old alike. Whether you are preparing for a holiday gathering, a family get-together, or simply indulging in a cozy night in, these cheesecake bars offer a versatile option that can elevate any occasion.
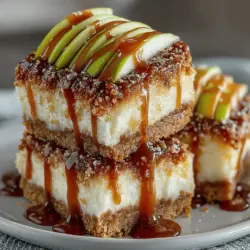
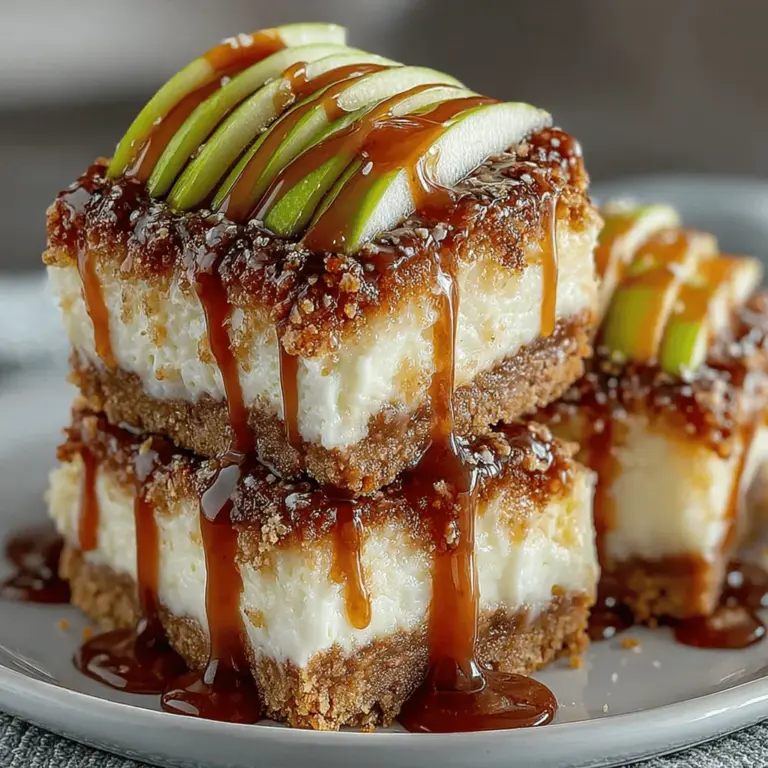
The allure of Caramel Apple Cinnamon Cheesecake Bars lies not only in their irresistible flavor combination but also in their stunning presentation. Imagine a rich and creamy cheesecake layer, infused with the aromatic notes of cinnamon, set atop a buttery graham cracker crust, and adorned with sweet caramel-drizzled apples. Each bite delivers a satisfying mix of textures, from the crunchy crust to the velvety cheesecake and the tender apple topping, creating an experience that is both comforting and indulgent.
Understanding the Ingredients
To create the perfect Caramel Apple Cinnamon Cheesecake Bars, understanding the key components of the recipe is essential. Each ingredient plays a significant role in contributing to the overall flavor and texture of the dessert.
1. The Crust: The foundation of any cheesecake bar is its crust. A well-made crust provides stability and adds a delightful crunch that contrasts beautifully with the creamy filling. For this recipe, graham crackers are the star, but the choice of graham cracker can make a world of difference in flavor. Opting for high-quality, honey-flavored graham crackers can enhance the sweetness of the crust and complement the richness of the cheesecake.
2. The Cheesecake Layer: The cheesecake filling is the heart of this dessert. The primary ingredient is cream cheese, which must be softened to ensure a smooth and creamy consistency. Incorporating sour cream not only adds richness but also a touch of tanginess that balances the sweetness from the caramel and apples. Spices like cinnamon and vanilla extract elevate the flavor profile, making each bite a delightful experience.
3. The Apple Topping: Apples, particularly tart varieties such as Granny Smith, are essential for cutting through the richness of the cheesecake. When cooked down with cinnamon and caramel, they transform into a luscious topping that adds both flavor and visual appeal. The combination of warm, spiced apples with a touch of caramel creates a perfect harmony that enhances the overall dessert.
Using quality ingredients is paramount in achieving the best flavor and texture for your Caramel Apple Cinnamon Cheesecake Bars. Fresh, ripe apples will yield the best results, while high-quality cream cheese and pure vanilla extract can elevate the dish to new heights.
Creating the Perfect Crust
The crust is a crucial component that supports the entire cheesecake bar and provides a satisfying crunch. A well-executed graham cracker crust is both simple to make and incredibly flavorful. Here’s how to create the perfect crust for your Caramel Apple Cinnamon Cheesecake Bars.
1. Choosing the Right Graham Crackers: Start by selecting high-quality graham crackers. Look for brands that use real honey and minimal additives for the best flavor. If you’re feeling adventurous, consider using flavored graham crackers such as cinnamon or chocolate to add a unique twist to your dessert.
2. Making the Crust: Begin by crushing the graham crackers into fine crumbs. This can be done using a food processor or by placing the crackers in a zip-top bag and rolling over them with a rolling pin. The goal is to achieve a fine, even crumb that will hold together when mixed with butter.
3. Mixing with Butter: In a mixing bowl, combine the graham cracker crumbs with melted butter. The butter acts as a binding agent, creating a crumbly mixture that will hold its shape when pressed into the pan. For the best results, aim for a ratio of about 1 and ½ cups of crumbs to ½ cup of melted butter.
4. Achieving the Ideal Texture: To ensure a perfectly crumbly texture, mix the crumbs and butter until they resemble wet sand. If the mixture feels too dry, add a little more melted butter, one tablespoon at a time, until the desired consistency is reached.
5. Baking the Crust: Preheat your oven to 350°F (175°C). Once your crust mixture is ready, press it firmly into the bottom of a lined baking pan, making sure it’s even and compact. Bake the crust for about 8-10 minutes, or until it is lightly golden. This step is crucial as it helps to set the crust and enhances the flavor through a light browning.
By following these steps meticulously, you can create a graham cracker crust that not only supports the cheesecake layer but also adds a delightful crunch to each bite.
Crafting the Cheesecake Layer
Once the crust is baked and cooled, it’s time to focus on the star of the show: the cheesecake layer. Achieving a smooth and creamy cheesecake requires attention to detail and the right techniques.
1. Soften the Cream Cheese: The first step in making the cheesecake batter is to ensure your cream cheese is at room temperature. Softened cream cheese mixes more easily and prevents lumps from forming, resulting in a silky-smooth filling. To speed up this process, you can cut the cream cheese into smaller cubes and allow it to sit out for about 30 minutes before mixing.
2. Mixing the Batter: In a large mixing bowl, beat the softened cream cheese with an electric mixer on medium speed until it is completely smooth and free of lumps. This may take about 2-3 minutes. Once the cream cheese is well-mixed, gradually add in granulated sugar, mixing until fully incorporated.
3. Incorporating the Eggs: Adding eggs to the cheesecake batter is where things can get tricky. To ensure a lump-free mixture, add the eggs one at a time, mixing on low speed after each addition. Overmixing the batter at this stage can introduce excess air, leading to cracks in the cheesecake once baked.
4. Adding Sour Cream and Flavorings: Incorporating sour cream not only enhances the creaminess of the cheesecake but also contributes to its overall flavor. Add the sour cream, vanilla extract, and ground cinnamon at this stage, mixing until just combined. Avoid overbeating to maintain a dense and rich texture.
5. Final Mixing: Before pouring the cheesecake batter over the crust, do a final check to ensure everything is well mixed. The mixture should be smooth and creamy, with no visible lumps.
With the crust prepared and the cheesecake layer crafted, you are now ready to assemble these delightful bars. The combination of textures and flavors in Caramel Apple Cinnamon Cheesecake Bars promises to impress anyone who takes a bite, making it a must-try recipe for your next gathering.
{{image_2}}
Importance of Layering for Texture and Presentation
When it comes to creating an impressive dessert, layering is not just about aesthetics; it significantly enhances the texture and flavor experience. For our Caramel Apple Cinnamon Cheesecake Bars, each layer serves a distinct purpose. The buttery graham cracker crust provides a crunchy base that contrasts beautifully with the creamy cheesecake filling. The apple topping adds a fresh and fruity element, while the caramel sauce introduces a rich sweetness that ties everything together.
The layering process not only ensures an appealing presentation but also allows flavors to meld together harmoniously. As you slice into these bars, the visual of the distinct layers will entice anyone at your gathering, making them eager to take a bite. Let’s dive into the steps for preparing the apple topping, adding the caramel sauce, baking, cooling, and serving these delightful cheesecake bars.
Preparing the Apple Topping
Selecting the Right Apples: Why Granny Smith Works Best
When it comes to baking, not all apples are created equal. Granny Smith apples are often considered the best choice for desserts like our caramel apple cheesecake bars due to their tartness. This balance of tart and sweet is crucial because it cuts through the richness of the cheesecake and caramel, providing a refreshing contrast. Their firm texture also ensures that the apples hold up well during the cooking process, maintaining a pleasant bite without becoming mushy.
Detailed Instructions for Preparing the Apple Topping
To prepare the apple topping, you will need approximately 3-4 medium-sized Granny Smith apples. Here’s how to prepare them:
1. Peel and Core: Start by peeling the apples and removing the cores. Slice them into thin wedges (about 1/4 inch thick) to ensure even cooking and a pleasing texture.
2. Sauté the Apples: In a large skillet, melt 2 tablespoons of unsalted butter over medium heat. Once melted, add the apple slices and sauté for about 5-7 minutes until they start to soften but still retain some firmness.
3. Add Flavor: Sprinkle in 1 teaspoon of ground cinnamon and the juice of half a lemon. The cinnamon adds a warm spice that complements the cheesecake, while the lemon juice prevents the apples from browning and adds brightness. Stir to coat the apples evenly.
4. Sweeten to Taste: If desired, you can sprinkle in 1-2 tablespoons of brown sugar to enhance the sweetness. Stir until the sugar dissolves and the apples are well-coated. Remove from heat and set aside to cool.
Coating the Apples: The Importance of Cinnamon and Lemon Juice
Coating the apples with cinnamon and lemon juice is integral for flavor enhancement. The cinnamon adds warmth, which pairs beautifully with the caramel and cheesecake layers. Lemon juice not only enhances the overall flavor profile but also helps to maintain the apples’ vibrant color and freshness. This step is crucial for achieving that perfect balance of flavors in your bars.
Tips for Arranging Apples Decoratively on the Cheesecake Layer
Once your apples are prepared, it’s time to layer them on the cheesecake. Here are some tips for arranging them decoratively:
– Use a Spatula: Gently spoon the sautéed apples onto the cooled cheesecake layer using a spatula. Start in the center and work your way outwards to create a visually appealing pattern.
– Layering Technique: For a more artistic look, layer the apple slices in a circular pattern, overlapping them slightly. This method not only looks inviting but also ensures that each slice contains a bit of apple topping.
– Finish with a Sprinkle: After arranging the apples, consider sprinkling a touch of extra cinnamon on top for added flavor and visual appeal.
Adding the Caramel Sauce
Choosing Between Store-Bought and Homemade Caramel Sauce
When it comes to caramel sauce, you have the option to use store-bought or homemade. Store-bought caramel sauce can save time and effort, especially if you’re short on time. However, making your own caramel sauce can elevate your bars to a new level of flavor.
Homemade Caramel Sauce Recipe:
If you opt to make your own, here’s a quick recipe:
1. In a medium saucepan, combine 1 cup of granulated sugar and 1/4 cup of water. Cook over medium heat until the sugar dissolves and starts to turn amber in color.
2. Remove from heat and slowly whisk in 1/2 cup of heavy cream (be cautious, as it will bubble). Finally, stir in 2 tablespoons of unsalted butter and a pinch of salt. Allow it to cool before drizzling.
Tips for Drizzling Caramel Sauce Without Overwhelming the Dessert
When it comes to drizzling the caramel sauce, less is often more. Here are some tips to ensure you achieve that perfect drizzle:
– Use a Squeeze Bottle: Transferring your caramel sauce into a squeeze bottle allows for better control over how much sauce you’re using. This will help you create a beautiful drizzle across the bars.
– Drizzle Sparingly: Start with a light drizzle over the apple topping and cheesecake layer. You can always add more if desired, but starting small allows the flavors to shine through without being overly sweet.
– Create Patterns: For a decorative touch, consider drizzling the caramel in an artistic pattern, such as zig-zags or spirals. This enhances the visual appeal and invites your guests to dive in.
The Balance of Flavors: How Caramel Complements Apple and Cinnamon
The addition of caramel sauce not only enhances the overall sweetness of the dessert but also helps to create a harmonious balance between the tart apples, creamy cheesecake, and warm cinnamon. The rich, buttery flavor of caramel adds depth and complexity, making each bite a delightful explosion of taste. This balance is what makes these cheesecake bars an unforgettable treat.
Baking and Cooling the Cheesecake Bars
Overview of the Baking Process: Ideal Temperatures and Times
Once all layers are prepared and assembled, it’s time to bake. Preheat your oven to 325°F (163°C). Bake the cheesecake bars for about 45-50 minutes, or until the edges appear set, while the center remains slightly jiggly. This slight jiggle is crucial as it ensures a creamy texture after cooling.
Understanding When the Cheesecake is Properly Set
To determine if your cheesecake is properly set, gently shake the pan. If the edges hold firm while the center has a slight wobble, it’s ready to come out. Overbaking can lead to cracks and a dry texture, so watch carefully.
Cooling Techniques: Why Gradual Cooling is Essential
After baking, allow the cheesecake to cool in the pan for about 15-20 minutes. This gradual cooling helps prevent cracks from forming on the surface. Once cooled, you can run a knife around the edges to loosen it from the pan, then transfer it to the refrigerator to chill completely for at least 4 hours, preferably overnight. Chilling allows the flavors to meld beautifully and enhances the overall texture.
Importance of Chilling for Texture and Flavor Development
Chilling the cheesecake bars is essential for achieving the right texture. As the bars cool, they firm up, making them easier to slice. Additionally, the chilling process allows all the flavors—apple, caramel, cinnamon, and cheesecake—to develop fully. The longer they sit, the better the flavors become!
Serving Suggestions
Creative Serving Ideas to Enhance Presentation
When it comes to serving your Caramel Apple Cinnamon Cheesecake Bars, presentation can elevate the experience. Here are some creative ideas:
– Slice Neatly: Use a sharp knife to cut clean slices. For a cleaner cut, dip the knife in hot water and wipe it dry before slicing.
– Serve on a Platter: Arrange the bars on a decorative platter with a drizzle of caramel sauce around them for a beautiful display.
– Individual Portions: Consider serving the bars in cupcake liners for individual servings. This makes them easy to grab and adds a fun touch.
Suggestions for Garnishing and Accompanying Flavors
To further enhance the dessert, consider adding garnishes:
– Whipped Cream: A dollop of freshly whipped cream on top of each bar provides a light and fluffy contrast.
– Chopped Nuts: Sprinkle some chopped pecans or walnuts on top for added crunch and flavor.
– Cinnamon Dust: Lightly dust with powdered sugar or additional cinnamon for a beautiful finishing touch.
Pairing with Beverages: Ideal Drinks to Complement the Dessert
To complete the experience, think about the beverages you’ll serve with your cheesecake bars. Here are some ideal pairings:
– Coffee: The rich flavor of coffee pairs beautifully with the creamy cheesecake and sweet caramel.
– Tea: A warm chai or spiced apple tea complements the dessert’s flavors perfectly.
– Wine: A sweet dessert wine, like a late harvest Riesling, can elevate the flavors and add sophistication to your serving.
Conclusion
In conclusion, the Caramel Apple Cinnamon Cheesecake Bars are a delightful blend of flavors and textures that are sure to impress anyone who tries them. The careful layering of the buttery crust, creamy cheesecake, sautéed apples, and rich caramel creates a dessert that is not only visually appealing but also an explosion of taste.
Whether you’re preparing for a family gathering, a special celebration, or simply want to indulge in some homemade goodness, these cheesecake bars are the perfect treat. The combination of tart apples, warm cinnamon, and sweet caramel makes for a memorable dessert experience.
We encourage you to try this recipe and share it with friends and family, bringing joy and deliciousness into your kitchen. After all, the joy of baking lies not just in the creation of delectable treats but also in sharing them with those we love. Happy baking!