
Frozen Pumpkin Cheesecake Cookie Cups: A Seasonal Delight
As autumn arrives, the air turns crisp, and the leaves change color, there’s an unmistakable shift in our culinary cravings. The flavors of pumpkin take center stage, captivating our taste buds with their warm, comforting essence. From lattes to pies, pumpkin-infused desserts evoke a sense of nostalgia and celebration, making them a staple during the fall season. Among the myriad of pumpkin desserts, one recipe stands out for its delightful fusion of textures and flavors: Frozen Pumpkin Cheesecake Cookie Cups.
These charming treats are a unique combination of a soft, buttery cookie base and a creamy, spiced pumpkin cheesecake filling. Their individual portions make them perfect for gatherings, allowing guests to indulge without the mess of traditional slices. Furthermore, these cookie cups can be made ahead of time and served straight from the freezer, making them a convenient option for busy fall days or festive occasions.
The Allure of Pumpkin Desserts
Pumpkin desserts have surged in popularity, particularly during the fall months, when everyone seems to crave that signature flavor. This trend isn’t just a passing phase; it’s rooted in the seasonal availability of pumpkins and their versatility. Pumpkin can be transformed into an array of sweet and savory dishes, from hearty soups to decadent cakes. Its naturally rich and slightly sweet flavor pairs beautifully with spices like cinnamon, nutmeg, and cloves, creating a comforting profile that resonates with many.
The concept of merging cookie and cheesecake into one delightful bite is not only innovative but also practical. Imagine the soft, chewy texture of a cookie cradling a luscious cheesecake filling, all infused with the warm spices of autumn. Each bite of these Frozen Pumpkin Cheesecake Cookie Cups offers a delightful contrast that is sure to please any palate.
Ingredients Overview
To create these delicious cookie cups, you’ll need a few key ingredients that work together to achieve the perfect balance of flavor and texture.
Cookie Base Ingredients
1. All-Purpose Flour – This is the backbone of your cookie cup, providing structure and stability.
2. Unsalted Butter – Ensure it’s at room temperature for optimal mixing. The butter adds richness and contributes to the cookie’s chewy texture.
3. Granulated Sugar and Brown Sugar – A combination of these sugars will result in a cookie that’s both sweet and has a slight depth of flavor.
4. Egg – Acts as a binding agent and helps to create a tender crumb.
5. Baking Soda and Salt – These leavening agents will help your cookie cups rise and provide balance to the sweetness.
6. Vanilla Extract – This enhances the overall flavor profile, adding a warm sweetness.
Each ingredient plays a crucial role in creating a cookie cup that is sturdy enough to hold the cheesecake filling while remaining soft and delicious.
Pumpkin Cheesecake Filling Ingredients
1. Cream Cheese – The star of the filling, cream cheese gives it a rich, velvety texture. Make sure it’s softened to ensure smooth mixing.
2. Pumpkin Puree – This provides the essential pumpkin flavor and a lovely orange hue. Be sure to use pure pumpkin puree, not pumpkin pie filling, which contains added sugars and spices.
3. Granulated Sugar – Sweetens the filling and balances the slight bitterness of the cream cheese.
4. Egg – Another binding agent, it helps set the filling as it bakes and contributes to a creamy texture.
5. Pumpkin Pie Spice – A blend of cinnamon, nutmeg, and ginger, this spice mix evokes the essence of fall and enhances the pumpkin flavor.
6. Vanilla Extract – Just like in the cookie base, this adds depth to the filling.
The combination of cream cheese and pumpkin puree is what makes this cheesecake filling so enchanting. It’s creamy, slightly tangy, and perfectly spiced, creating a flavor profile that is both rich and refreshing.
Garnishing Options
Once your cookie cups are filled and frozen, you can take them to the next level with garnishes. Here are a few suggestions:
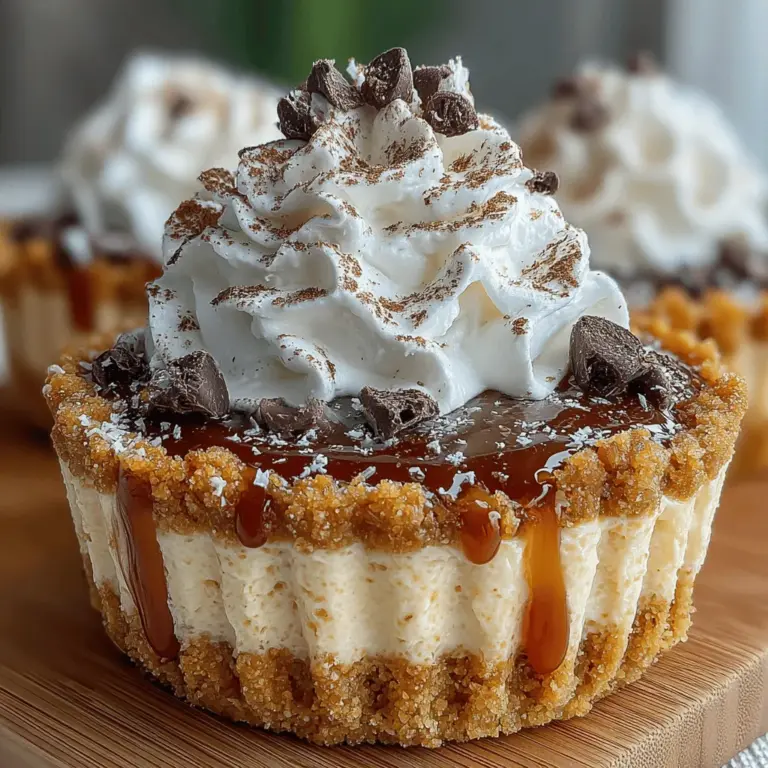
– Whipped Cream – A dollop of freshly whipped cream adds a light, airy texture and complements the richness of the cheesecake.
– Cinnamon or Nutmeg Dusting – A sprinkle of these spices on top not only enhances the visual appeal but also reinforces the fall flavors.
– Caramel Drizzle – A drizzle of caramel sauce can introduce a sweet, buttery contrast to the spiced pumpkin.
– Chopped Nuts – Consider adding chopped pecans or walnuts for a crunchy texture and nutty flavor.
These garnishes allow for customization, enabling you to create a presentation that suits your style or the occasion. Whether you opt for a simple whipped cream topping or a more elaborate caramel drizzle, these finishing touches will elevate your Frozen Pumpkin Cheesecake Cookie Cups.
Step-by-Step Instructions
Preheating and Preparing the Muffin Pan
Before diving into the cookie dough, it’s essential to prepare your baking environment. Preheat your oven to 350°F (175°C). The right temperature is crucial for ensuring that your cookie cups bake evenly and achieve that perfect golden-brown color.
While the oven is preheating, prepare a standard muffin tin by greasing it lightly with cooking spray or butter. This step is vital for easy removal of the cookie cups once they are baked. Alternatively, you can use cupcake liners for added convenience, but be aware that this may affect the texture of the cookie base.
Making the Cookie Dough
With your muffin pan ready and your oven preheated, it’s time to make the cookie dough. In a large mixing bowl, cream together the softened unsalted butter, granulated sugar, and brown sugar until the mixture is light and fluffy. This process incorporates air into the dough, which helps create a tender cookie cup.
Next, add in the egg and vanilla extract, mixing until well combined. In a separate bowl, whisk together the all-purpose flour, baking soda, and salt. Gradually add the dry ingredients to the wet mixture, stirring until just combined. Be careful not to overmix, as this can lead to tougher cookie cups.
Once your dough is ready, it should be soft yet somewhat firm, allowing it to hold its shape when pressed into the muffin tin. Use a cookie scoop or your hands to portion out the dough into each muffin cup, pressing it down gently to create a small well in the center for the cheesecake filling.
Now that you’ve laid the groundwork for your cookie cups, you’re ready to move on to the next phase: preparing the pumpkin cheesecake filling. This is where the magic truly happens, as you blend the creamy elements with the vibrant pumpkin to create a dessert that embodies the spirit of fall.
Stay tuned for the upcoming sections, where we will delve into the filling preparation and baking process, ensuring your Frozen Pumpkin Cheesecake Cookie Cups are a standout treat for any occasion.
{{image_2}}
Detailed Mixing Process and Desired Texture
To achieve the perfect dough for your Frozen Pumpkin Cheesecake Cookie Cups, begin by creaming together the softened butter and sugars in a mixing bowl until the mixture becomes light and fluffy. This process typically takes about 2-3 minutes using a hand mixer or stand mixer on medium speed. The lightness of the mixture is crucial; it creates air pockets that contribute to a tender cookie cup.
Next, gradually add the egg and vanilla extract, mixing until well combined. The dough should be soft but not sticky. As you incorporate the dry ingredients—flour, baking soda, and spices—mix until just combined. Over-mixing can lead to tough cookie cups, so stop as soon as you no longer see flour. The final texture should be soft, pliable, and slightly sticky to the touch, but it should hold its shape when formed.
Tips for Achieving a Soft, Pliable Dough
– Use Room Temperature Ingredients: Ensure that your butter and egg are at room temperature. This helps to emulsify the mixture better and achieve that desired creamy consistency.
– Sift Your Dry Ingredients: Sifting the flour, baking soda, and spices before adding them to your wet ingredients can prevent clumps and promote an even distribution in your dough.
– Adjust Flour as Necessary: Depending on humidity and other factors, you may need to adjust the flour. If the dough feels too sticky, add a tablespoon more flour at a time until it reaches the right consistency.
Forming the Cookie Cups
Techniques for Creating Evenly Shaped Cups
Once your dough is ready, it’s time to form the cookie cups. Preheat your oven to 350°F (175°C) and prepare a muffin tin by greasing it lightly or using silicone muffin liners for easy removal.
Using a cookie scoop or your hands, portion out equal amounts of dough (about 1.5 tablespoons) and roll them into balls. Place each ball into a muffin cup, ensuring there’s enough space between them. To create the cup shape, use your fingers or the bottom of a shot glass to press down the dough evenly across the bottom and up the sides of the muffin tin. Aim for a thickness of about 1/4 inch to ensure they hold their shape while baking.
Importance of Pressing the Dough Down Correctly
Pressing the dough down correctly is crucial for the structural integrity of each cookie cup. If the dough is too thick in places, it may not bake evenly, leading to some cups that are undercooked while others are too hard. A uniform thickness will ensure even baking and a delightful texture.
Baking the Cookie Cups
Baking Time Tips and Visual Cues for Doneness
Bake the cookie cups in the preheated oven for 10-12 minutes, or until the edges are lightly golden brown. Keep an eye on them; the centers may appear a little soft, but they will continue to cook as they cool in the muffin tin. If you notice that the edges are browning too quickly, you can rotate the pan halfway through baking for even heat distribution.
Importance of Cooling Before Adding the Filling
Once baked, remove the muffin tin from the oven and allow the cookie cups to cool in the pan for about 5 minutes. This cooling period is essential. If you try to add the filling while they are still hot, the filling may melt or become runny instead of maintaining a beautiful layered look. After cooling slightly, carefully transfer the cookie cups to a wire rack to cool completely before filling.
Preparing the Pumpkin Cheesecake Filling
The filling for your cookie cups is where the magic happens. In a medium mixing bowl, combine the cream cheese and sugar, beating until smooth. Gradually add in the pumpkin puree, vanilla extract, and pumpkin spice. Mixing it slowly is key here; start with a low speed to incorporate the ingredients without splattering. Once all ingredients are combined, increase the speed to medium and beat until the mixture is creamy and free of lumps.
Techniques for Ensuring a Smooth and Creamy Filling
To achieve a perfectly smooth filling, ensure your cream cheese is softened before mixing. Cold cream cheese can create lumps that are difficult to incorporate. If you do encounter lumps, consider using a hand mixer or a food processor to blend until completely smooth.
Importance of Incorporating Ingredients Slowly
Incorporating ingredients slowly will help avoid a grainy texture. This technique allows the sugars to dissolve properly into the cream cheese and pumpkin puree, creating a silky texture that complements the cookie cups beautifully.
Filling the Cookie Cups
Tips for Achieving a Clean and Attractive Fill
Once your cookie cups have cooled completely, it’s time to fill them with the pumpkin cheesecake mixture. Using a piping bag or a spoon, carefully fill each cookie cup, being mindful not to overfill. Aim for a level fill just slightly below the top of the cookie cup to allow for some visual appeal and to prevent overflow.
Suggestions for Leveling the Filling for Presentation
For a polished presentation, you can use an offset spatula or the back of a spoon to level off the filling. This will make your cookie cups look professional and inviting. If you want to add a decorative touch, consider swirling the top with a spoon or piping additional filling in a decorative pattern.
Freezing the Cookie Cups
Importance of Freezing for the Final Texture
Once filled, place the cookie cups in the freezer. Freezing not only helps set the filling but also enhances the overall texture, making them more enjoyable to eat. Allow them to freeze for at least 4 hours or until completely firm. This step is vital; if you serve them too soon, the filling might be too soft, and the cookie cup may crumble.
Recommended Storage Methods to Maintain Quality
Once frozen, you can transfer the cookie cups to an airtight container, separating layers with parchment paper to prevent them from sticking together. They can be stored in the freezer for up to 2 months. When you’re ready to serve, simply remove them from the freezer and let them sit at room temperature for about 10-15 minutes for the perfect texture.
Serving Suggestions
Best Practices for Serving Frozen Cookie Cups
When it’s time to serve your Frozen Pumpkin Cheesecake Cookie Cups, remove them from the freezer and let them thaw slightly for the best flavor and texture. You can serve them as-is or with a dollop of whipped cream on top. This addition not only enhances the flavor but also contrasts beautifully with the rich pumpkin filling.
Ideas for Presentation to Impress Guests
For an impressive presentation, consider garnishing with a sprinkle of cinnamon or a drizzle of caramel sauce. Placing the cookie cups on a decorative platter with autumn-themed garnishes like mini pumpkins or fall leaves can elevate your dessert display.
Discuss the Balance of Flavors and Textures
The combination of the creamy pumpkin cheesecake filling and the soft, slightly chewy cookie cup creates a delightful balance of flavors and textures. The subtle sweetness of the filling complements the spiced cookie, making each bite a wonderful experience. Topping it with whipped cream and a sprinkle of spices adds an extra layer of flavor that truly captures the essence of fall.
Conclusion
Making and serving Frozen Pumpkin Cheesecake Cookie Cups is a joyful experience that brings the flavors of fall to your table. This easy and delightful recipe is perfect for various occasions, whether it’s a casual gathering with friends or a festive holiday celebration. The unique combination of spiced cookie and creamy pumpkin filling is sure to impress everyone, making it a treat that will be remembered long after the last bite.
Don’t hesitate to embrace the flavors of fall with this recipe. Get creative with your presentations and enjoy the delightful textures and tastes that these cookie cups offer. They are not just desserts; they are a celebration of the season!
