Choco-Banana Bliss Pops: A Deliciously Healthy Frozen Treat
As the temperatures rise and the sun shines brightly, nothing beats the refreshing satisfaction of a frozen treat. From ice cream to sorbets, frozen desserts have long been a staple for cooling down during the warmer months. However, if you’re looking for a sweet indulgence that marries flavor with health, look no further than Choco-Banana Bliss Pops. These delightful frozen pops are not only simple to make but also serve as a nutritious dessert option that appeals to both children and adults alike.
Choco-Banana Bliss Pops are a harmonious blend of creamy bananas and rich chocolate, creating a delectable treat that is hard to resist. The pops encapsulate the sweet, tropical essence of ripe bananas, complemented by the indulgent taste of chocolate. Each bite offers a delightful contrast of textures—the smoothness of the banana alongside the satisfying crunch of toppings, making these pops an enjoyable experience for the senses. Whether you’re hosting a summer party or simply looking for a sweet snack, these blissful pops are sure to be a hit.
Understanding the Appeal of Choco-Banana Bliss Pops
What truly sets Choco-Banana Bliss Pops apart is their balanced combination of health benefits and indulgence. The star ingredient, bananas, is packed with essential vitamins and minerals. They are an excellent source of potassium, which is vital for heart health and maintaining proper muscle function. Bananas also provide dietary fiber, aiding in digestion and contributing to a feeling of fullness. This natural sweetness makes them an ideal base for a dessert that doesn’t compromise on health.
On the other hand, the addition of chocolate elevates the experience to a whole new level. Chocolate is often associated with indulgence, and it has been shown to have mood-boosting properties, thanks to its ability to release endorphins in the brain. Dark chocolate, in particular, is rich in antioxidants and can offer health benefits when consumed in moderation. The combination of bananas and chocolate not only satisfies sweet cravings but also provides a guilt-free way to enjoy dessert.
Another appealing aspect of Choco-Banana Bliss Pops is their versatility. The pops can be customized with a variety of toppings, catering to different tastes and dietary preferences. Whether you prefer the crunch of nuts, the fun of colorful sprinkles, or the richness of shredded coconut, you can easily personalize these pops to create a treat that everyone will love.
Ingredients Overview
Before diving into the step-by-step guide for making Choco-Banana Bliss Pops, it’s essential to understand the key ingredients that contribute to their deliciousness.
Ripe Bananas: The foundation of this recipe is ripe bananas. When selecting bananas, look for those that are slightly speckled with brown spots, as this indicates optimal sweetness and flavor. Ripe bananas are not only sweeter but also easier to blend, providing a creamy texture to the pops. Nutritionally, bananas are low in calories and high in fiber, making them an excellent choice for a healthy dessert.
Dark vs. Semi-Sweet Chocolate Chips: The choice of chocolate can significantly impact the flavor profile of your pops. Dark chocolate offers a rich, intense flavor and contains less sugar compared to semi-sweet chocolate chips, making it a healthier option. However, if you prefer a sweeter taste, semi-sweet chocolate chips can also be used. Both types of chocolate melt well and create a luscious coating for the banana base.
Coconut Oil: To achieve a smooth, glossy chocolate coating, coconut oil is often added when melting the chocolate. This ingredient not only helps the chocolate melt evenly but also adds a hint of richness to the final product. Additionally, coconut oil has health benefits, such as improving metabolism and supporting heart health.
Chopped Nuts: For an added crunch factor, incorporating chopped nuts is a fantastic option. Almonds, peanuts, or walnuts can be used to enhance the texture of the pops, providing a satisfying bite. Nuts are also packed with healthy fats and protein, making them a nutritious addition.
Colorful Sprinkles: For those who want to add a fun element to their Choco-Banana Bliss Pops, colorful sprinkles can be a delightful choice. They not only make the pops visually appealing but also excite kids and add a celebratory touch to any occasion. While sprinkles are optional, they can elevate the overall presentation of your pops.
Emphasizing the importance of using quality ingredients cannot be overstated. When you choose fresh, high-quality bananas, rich chocolate, and premium add-ins, you create a dessert that is not only delicious but also wholesome. The taste and texture of your Choco-Banana Bliss Pops will reflect the care taken in selecting each ingredient.
Step-by-Step Guide to Making Choco-Banana Bliss Pops
Now that we’ve explored the appeal and ingredients of Choco-Banana Bliss Pops, it’s time to get started on making these delightful frozen treats. The process is straightforward and can be completed in just a few steps.
1. Prepare the Bananas: Start by peeling the ripe bananas and cutting them in half. If you prefer smaller bites, you can cut them into quarters. Insert a popsicle stick into each banana half, ensuring it’s secure enough to hold them during freezing.
2. Melt the Chocolate: In a microwave-safe bowl, combine your choice of chocolate chips with a tablespoon of coconut oil. Heat the mixture in the microwave in 30-second intervals, stirring in between, until the chocolate is fully melted and smooth. This method helps prevent burning the chocolate and ensures a creamy consistency.
3. Coat the Bananas: Once the chocolate is melted, dip each banana half into the chocolate, ensuring it’s fully coated. Allow any excess chocolate to drip off before moving to the next step.
4. Add Toppings: While the chocolate coating is still wet, roll or sprinkle the bananas with your choice of toppings. If you’re using chopped nuts or sprinkles, now is the time to get creative.
5. Freeze the Pops: Place the coated bananas on a parchment-lined baking sheet and transfer them to the freezer. Allow the pops to freeze for at least 2-3 hours or until they are completely solid.
This initial preparation lays the groundwork for creating mouthwatering Choco-Banana Bliss Pops. As you progress through the recipe, you will find that these simple ingredients come together to form a delightful treat that is perfect for warm days or any time you’re craving something sweet. Stay tuned for the next part of the article, where we will explore more customization options and tips for serving these irresistible pops!
{{image_2}}
Preparing the Bananas
To create the perfect Choco-Banana Bliss Pops, it’s essential to start with the bananas. Choose ripe but firm bananas for the best texture; overripe bananas can be mushy and may not hold up well during the freezing and coating processes. Begin by peeling the bananas and slicing them into thick pieces, approximately one-inch thick. This thickness ensures they will hold together when you insert the popsicle sticks and freeze them.
When it comes to inserting the sticks, it’s important to do this correctly to avoid any mishaps later on. Use wooden popsicle sticks, which provide a sturdy handle. Gently insert the stick into the center of each banana slice, ensuring it goes in far enough to support the weight of the chocolate coating. You can also opt for half bananas (cut lengthwise), which can be more visually appealing and easier to coat. Once the sticks are in place, arrange the banana slices on a parchment-lined baking sheet, making sure they are spaced apart to prevent sticking.
Freezing Process
The freezing process is crucial to achieving the perfect Choco-Banana Bliss Pops. After preparing the bananas, place the baking sheet in the freezer for at least 2 hours or until the banana slices are completely frozen. Proper freezing not only helps in maintaining the shape of the bananas but also ensures that they don’t stick together. To avoid sticking, make sure that the banana slices are well spaced apart on the baking sheet.
Freezing the bananas thoroughly also makes the chocolate coating easier to apply. If the bananas are not frozen enough, the warm melted chocolate can cause the bananas to become mushy, leading to an undesirable texture. Once the bananas are frozen solid, you’re ready to move on to melting the chocolate.
Melting the Chocolate
For the best results, use high-quality chocolate, whether it’s dark, milk, or white chocolate, depending on your preference. To melt the chocolate, you can use either a microwave or a double boiler method. If using the microwave, place the chocolate in a microwave-safe bowl and heat it in 30-second intervals, stirring in between. This method helps prevent overheating, which can lead to a burned chocolate consistency.
If you prefer the double boiler method, fill a saucepan with a small amount of water and bring it to a simmer. Place a heatproof bowl on top, making sure it doesn’t touch the water, and add the chocolate to the bowl. Stir continuously until the chocolate is completely melted and smooth. The key is to keep the heat low and avoid direct contact with the flame to prevent the chocolate from scorching.
Coating the Banana Pops
Once the chocolate is melted and smooth, it’s time to coat the frozen banana pops. Remove the banana slices from the freezer one at a time to ensure they remain frozen while you work. Dip each banana pop into the melted chocolate, making sure to coat it evenly. You can use a spoon to help pour chocolate over areas that need more coverage.
To ensure that the coating is smooth and even, gently rotate the banana pop as you dip it. After coating, hold it over the bowl for a moment to let any excess chocolate drip back in. This technique prevents the chocolate from pooling at the base of the pops, which can create an unappealing look.
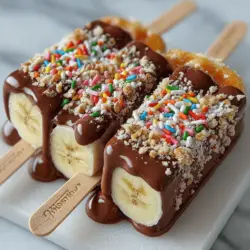
Adding Toppings
The fun doesn’t stop at chocolate! Adding toppings can elevate your Choco-Banana Bliss Pops and make them visually appealing. Before the chocolate hardens, sprinkle your desired toppings over the chocolate coating. Chopped nuts, shredded coconut, or colorful sprinkles are excellent choices. To make sure the toppings stick, you can gently press them into the chocolate coating.
For an elegant touch, consider drizzling some additional melted chocolate over the coated pops after they have been topped. This adds dimension and presents an eye-catching treat that’s perfect for parties or gatherings.
Final Setting
After coating and topping your banana pops, it’s essential to allow the chocolate to harden completely. Place the pops back on the parchment-lined baking sheet and return them to the freezer for about 30 minutes. This final setting process is crucial for achieving the perfect texture. When the chocolate is fully hardened, it creates a delightful contrast to the creamy banana inside.
Serving Suggestions and Presentation Ideas
When it comes to serving your Choco-Banana Bliss Pops, presentation matters. Here are some creative ideas to make your treats stand out:
– Party Platter: Arrange the pops on a large platter, alternating flavors and toppings for visual interest. You can even insert them into a block of styrofoam or a decorative foam base to create a fun display.
– Elegant Drizzles: Use leftover melted chocolate to create beautiful drizzles over the pops. This not only enhances the appearance but also adds an extra layer of flavor.
– Accompaniments: Serve your pops alongside fresh fruit, such as berries or sliced kiwi, for a refreshing contrast. A side of whipped cream or a yogurt dip can also make for a delightful addition.
These serving suggestions will impress your guests and make your Choco-Banana Bliss Pops the star of the show.
Nutritional Information and Dietary Considerations
Understanding the nutritional content of your treats is important, especially if you are keeping an eye on your diet. Each Choco-Banana Bliss Pop contains approximately 100-150 calories, depending on the type of chocolate and toppings used. The nutritional breakdown typically includes healthy fats from the bananas and any nuts you may include, along with carbohydrates and sugars.
For those with dietary restrictions, consider using dairy-free chocolate chips to make this recipe vegan-friendly. Additionally, to make it gluten-free, ensure that any toppings you choose, such as nuts or sprinkles, are certified gluten-free.
When enjoying these pops, consider portion control, especially if you’re indulging in multiple treats. They can fit into a balanced diet when enjoyed in moderation, providing a sweet yet nutritious option for dessert.
Conclusion
Making Choco-Banana Bliss Pops at home is not only easy but also a delightful way to enjoy a frozen treat that combines the rich flavor of chocolate with the natural sweetness of bananas. The versatility of this recipe allows for endless experimentation with flavors and toppings, encouraging you to create personalized versions that reflect your taste preferences.
Sharing homemade treats with family and friends can be a joyous experience, bringing everyone together for a sweet moment. So gather your ingredients, follow the steps, and enjoy the process of creating these delicious pops that are sure to be a hit at any gathering. Whether for a summer party, a cozy evening at home, or a special celebration, Choco-Banana Bliss Pops are a guaranteed crowd-pleaser.