
Introduction
Welcome to the world of culinary delight with our Savory Garlic Butter Shrimp Pasta! This dish combines the succulent flavors of fresh shrimp with the rich, aromatic essence of garlic butter, creating a meal that’s not only delicious but also incredibly satisfying. Imagine twirling al dente pasta around your fork, drenched in a silky garlic butter sauce, with juicy shrimp that burst with flavor in every bite. This dish is perfect for a romantic dinner, a family gathering, or simply indulging in a luxurious meal at home.
Garlic butter is a magical ingredient that enhances the flavors of any dish it touches. Its creamy, savory taste elevates the shrimp and pasta, making each bite a true celebration of flavor. In this article, we will dive into the essential elements of creating this exquisite dish, from understanding the ingredients to mastering the preparation techniques. Whether you are an experienced cook or a beginner in the kitchen, you will find everything you need to create a memorable dining experience.
Understanding the Ingredients
To craft a truly delightful garlic butter shrimp pasta, it’s crucial to understand the ingredients that contribute to its rich flavor and texture. Let’s explore each component in detail, ensuring you choose the best options for your dish.
Fresh Shrimp: Types and How to Choose the Best
When it comes to shrimp, freshness is key. You can choose from several types of shrimp, including tiger shrimp, white shrimp, and pink shrimp. Each variety offers distinct flavors and textures, but for this dish, large, peeled shrimp are recommended for their meaty consistency and ability to absorb the garlic butter sauce beautifully.
When selecting shrimp, look for those that are firm to the touch, with a clean, ocean-like smell. Avoid shrimp that have a strong, fishy odor or those that appear slimy. If possible, opt for shrimp that are wild-caught, as they tend to have superior taste and texture compared to farmed varieties. Additionally, make sure to check if the shrimp are deveined; this will save you time during preparation.
Garlic: Varieties and Health Benefits
Garlic is the star of the show in this recipe, providing a robust flavor that complements the shrimp and pasta. There are various garlic varieties, including hardneck and softneck, each offering unique flavors and aromas. For this dish, you can use either fresh garlic cloves or pre-minced garlic, though fresh is always recommended for the best taste.
Beyond its culinary advantages, garlic is known for its numerous health benefits. It contains allicin, a compound that has been linked to improved heart health, enhanced immune function, and even potential cancer-fighting properties. Incorporating garlic into your meals not only elevates flavors but also contributes to your overall wellness.
Pasta: Different Types Suitable for This Dish
Pasta is the foundation of this dish, and choosing the right type can significantly impact the final result. While traditional spaghetti or linguine are popular choices for garlic butter shrimp pasta, you can also experiment with other varieties like fettuccine, penne, or even whole wheat pasta for a healthier option.
When selecting pasta, consider the shape and texture that will best hold onto the garlic butter sauce. Long, thin pasta like spaghetti or linguine is excellent for twirling around shrimp, while thicker shapes like fettuccine can provide a heartier bite. Be sure to follow the cooking instructions on the package for the best results, aiming for an al dente texture that will absorb the sauce without becoming mushy.
Butter: The Role of Quality Butter in Flavor
Butter is the soul of the garlic butter sauce, providing richness and depth to the dish. Opt for high-quality unsalted butter, as this allows you to control the saltiness of the sauce more effectively. The creaminess of butter enhances the flavors of the garlic and shrimp, creating a luxurious mouthfeel that ties the dish together.
For an added layer of flavor, consider using European-style butter, which has a higher fat content and a more intense flavor profile than regular butter. This choice will amplify the overall richness of the sauce, ensuring your garlic butter shrimp pasta is indulgent and satisfying.
Fresh Herbs: Enhancing the Dish with Basil or Parsley
To enhance the overall presentation and flavor of your garlic butter shrimp pasta, fresh herbs play an essential role. Basil and parsley are two popular choices that add freshness and color to the dish. Basil offers a sweet, aromatic flavor that pairs beautifully with shrimp, while parsley provides a mild, slightly peppery taste that brightens the dish.
When using fresh herbs, make sure to chop them finely to release their essential oils and maximize their flavor. Sprinkle them generously over the finished pasta for a burst of color and freshness that will elevate your dish to restaurant-quality standards.
Preparation: Setting Up for Success
Before diving into the cooking process, it’s important to set up your kitchen for success. Proper preparation will ensure that your cooking experience is smooth and enjoyable. Let’s take a look at the essential tools and steps you need to consider.
Essential Kitchen Tools and Equipment
Having the right tools on hand can make all the difference in your cooking experience. For this recipe, you will need:
– A large pot for boiling pasta
– A large skillet or sauté pan for cooking the shrimp and sauce
– A cutting board and chef’s knife for chopping garlic and herbs
– A colander for draining the pasta
– A wooden spoon or spatula for stirring
Make sure all your tools are clean and ready to use before you start cooking. This will help streamline the process and keep you organized.
Preparing the Shrimp: Cleaning and Deveining
If your shrimp are not already deveined, it’s essential to clean and devein them before cooking. Start by rinsing the shrimp under cold water to remove any debris. To devein the shrimp, use a sharp knife to make a shallow cut along the back of each shrimp, exposing the dark vein. Gently pull it out with the knife or your fingers and discard it.
Once cleaned and deveined, pat the shrimp dry with paper towels to remove excess moisture. This step is crucial, as it helps the shrimp to sear properly in the pan without steaming. Season the shrimp with a pinch of salt and pepper, allowing them to absorb the seasoning as you prepare the other ingredients.
Cooking Pasta: Tips for Achieving the Perfect Al Dente Texture
Cooking the pasta to perfection is vital for this dish. Begin by bringing a large pot of salted water to a rolling boil. The general rule of thumb is to add about 1 tablespoon of salt per every 4 quarts of water. This enhances the flavor of the pasta during cooking.
Once the water is boiling, add the pasta of your choice and stir gently to prevent sticking. Follow the cooking time indicated on the package, tasting the pasta a minute or two before the suggested time to achieve that perfect al dente texture. The pasta should be tender yet firm to the bite. Once cooked, reserve a cup of the pasta water and then drain the rest in a colander. This reserved water can be used later to adjust the consistency of the sauce.
Making the Garlic Butter Sauce
With your ingredients prepped and pasta cooked, it’s time to create the rich garlic butter sauce that will elevate your dish to new heights. Follow these steps to achieve a delectable sauce that complements the shrimp and pasta perfectly.
Melting the Butter: Techniques for Flavor Enhancement
In a large skillet or sauté pan, melt the unsalted butter over medium heat. You want to reach a point where the butter is foamy but not browned. This stage is crucial because browned butter can lend a nutty flavor that may overpower the garlic. If you’re aiming for a more robust flavor, consider adding a touch of olive oil to the butter, which can help prevent it from burning while adding its own depth.
Adding Garlic: Timing and Tips for Perfect Sautéing
Once the butter is melted, it’s time to add the minced garlic. The key to perfect sautéed garlic is timing; you want it to become fragrant and slightly golden without burning. Add the garlic to the melted butter and stir frequently for about 30 seconds to one minute. As soon as you notice its aroma filling the air, it’s time to move on to the next step.
Be cautious not to let the garlic darken too much, as burnt garlic can impart a bitter taste to your sauce. If you find that the garlic is cooking too quickly, lower the heat to prevent it from burning.
Balancing Flavors: Incorporating White Wine or Lemon Juice
To enhance the flavors of your garlic butter sauce, consider adding a splash of white wine or fresh lemon juice. If using white wine, pour in about a half cup after the garlic has sautéed, allowing it to simmer for a minute or two until the alcohol evaporates. This step will impart a lovely acidity that balances the richness of the butter and shrimp.
If you prefer a citrusy note, a squeeze of fresh lemon juice can brighten the sauce while adding a refreshing twist. This acidity will help cut through the richness, creating a well-rounded flavor profile.
Adjusting Consistency: How to Achieve the Right Sauce Thickness
As the sauce simmers, you may want to adjust its consistency to your liking. If the sauce appears too thick, gradually stir in some of the reserved pasta water, adding a tablespoon at a time until you achieve your desired thickness. The starchy pasta water not only helps to thin the sauce but also allows it to cling better to the pasta.
Conversely, if your sauce is too thin, allow it to simmer for a few extra minutes over low heat until it reduces to your desired consistency. Keep in mind that the sauce should be thick enough to coat the pasta without being overly watery.
With your sauce perfectly balanced and flavorful, you are now ready to combine the pasta and shrimp for a truly indulgent dish. Stay tuned for the next part, where we will guide you through the final steps of cooking the pasta and shrimp together, creating a harmonious blend of flavors that will delight your taste buds.
{{image_2}}
Timing the Cooking Process: Ensuring Everything is Ready Simultaneously
To achieve the perfect Indulgent Espresso Custard Pots, timing is crucial. The cooking process involves preparing the espresso custard and allowing it to chill properly before serving. Here’s a structured approach to ensure everything is ready at the same time:
1. Prepare Ingredients First: Before you start cooking, measure out all your ingredients. This includes the heavy cream, milk, sugar, egg yolks, espresso, and vanilla extract. Having everything ready will streamline the cooking process.
2. Start with the Espresso: Brew your espresso first. While the espresso is brewing, you can begin heating the cream and milk mixture. This multitasking will save you valuable time.
3. Monitor Cooking Times: Once your cream and milk are heated (but not boiling), slowly mix in the espresso and sugar. Keep an eye on the mixture as you continue to whisk it until it thickens. This should take about 5 to 7 minutes.
4. Chill Efficiently: After cooking, pour the custard into pots and allow them to cool at room temperature for about 30 minutes before placing them in the refrigerator. This ensures that they chill evenly without creating condensation on the pots.
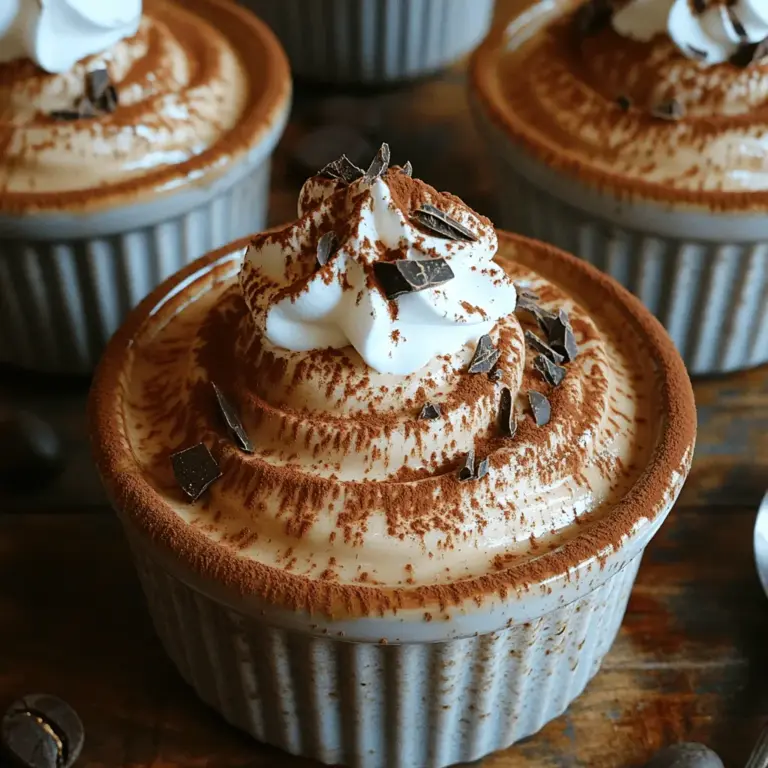
5. Final Touches Just Before Serving: While the custards are chilling, you can prepare any garnishes such as whipped cream or chocolate shavings. This will allow you to present a fresh and appealing dessert.
Combining the Custard and Final Touches: How to Elevate the Dish
Once your custard mixture is ready and has cooled to the desired temperature, it’s time to enhance its presentation and flavor profile. Here are some techniques to elevate your Indulgent Espresso Custard Pots:
1. Whipped Cream Topping: Whip heavy cream with a little sugar and vanilla extract until soft peaks form. This light and airy topping complements the dense custard beautifully. Pipe or spoon it on top of the custard for a professional look.
2. Chocolate Shavings: Use a vegetable peeler to create chocolate shavings from a dark chocolate bar. Sprinkle these on top of the whipped cream for a touch of elegance and added flavor.
3. Espresso Beans: For a bold garnish, add a few espresso beans on top of each custard pot. Not only do they enhance the visual appeal, but they also provide a delightful crunch.
4. Cacao Powder Dusting: For an extra layer of chocolate flavor, lightly dust the top of each custard with unsweetened cacao powder. This adds a rich, bittersweet finish that pairs perfectly with the sweetness of the custard.
Serving Suggestions
Plating Techniques for an Appealing Presentation
Presentation is key when serving desserts. Here are some tips on how to plate your Indulgent Espresso Custard Pots:
– Use Clear Glass Pots: Choose clear glass containers to showcase the beautiful layers and texture of the custard. This transparency adds an inviting aesthetic.
– Layered Garnishes: Instead of just topping the custard with whipped cream, consider layering the toppings. Start with a layer of whipped cream, followed by chocolate shavings, and finish with a dusting of cacao powder.
– Serve with a Side: Pair your custard pots with a small cookie or biscotti on the side. This not only adds an appealing contrast but also provides a crunchy texture that balances the creaminess of the custard.
Complementary Side Dishes: What Pairs Well with Indulgent Espresso Custard Pots
While the custard pots are delightful on their own, serving them with complementary sides can enhance the overall experience:
– Biscotti or Ladyfingers: These light, crunchy cookies are perfect for dipping into the custard, providing a delightful contrast in texture.
– Fresh Berries: A small bowl of mixed berries, such as raspberries or strawberries, can add a refreshing tartness that complements the rich flavors of the custard.
– Chocolate-Dipped Fruits: Consider serving your custard with chocolate-dipped strawberries or banana slices for a decadent yet refreshing pairing.
Wine Pairings: Recommendations for the Perfect Drink
Choosing the right beverage can elevate your dessert experience. Here are some wine pairings that complement the flavors of the Indulgent Espresso Custard Pots:
– Dessert Wine: A sweet dessert wine like a Sauternes or a late-harvest Riesling can enhance the sweetness of the custard while balancing its rich flavors.
– Coffee Liqueur: For a more indulgent experience, serve your custard with a shot of coffee liqueur. This echoes the espresso flavor in the custard and adds a delightful kick.
– Port Wine: A glass of Ruby Port, with its rich berry flavors, can be a fantastic pairing, offering a beautiful contrast to the custard’s creaminess.
Nutritional Information
Breakdown of Calories and Macronutrients
Understanding the nutritional value of your Indulgent Espresso Custard Pots can help you enjoy them in moderation. Here’s a general breakdown for one serving:
– Calories: Approximately 250-300 calories
– Protein: 4-6 grams
– Carbohydrates: 20-25 grams
– Fat: 20-25 grams
These values can vary based on the specific ingredients used, so it’s always good to calculate based on your exact recipe.
Health Benefits of Espresso and Custard Ingredients
The ingredients in your custard not only create a delicious dessert but also offer some health benefits:
– Espresso: Rich in antioxidants, espresso can improve cognitive function and boost metabolism. The caffeine content can also enhance energy levels.
– Egg Yolks: Full of essential vitamins like B12 and D, egg yolks are a source of choline, which is important for brain health.
– Whole Milk and Cream: While high in calories, these dairy products provide calcium and vitamin D, essential for bone health.
Tips for Making the Dish Healthier Without Sacrificing Flavor
If you’re looking to lighten your custard while maintaining flavor, consider the following adjustments:
– Use Low-Fat Milk: Substitute whole milk with low-fat or almond milk to reduce calories and fat content.
– Reduce Sugar: Try using a sugar substitute or reducing the amount of sugar in the recipe. The natural sweetness of the espresso can balance the flavors.
– Add Flavor Extracts: Enhance the flavor with vanilla or almond extract instead of relying solely on sugar. This adds depth without the extra calories.
Variations and Substitutions
Exploring Different Custard Types: Gluten-Free Options and Alternatives
While the classic Indulgent Espresso Custard Pots are delightful, experimenting with variations can yield exciting results:
– Gluten-Free Custard: The original recipe is naturally gluten-free, but ensure that any additional flavorings or toppings are also gluten-free.
– Dairy-Free Custard: Substitute heavy cream and milk with coconut cream or almond milk for a dairy-free version that retains a creamy texture.
Vegetarian Adaptations: Using Plant-Based Proteins
For those seeking vegetarian options, consider these adaptations to include plant-based proteins:
– Chia Seed Custard: Use chia seeds to create a plant-based custard. Soak the seeds in almond milk with espresso, blending them until smooth for a healthy alternative.
– Silken Tofu: Blend silken tofu with espresso and a sweetener of choice for a creamy, protein-rich custard that is entirely vegan.
Flavor Twists: Adding Spices or Vegetables for a Unique Twist
Get creative with your custard by incorporating unique flavors or spices:
– Spice It Up: Add a pinch of cinnamon or nutmeg to the espresso mixture for a warm, spiced flavor profile.
– Chocolate Espresso Custard: Melt some chocolate and mix it into the custard for a rich chocolate espresso experience.
Storing and Reheating Leftovers
Best Practices for Storing Leftover Custard
If you have leftover custard pots, proper storage is essential for maintaining their freshness:
– Refrigeration: Store the custard pots in the refrigerator, covered with plastic wrap or a lid. They can typically last up to 3 days.
– Avoid Freezing: Custard does not freeze well, as the texture can become grainy upon thawing. It’s best enjoyed fresh.
Reheating Methods: Microwaving vs. Stovetop
When reheating, it’s crucial to do so gently to maintain the custard’s creamy texture:
– Microwave: If you choose to microwave, do so in short intervals, stirring in between to ensure even heating without overheating.
– Stovetop: For a more controlled method, reheat on the stovetop over low heat, stirring continuously until warmed through.
Conclusion
The Indulgent Espresso Custard Pots are not just a dessert; they are a culinary experience that combines rich flavors, creamy textures, and elegant presentations. This recipe is versatile, allowing for variations and adaptations to suit different tastes and dietary needs. Whether you enjoy them as a simple treat or dress them up for a special occasion, these custard pots are sure to impress.
As you embark on your journey to create these delightful desserts, don’t hesitate to experiment with flavors, garnishes, and serving suggestions. Cooking is about creativity and joy, and sharing meals with loved ones can create lasting memories. So roll up your sleeves, embrace the process, and indulge in the deliciousness that is your homemade espresso custard. Happy cooking!
