Introduction
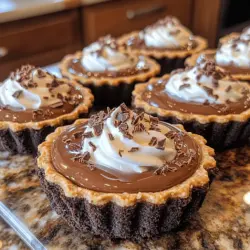
Desserts have a remarkable ability to elevate any gathering, whether it’s a casual family dinner or a grand celebration. Among the plethora of sweet treats available, mini chocolate cream pies have emerged as a favorite for many dessert lovers. These delightful little confections pack an incredible punch of flavor while offering a charming presentation that is sure to impress guests. Their rich, creamy filling paired with a crisp, delectable crust creates a harmony of textures and tastes that is simply irresistible.
The allure of homemade desserts like mini chocolate cream pies extends beyond their taste. The act of baking brings a sense of joy and satisfaction, allowing you to share love and warmth through food. There’s something special about creating a dessert from scratch, using quality ingredients, and watching it transform into a beautiful and delicious treat. Whether you are serving them at a birthday party, a holiday gathering, or simply indulging yourself on a weekend afternoon, these mini pies are sure to leave a lasting impression.
The Allure of Mini Desserts
In recent years, mini desserts have surged in popularity, and for good reason. They offer a perfect solution for those who want to indulge without overcommitting to a large portion. Mini chocolate cream pies are not only adorable but also offer the versatility to suit various occasions. They can be elegantly plated for formal events or served casually at family potlucks, making them an ideal choice for any gathering.
Another significant appeal of mini desserts is their focus on portion control. In a world where health and wellness are increasingly prioritized, these bite-sized treats allow for a guilt-free indulgence. You can enjoy the rich flavors of chocolate and cream without the feeling of overindulgence. This balance of indulgence in moderation is becoming more desirable among dessert enthusiasts, making mini chocolate cream pies a delightful option for many.
Understanding the Ingredients
Creating the perfect mini chocolate cream pie starts with understanding the ingredients that contribute to its deliciousness. The basic components include a crunchy chocolate cookie crust, a luscious chocolate cream filling, and a light topping that often consists of whipped cream or chocolate shavings. Each ingredient plays a crucial role in defining the flavor and texture of the finished dessert.
Quality Ingredients Matter
Choosing high-quality ingredients is paramount for optimal flavor. For instance, using premium chocolate can significantly enhance the richness of the filling, while fresh dairy products can add a creaminess that elevates the overall experience. Additionally, the quality of the sugar affects not just sweetness but also the texture of the cream filling.
In terms of nutrition, chocolate, dairy, and sugar components offer both benefits and considerations. Dark chocolate, for example, is known to contain antioxidants and may provide health benefits when consumed in moderation. Dairy adds calcium and creaminess, while sugar serves as the primary sweetener in the recipe. It’s essential to strike a balance, ensuring that while the dessert is indulgent, it remains a treat to be enjoyed occasionally.
Crafting the Perfect Crust
The crust is a vital element of mini chocolate cream pies, providing a sturdy base that complements the creamy filling. For these pies, a chocolate cookie crumb crust is the star. It’s essential to use high-quality chocolate cookies, such as Oreos or similar brands, as they contribute both flavor and texture to the crust.
Step-by-Step Instructions for the Crust
1. Gather Ingredients: For the crust, you will need chocolate cookies, unsalted butter, and a touch of sugar.
2. Crush the Cookies: Start by placing the chocolate cookies in a food processor. Pulse until they turn into fine crumbs. If you don’t have a food processor, you can place the cookies in a resealable plastic bag and crush them with a rolling pin.
3. Mix with Butter and Sugar: In a mixing bowl, combine the cookie crumbs with melted unsalted butter and a sprinkle of sugar. The butter acts as a binding agent, while the sugar adds a touch of sweetness.
4. Press into Mini Pie Tins: Once combined, press the mixture firmly into the bottom and up the sides of mini pie tins. Ensure the crust is even and compact, as this will affect its stability and texture.
5. Bake the Crust: Preheat your oven to 350°F (175°C) and bake the crusts for about 8-10 minutes. This step helps to set the crust and enhances its flavor. Allow them to cool completely before filling.
Tips for Achieving the Perfect Crust Consistency
– Don’t Overmix: When combining the cookie crumbs, butter, and sugar, mix just until combined. Overmixing can lead to a tough crust.
– Use Parchment Paper: If you’re concerned about sticking, consider lining the bottom of your mini pie tins with parchment paper for easier removal.
– Cooling is Key: Allow the crust to cool completely before adding the filling. This helps maintain the structure and prevents the filling from becoming too runny.
Creating the Rich Chocolate Cream Filling
The filling is the heart of these mini chocolate cream pies. It should be rich, creamy, and bursting with chocolate flavor. The perfect filling relies on a balance of ingredients to achieve the desired texture and taste.
Breakdown of the Filling Ingredients
The main ingredients for the chocolate cream filling include high-quality cocoa powder, granulated sugar, cornstarch, milk, and egg yolks. Each ingredient serves a specific purpose:
– Cocoa Powder: Provides the rich chocolate flavor that defines the filling. Opt for unsweetened cocoa powder for an intense taste.
– Cornstarch: Acts as a thickening agent, giving the filling body and creaminess.
– Egg Yolks: Add richness and help to create a velvety texture.
The Cooking Process
1. Combine Dry Ingredients: In a saucepan, whisk together the cocoa powder, cornstarch, and sugar. This ensures that the dry ingredients are evenly distributed before adding any liquid.
2. Add Milk Slowly: Gradually whisk in milk to the dry mixture over medium heat. This step is crucial for preventing lumps from forming.
3. Cook Until Thickened: Continuously stir the mixture as it heats, allowing it to thicken. This process usually takes about 5-7 minutes. Once it reaches a pudding-like consistency, remove it from the heat.
4. Incorporate Egg Yolks: In a separate bowl, lightly beat the egg yolks. Slowly add a small amount of the hot chocolate mixture to the yolks to temper them, then whisk the yolk mixture back into the saucepan. This technique helps prevent the yolks from scrambling.
5. Final Cooking: Return the saucepan to the heat and continue cooking for another couple of minutes, ensuring everything is well combined and creamy.
As you create the filling for your mini chocolate cream pies, remember that patience and attention to detail are key. With the right techniques and quality ingredients, you can achieve a filling that is as decadent as it is satisfying.
—
This comprehensive introduction and detailed breakdown of the initial steps involved in making Heavenly Mini Chocolate Cream Pies sets the stage for a delightful dessert experience. In the following sections, we will delve deeper into the finishing touches and presentation of these irresistible treats. Stay tuned for more delicious details!
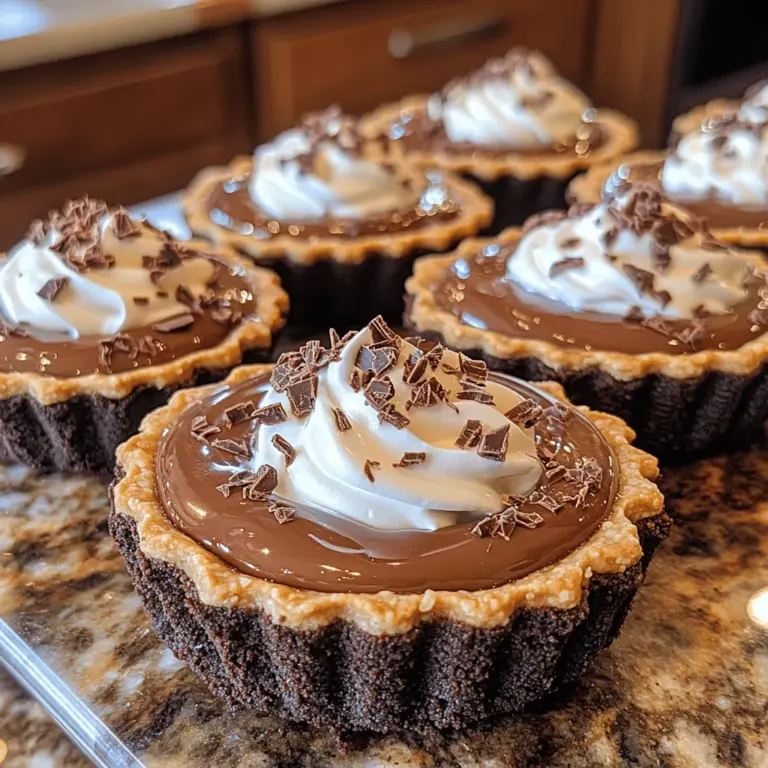
{{image_2}}
Whisking to Avoid Lumps and Ensuring Smoothness
When preparing the filling for your Heavenly Mini Chocolate Cream Pies, achieving a smooth, lump-free texture is crucial. Start by whisking your dry ingredients in a separate bowl to combine them evenly and break up any clumps. Then, when you introduce the wet ingredients, particularly the milk and cream, do so gradually while whisking continuously. This technique helps prevent lumps from forming, ensuring a velvety filling that enhances the overall experience of your dessert.
One effective method to achieve smoothness is to use a fine-mesh sieve to strain the mixture after cooking. This step removes any stubborn lumps or bits of cooked egg that may have formed, resulting in a silky texture. It’s a bit of extra work, but the payoff is a perfectly smooth filling that melts in your mouth.
Tips for Tempering Egg Yolks Effectively
Tempering egg yolks is a critical step in creating a rich and creamy filling for your mini pies. To temper egg yolks without scrambling them, begin by whisking the yolks in a bowl. Gradually add a small amount of the hot chocolate mixture to the yolks while whisking vigorously. This process slowly raises the temperature of the yolks, reducing the risk of cooking them too quickly. Once combined, pour the tempered yolk mixture back into the saucepan with the remaining chocolate mixture, whisking continuously.
Keep an eye on the heat throughout this process; using a medium-low setting is ideal. If the mixture starts to bubble, remove it from the heat immediately to prevent scrambling. This careful technique ensures a luxurious, custard-like filling that is the hallmark of a great chocolate cream pie.
Suggestions for Variations in Filling Flavors
While the classic chocolate filling is undoubtedly delicious, you can elevate your mini pies with a few creative variations. Consider adding a teaspoon of espresso powder to the chocolate mixture for a rich mocha flavor. The coffee enhances the chocolate, making it even more decadent without overwhelming the palate.
If you’re feeling adventurous, incorporate a splash of your favorite liqueur, such as Baileys, Kahlua, or Grand Marnier, into the filling. This addition not only adds a unique twist but also brings an adult flair to your dessert. Adjust the quantity to your taste, but start with a tablespoon and increase from there if desired.
Whipping Up the Perfect Topping
The whipped cream topping is essential for both presentation and taste, providing a light, airy contrast to the rich chocolate filling. To make whipped cream, start with cold heavy whipping cream and a chilled mixing bowl. This ensures that the cream whips up quickly and achieves the desired consistency.
1. Step-by-Step Guide to Making Whipped Cream:
– Pour the cold heavy cream into the mixing bowl.
– Add sugar to taste; about 2 tablespoons for every cup of cream is a good starting point.
– Optionally, include a splash of vanilla extract for flavor.
– Using an electric mixer, whisk on medium-high speed until soft peaks form. This typically takes about 2-3 minutes.
2. Discussion on Achieving the Right Consistency:
Watch closely as you whip the cream. You’re aiming for soft peaks, which means that the cream holds its shape but still has a slightly droopy appearance. This consistency is perfect for topping your pies, as it will hold up well without being overly stiff.
3. How to Avoid Overwhipping and What to Do If It Happens:
If you accidentally overwhip your cream, it can turn grainy and start to separate. To salvage it, gently fold in a bit more unwhipped cream to smooth it out again. If it’s too far gone, you might need to start over, but this technique can recover a slightly overwhipped batch.
4. Optional Garnishing Techniques:
For an elegant touch, consider garnishing your whipped cream topping with chocolate shavings or a dusting of cocoa powder. To create chocolate shavings, use a vegetable peeler on a chocolate bar, allowing you to create delicate curls that will impress your guests.
Assembling the Heavenly Mini Pies
Now that you have your filling and topping ready, it’s time to assemble your mini pies. Follow these detailed instructions to ensure a beautiful presentation:
1. Detailed Instructions for Assembling the Pies:
– Start by filling each pre-baked mini pie crust with the chocolate filling. Use a piping bag or a spoon to fill them evenly, ensuring no air pockets remain.
– Once filled, smooth the top with a spatula or the back of a spoon for an even finish.
2. Tips for Achieving a Professional Look:
– After filling the pies, chill them in the refrigerator for at least 4 hours, allowing the filling to set properly.
– When ready to serve, pipe the whipped cream onto each pie for a professional finish, creating swirls or peaks for added visual appeal.
3. The Importance of Chilling the Pies for the Best Texture:
Chilling is not just about setting the filling; it also enhances the flavors as they meld together. A well-chilled pie will provide a firmer texture and a more enjoyable eating experience.
Serving Suggestions and Pairings
When it comes to serving your mini chocolate cream pies, creativity can elevate the experience:
1. Ideas for Serving Mini Chocolate Cream Pies at Gatherings:
– Consider displaying the mini pies on a decorative platter, allowing guests to help themselves. For a more formal setting, serve each pie on individual dessert plates for an elegant touch.
– Drizzle chocolate sauce or caramel sauce on the plates for added flair.
2. Suggested Beverages That Pair Well with Chocolate Desserts:
– Chocolate desserts pair beautifully with coffee, whether it’s a rich espresso or a frothy cappuccino. For a more decadent experience, serve with a glass of red wine, such as a Cabernet or Merlot, which complements the chocolate’s richness.
– Alternatively, a glass of cold milk or a creamy vanilla latte enhances the flavors without overpowering them.
3. Presentation Tips for Impressing Guests:
– Use fresh mint leaves as a garnish alongside the whipped cream for a pop of color and a refreshing contrast to the chocolate.
– Sprinkle some crushed nuts, like hazelnuts or almonds, over the whipped cream for an added crunch and texture.
The Joy of Homemade Desserts
There’s something truly special about making desserts from scratch. The process itself can be therapeutic, offering a creative outlet that brings joy to both the maker and those who enjoy the final product. Homemade desserts often evoke feelings of nostalgia, reminding us of family traditions and celebrations.
Creating these Heavenly Mini Chocolate Cream Pies not only allows you to share delicious treats with loved ones, but it also provides an opportunity to experiment with flavors and techniques. Don’t hesitate to add your personal touch, whether it’s a unique flavor twist or a creative presentation style.
Conclusion
In summary, Heavenly Mini Chocolate Cream Pies are a delightful dessert that combines rich chocolate filling, light whipped cream, and a buttery crust, making them irresistible. The charm of these mini treats lies not only in their taste but also in the joy of creating them from scratch and sharing them with friends and family.
As you embark on this baking adventure, remember that every pie you create carries the love and care you put into it. So gather your ingredients, follow the steps outlined, and savor the delight of these heavenly treats. Whether for a special occasion or simply a sweet indulgence, these mini pies will surely impress and bring smiles to everyone who tries them. Enjoy the process, and happy baking!